# Welcome

Your go-to resource for tapping into the full potential of the MapsIndoors® platform. Dive into comprehensive guides, tutorials, and reference materials designed to make your implementation process seamless.

{% hint style="info" %}
Working with an AI-agent? Quickstart your implementation following our [LLM guide](/other/build-on-mapsindoors-with-llms).
{% endhint %}

## SDKs & Frameworks

<table data-view="cards"><thead><tr><th></th><th data-hidden></th><th data-hidden></th><th data-hidden data-card-cover data-type="files"></th><th data-hidden data-type="content-ref"></th><th data-hidden data-card-target data-type="content-ref"></th></tr></thead><tbody><tr><td>Web SDK</td><td></td><td></td><td><a href="/files/m1NG6uhAdTF1yzoopgSl">/files/m1NG6uhAdTF1yzoopgSl</a></td><td></td><td><a href="/pages/hGCVL4BYWWf9E8GfXeiW">/pages/hGCVL4BYWWf9E8GfXeiW</a></td></tr><tr><td>Android SDK</td><td></td><td></td><td><a href="/files/w7k3sHLh44mx113cDcQj">/files/w7k3sHLh44mx113cDcQj</a></td><td></td><td><a href="/pages/R2BgtViJgAzukc8rUSKA">/pages/R2BgtViJgAzukc8rUSKA</a></td></tr><tr><td>iOS SDK</td><td></td><td></td><td><a href="/files/qWevxzvxOuCjU4oc6lHm">/files/qWevxzvxOuCjU4oc6lHm</a></td><td></td><td><a href="/pages/PmdjbzpPsEAKoqdd58kn">/pages/PmdjbzpPsEAKoqdd58kn</a></td></tr><tr><td>Integration API</td><td></td><td></td><td><a href="/files/Kxbhbd1NfpfZitN7WqLa">/files/Kxbhbd1NfpfZitN7WqLa</a></td><td></td><td><a href="/pages/Jr2DI7JophOmukVIQW7U">/pages/Jr2DI7JophOmukVIQW7U</a></td></tr><tr><td>React Native</td><td></td><td></td><td><a href="/files/TR1JclCSzEcwBFuVrpxe">/files/TR1JclCSzEcwBFuVrpxe</a></td><td></td><td><a href="/pages/g2X6vShEuFOcI3FUFJQD">/pages/g2X6vShEuFOcI3FUFJQD</a></td></tr><tr><td>Flutter</td><td></td><td></td><td><a href="/files/9cfNhlRLxZOZPHh5IApe">/files/9cfNhlRLxZOZPHh5IApe</a></td><td></td><td><a href="/pages/79prCj27NZCzm1STA0Vj">/pages/79prCj27NZCzm1STA0Vj</a></td></tr></tbody></table>

{% hint style="info" %}
Not ready for a full integration? Quickly get started [without code](/products/web-app).
{% endhint %}

## Products

<table data-view="cards"><thead><tr><th></th><th data-hidden></th><th data-hidden></th><th data-hidden data-card-target data-type="content-ref"></th><th data-hidden data-card-cover data-type="files"></th></tr></thead><tbody><tr><td>Product Overview</td><td></td><td></td><td><a href="/pages/wJZIu6jC82ghnuMb3FEj">/pages/wJZIu6jC82ghnuMb3FEj</a></td><td><a href="/files/LplEnDhObpoTipHBlIn0">/files/LplEnDhObpoTipHBlIn0</a></td></tr><tr><td>CMS</td><td></td><td></td><td><a href="/pages/ESgrJFHQwi1lsgOznlIf">/pages/ESgrJFHQwi1lsgOznlIf</a></td><td><a href="/files/NLZu7qJvRIKytsSKC9Ek">/files/NLZu7qJvRIKytsSKC9Ek</a></td></tr><tr><td>Map Template</td><td></td><td></td><td><a href="/pages/DZbBSGXZtVolLseSbKVr">/pages/DZbBSGXZtVolLseSbKVr</a></td><td><a href="/files/zbZssTZ6cIeZI1Gsnq9w">/files/zbZssTZ6cIeZI1Gsnq9w</a></td></tr></tbody></table>

## Other

<table data-view="cards"><thead><tr><th></th><th data-hidden></th><th data-hidden></th><th data-hidden data-card-target data-type="content-ref"></th><th data-hidden data-card-cover data-type="files"></th></tr></thead><tbody><tr><td>Design</td><td></td><td></td><td><a href="/pages/cgvRj7KGFTEGbeFdnuWv">/pages/cgvRj7KGFTEGbeFdnuWv</a></td><td><a href="/files/jkcCLEoXZEpDjDaOwLDv">/files/jkcCLEoXZEpDjDaOwLDv</a></td></tr><tr><td>Glossary</td><td></td><td></td><td><a href="/pages/uwtbt9zJrsWeSQyEZIuH">/pages/uwtbt9zJrsWeSQyEZIuH</a></td><td><a href="/files/zjPBWFYPwUF96X28jmX0">/files/zjPBWFYPwUF96X28jmX0</a></td></tr><tr><td>Changelog</td><td>Reference Docs</td><td></td><td><a href="/pages/orEPlQKz0hS5HmAixL8p">/pages/orEPlQKz0hS5HmAixL8p</a></td><td><a href="/files/UuRDuoa5izwyFT6pivLK">/files/UuRDuoa5izwyFT6pivLK</a></td></tr></tbody></table>


# Web

Documentation on the MapsIndoors Web SDK

Unlock the power of indoor mapping with the MapsIndoors JavaScript SDK! Dive into a world where integrating indoor mapping solutions into your applications is not only possible but also incredibly efficient and customizable.

**Why Choose MapsIndoors JavaScript SDK?**

* **Comprehensive Toolkit:** Seamlessly manipulate maps and interact with MapsIndoors data to meet your specific requirements.
* **Developer-Friendly:** Utilize a range of [**npm-hosted web components**](https://www.npmjs.com/package/@mapsindoors/components) to minimize UI creation overhead and simplify development.
* **Adaptability:** Tailor your map to adapt to various conditions and requirements with ease.

**What’s in the Box?**

* **Multifaceted Interaction:** Engage with MapsIndoors data in myriad ways.
* **Map Manipulation:** Alter and manage the map according to your unique needs and conditions.
* **Web Components:** Leverage pre-built components to streamline UI development.

**Prefer a Ready-to-Use Solution?** Consider our [**Map Template**](/products/fast-track-maptemplate)! Crafted for those who'd rather leave UI and UX to the pros, this React-based application offers:

* **Battle-Tested Experience:** Proven search and wayfinding capabilities.
* **Minimal Customization Needed:** Especially suited for projects where quick implementation is key.


# Getting Started

This guide will walk you through how to create your own MapsIndoors implementation from the ground up. You will gain experience with the MapsIndoors Software Development Kit (SDK) and the typical development process of using it. Furthermore, you will be able to gain an understanding of the basic concepts, tools and terminology commonly used when interacting with the SDK.

Following features are included in this Getting Started guide:

* Display an interactive map with MapsIndoors
* Implement search functionality to interact with the displayed map
* Generate and show directions between two points on the map

Parts of this guide rely on having access to a MapsIndoors Solution. The [MapsIndoors](/sdks-and-frameworks/web/tutorial/getting-started/mapsindoors) section will guide you on how to use our Demo API key if you do not have your own.


# Prerequisites

In order to start developing your own solution, there are a number of requirements that need to be fulfilled in order to ensure a smooth development process.

The following subsections will guide you in how to get the necessary API keys for:

* MapsIndoors API Key
* A map engine provider, Google Maps or Mapbox


# MapsIndoors

### Get your MapsIndoors API Key​ <a href="#get-your-mapsindoors-api-key" id="get-your-mapsindoors-api-key"></a>

In order to include MapsIndoors in your app, you need a MapsIndoors API key. If you do not yet have access to your MapsIndoors API key, you can use the demo API key `02c329e6777d431a88480a09` to follow the guide.

If you have access to the MapsIndoors CMS, you'll find your MapsIndoors API key as described [<mark style="color:purple;">here</mark>](/products/cms/interface-overview#api-keys).


# Map Engine Provider

MapsIndoors is built on top of an external map engine, either Mapbox or Google Maps.

You'll need an Access Token for your chosen map engine with the relevant APIs enabled and a MapsIndoors API key to get started building your own app.\
\
You can use either Mapbox or Google Maps as your map provider. **You only need to obtain one type of token** - choose the provider that best suits your needs.

Token Options

* [Mapbox Token](/sdks-and-frameworks/web/tutorial/getting-started/map-engine-provider/option-1-get-your-mapbox-access-token)
* [Google Maps API Key](/sdks-and-frameworks/web/tutorial/getting-started/map-engine-provider/option-2-get-your-google-maps-api-keys)

**Note**: While both providers support core mapping features, some specialized functionality may only be available with a specific provider. These cases will be clearly marked throughout the documentation.

See the sections below for detailed setup instructions for your chosen provider:


# Option 1: Get your Mapbox Access Token

To create a Mapbox Access Token, follow the steps provided in the link below:

* [<mark style="color:purple;">Mapbox Access Token documentation</mark>](https://docs.mapbox.com/help/getting-started/access-tokens/)

Remember to enable relevant *scopes* on the Mapbox Access Token, such as:

* [<mark style="color:purple;">Vector Tiles API</mark>](https://docs.mapbox.com/api/maps/vector-tiles/)
* [<mark style="color:purple;">Styles API</mark>](https://docs.mapbox.com/api/maps/styles/)
* [<mark style="color:purple;">Directions API</mark>](https://docs.mapbox.com/api/navigation/directions/)


# Option 2: Get your Google Maps API Keys​

To make sure you can use the full feature set of MapsIndoors you'll need to enable these services.

* [<mark style="color:purple;">Maps JavaScript API</mark>](https://console.cloud.google.com/apis/library/maps-backend.googleapis.com)
* [<mark style="color:purple;">Google Maps Distance Matrix API</mark>](https://console.cloud.google.com/apis/library/distance-matrix-backend.googleapis.com)
* [<mark style="color:purple;">Google Maps Directions API</mark>](https://console.cloud.google.com/apis/library/directions-backend.googleapis.com)
* [<mark style="color:purple;">Google Places API Web Service</mark>](https://console.cloud.google.com/apis/library/places-backend.googleapis.com)

Then you need to create your Google Maps API key by following the link below:

* [<mark style="color:purple;">Create Google Maps API key</mark>](https://developers.google.com/maps/documentation/javascript/get-api-key)

If you apply restrictions to your key, remember to include the Google services listed above.


# Map Engine Setup

MapsIndoors provides support for both Mapbox GL JS v2 and v3. Our commitment to staying at the forefront of mapping technologies ensure that you have the flexibility to choose the Mapbox version that best align with your requirements.

## Mapbox V3

In order to access Mapbox v3 and its options, use `mapView`:

```javascript
const mapView = new mapsindoors.mapView.MapboxV3View({
    accessToken: 'YOUR_MAPBOX_ACCESS_TOKEN',
    element: document.getElementById('map'),
    center: { lat: 38.8974905, lng: -77.0362723 },
    zoom: 17,
    maxZoom: 25,
    mapsIndoorsTransitionLevel: 17,
    showMapMarkers: false,
    lightPreset: 'dusk'
});

// Then the MapsIndoors SDK is initialized
const mi = new mapsindoors.MapsIndoors({
    mapView: mapView,
    floor: "1",
    labelOptions: {
        pixelOffset: { width: 0, height: 18 }
    }
});
```

For Mapbox v3, we exposed three new constructor parameters for Mapbox v3:

* `mapsIndoorsTransitionLevel: number`- controls transition between Mapbox and MapsIndoors data. Defaults to `17`. Setting it to `17` will make a transition between Mapbox and MapsIndoors data between zoom levels `17` to `18`.
* `showMapMarkers: boolean` - boolean parameter that dictates if Mapbox map markers such as POIs should be shown or not. By not setting this parameter, Mapbox map markers will be hidden as soon as MapsIndoors data is shown.
* `lightPreset: string` - sets global light. Can be set to: **day**, **dawn**, **dusk** or **night**. Defaults to **day**.

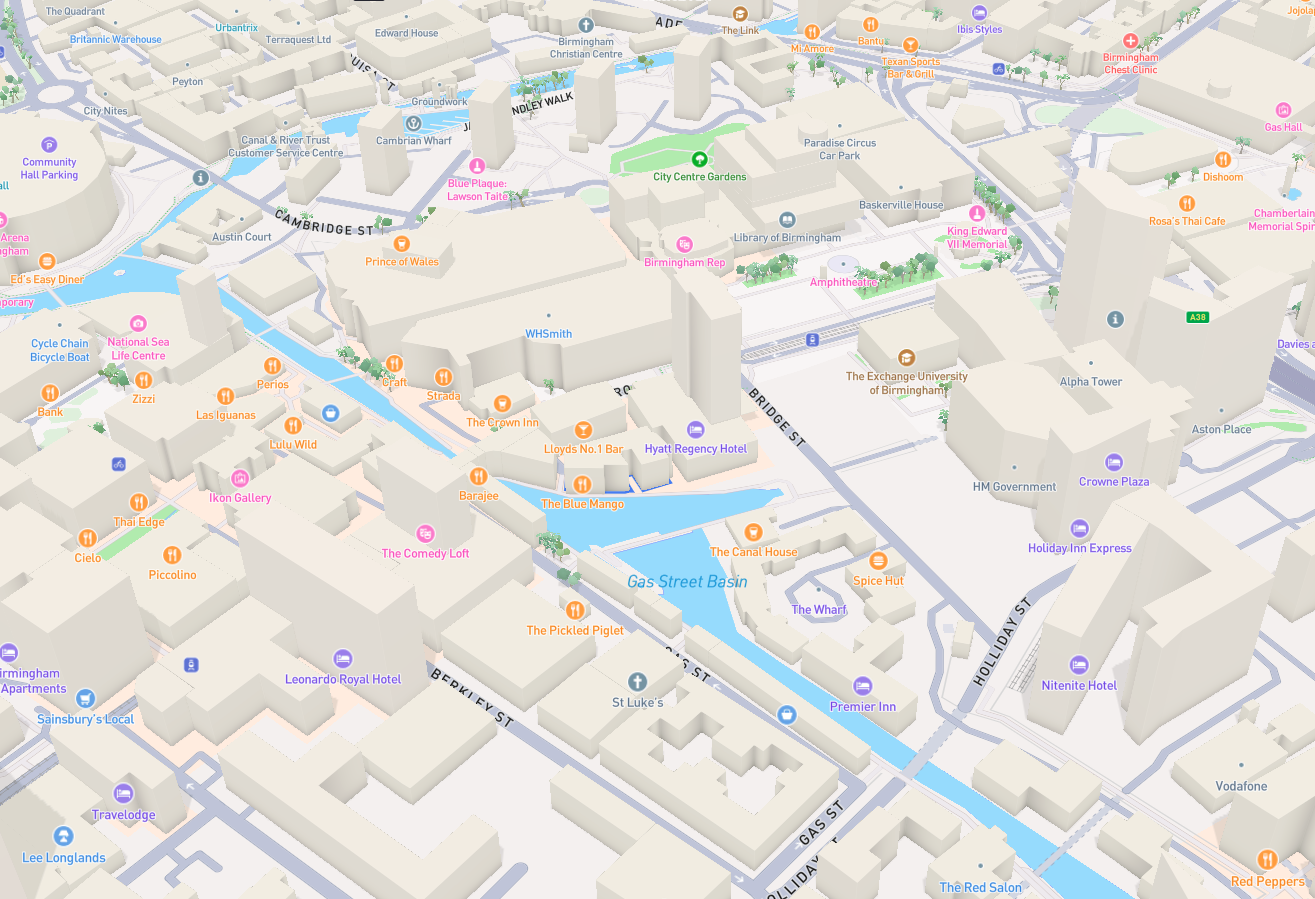
The new Mapbox v3 Standard Style design provides the new design of the map and 3D buildings.

<figure><img src="/files/bNeqv196gP1htMGcMYvG" alt=""><figcaption><p>Mapbox v3 Map layout</p></figcaption></figure>

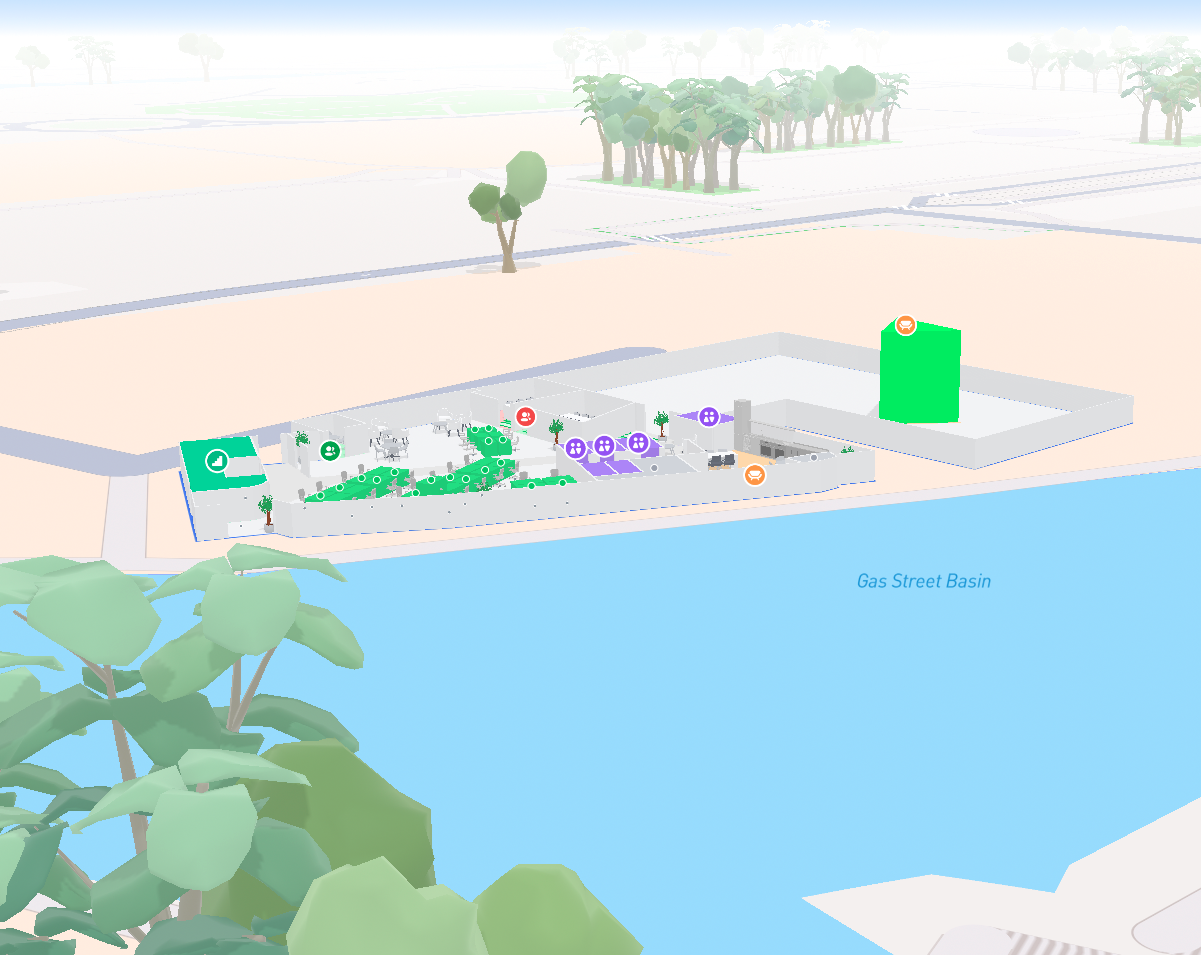
Mapbox' extruded buildings are not visible when MapsIndoors data is shown at the specified zoom level:

<figure><img src="/files/XDnIgGuKnJlpwDDVoxBa" alt=""><figcaption><p>MapsIndoors solution</p></figcaption></figure>

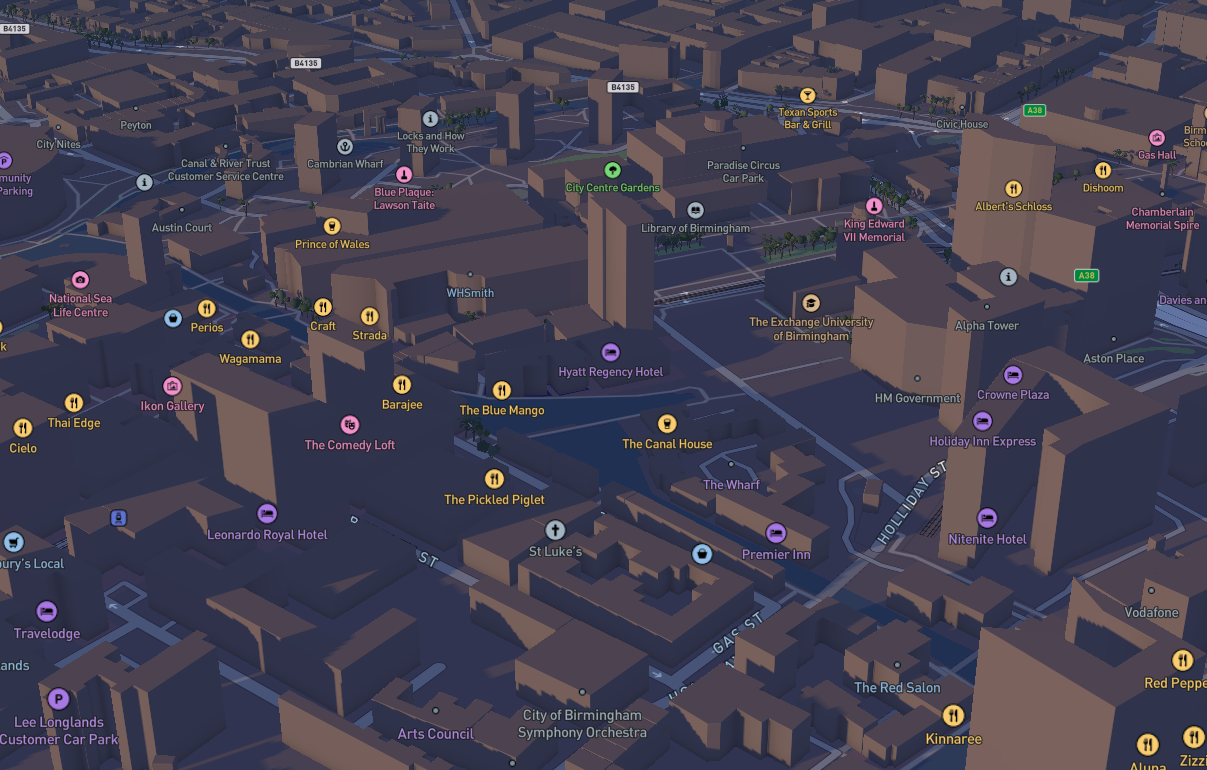
You can now choose between 4 different types of light: **day**, **dawn**, **night** or **dusk**.

<figure><img src="/files/oRgIEDd6kMtA0wnhgRzp" alt=""><figcaption><p>Mapbox v3 'dusk' light</p></figcaption></figure>

You can read more about the latest Mapbox v3 Standard Style [here](https://www.mapbox.com/blog/standard-core-style).

## Mapbox V2

In order to access Mapbox v2 and its options, use `mapView` and instantiate it as a new MapsIndoors object:

```javascript
const mapView = new mapsindoors.mapView.MapboxView({
    accessToken: YOUR_MAPBOX_ACCESS_TOKEN
    element: document.getElementById('map'),
    center: { lat: 38.8974905, lng: -77.0362723 },
    zoom: 17,
    maxZoom: 25,
});

// Then the MapsIndoors SDK is initialized
const mi = new mapsindoors.MapsIndoors({
    mapView: mapView,
    floor: "1",
    labelOptions: {
        pixelOffset: { width: 0, height: 18 }
    }
});
```

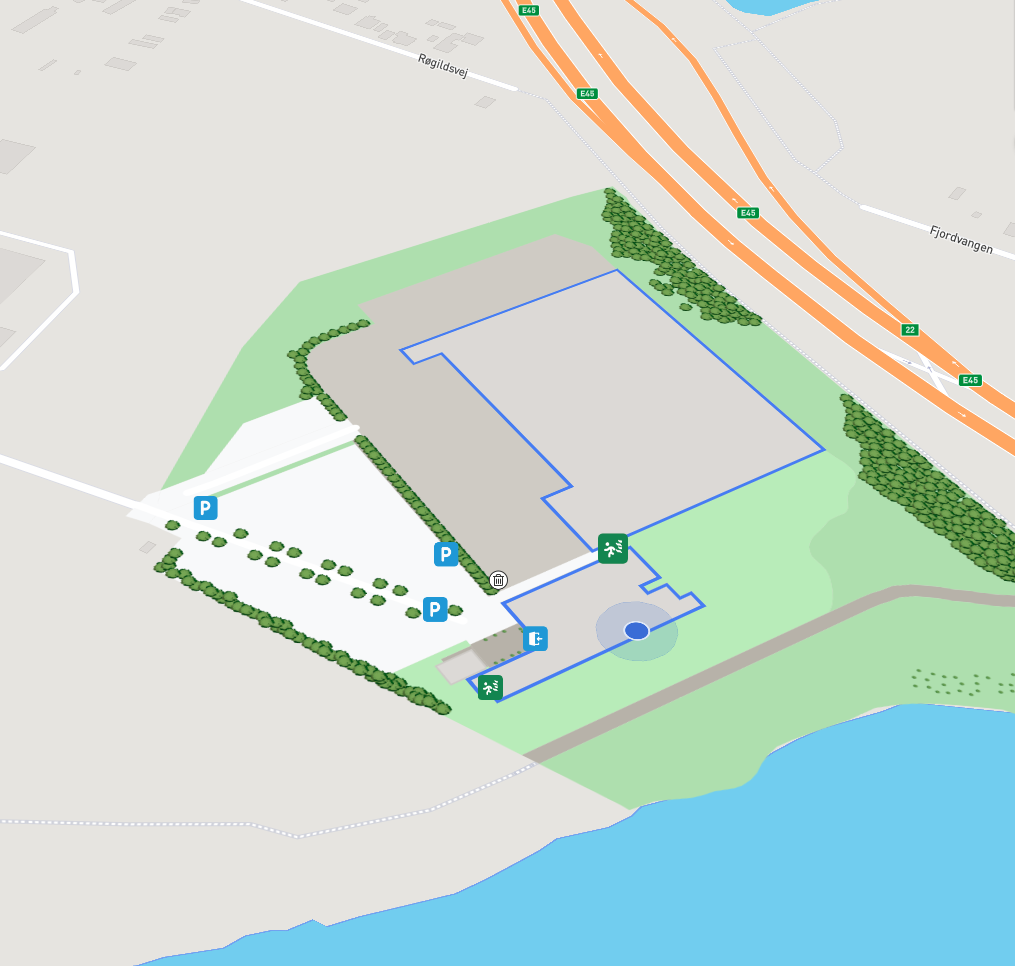
After successful `mapView` load you should be able to use Mapbox v2:

<figure><img src="/files/MVQjFI5YcFBqT1MB2Bja" alt=""><figcaption><p>Solution using Mapbox v2</p></figcaption></figure>

[<br>](https://docs.mapsindoors.com/getting-started/web/)


# Set Up Your Environment

This guide assumes you have a basic understanding of HTML, CSS, and JavaScript. If you're new to web development, we recommend using an Integrated Development Environment (IDE) like [Visual Studio Code](https://code.visualstudio.com/) to help manage your files and code.

Let's start by creating the necessary file structure:

1. **Create a new project folder:** Choose any location on your computer. Let's call this folder `mapsindoors-tutorial`. Ensure the folder is empty.
2. **Create three empty files** inside your `mapsindoors-tutorial` folder:
   * `index.html`: This file will be your application's entry point and contain the main HTML structure.
   * `style.css:` This file will contain the CSS styles for the HTML document.
   * `script.js`: This file will contain the JavaScript code for initializing and controlling the MapsIndoors map.

Now, open the `index.html` file in your code editor and add the following basic HTML structure. This includes the necessary boilerplate and links to the MapsIndoors Web SDK, your custom CSS, and your custom JavaScript file:

{% code lineNumbers="true" %}

```html
<!-- index.html -->

<!DOCTYPE html>
<html lang="en">

<head>
    <meta charset="UTF-8">
    <meta name="viewport" content="width=device-width, initial-scale=1.0">
    <title>MapsIndoors</title>
    <!-- Include the style.css -->
    <link rel="stylesheet" href="style.css">
    <!-- Include the MapsIndoors SDK -->
    <script src="https://app.mapsindoors.com/mapsindoors/js/sdk/4.41.0/mapsindoors-4.41.0.js.gz"></script>
</head>

<body>
    <script src="script.js"></script>
</body>

</html>
```

{% endcode %}

Next, open the `style.css` file and add the following styles. These styles ensure the map container can fill the page correctly.

{% code lineNumbers="true" %}

```css
/* style.css */

/* Ensure html and body take up full height and use flexbox */
html, body {
    height: 100%;
    margin: 0;
    padding: 0;
    overflow: hidden; /* Prevent scrollbars if map is full size */
    display: flex; /* Use flexbox for layout */
    flex-direction: column; /* Stack children vertically */
}
```

{% endcode %}

**Explanation:**

* We've set up a standard HTML5 document (`index.html`).
* The `<meta>` tags ensure proper character display and responsiveness.
* The `<title>` tag sets the title for the browser tab.
* The `<link rel="stylesheet" href="style.css">` tag in the `<head>` loads your external CSS file, allowing you to style your HTML elements.
* The first `<script>` tag in the `<head>` loads the MapsIndoors Web SDK library.
* The `<script src="script.js"></script>` tag at the end of the `<body>` links to your custom JavaScript file. Placing it here ensures it runs after the HTML body has been parsed and the MapsIndoors SDK is available.
* The `style.css` file currently contains basic styles for the `html` and `body` elements. We've added `display: flex` and `flex-direction: column` to prepare the page for a flexible layout where elements can fill the available space, which will be useful when adding the map and other UI components later. `height: 100%`, `margin: 0`, `padding: 0`, and `overflow: hidden` are included to ensure the page takes up the full viewport and prevents unwanted scrollbars.

*Note: In this documentation, we indicate which file a code snippet belongs to by showing the filename on the first line in the code samples.*

You have now created the basic project structure and included the MapsIndoors SDK and your custom CSS file.


# Using Mapbox


# Display a map

**Goal:** This guide will walk you through initializing the MapsIndoors SDK and displaying your first interactive indoor map using Mapbox GL JS as the map provider.

**SDK Concepts Introduced:**

* Setting the MapsIndoors API Key using `mapsindoors.MapsIndoors.setMapsIndoorsApiKey()`.
* Initializing the Mapbox map view using `mapsindoors.mapView.MapboxV3View`.
* Creating the main `mapsindoors.MapsIndoors` instance.
* Adding a `mapsindoors.FloorSelector` control.
* Using `mapsIndoorsInstance.goTo()` to pan and zoom the map to the selected location.
* Handling map clicks to center the map on a clicked POI (location) using `mapsIndoorsInstance.on('click', callback)`

### Prerequisites

* Completion of the [Set Up Your Environment guide](/sdks-and-frameworks/web/tutorial/set-up-your-environment).
* You will need a **Mapbox Access Token**. If you don't have one, you can create one for free on the [Mapbox website](https://www.mapbox.com/signup/).
* You will need a **MapsIndoors API Key**. For this tutorial, you can use the demo API key: `02c329e6777d431a88480a09`.

### The Code

To display the map, you'll need to update your `index.html`, `style.css`, and `script.js` files as follows.

#### Update index.html

Open your `index.html` file. You need to include the Mapbox GL JS CSS and JavaScript libraries from their CDN and ensure there's a `<div>` element to contain the map.

{% code lineNumbers="true" %}

```html
<!-- index.html -->
<!DOCTYPE html>

<html lang="en">
<head>
    <meta charset="UTF-8">
    <meta name="viewport" content="width=device-width, initial-scale=1.0">
    <title>MapsIndoors</title>
    <link rel="stylesheet" href="style.css">
    <!-- Mapbox GL JS CSS -->
    <link href='https://api.mapbox.com/mapbox-gl-js/v3.10.0/mapbox-gl.css' rel='stylesheet' />
    <!-- MapsIndoors SDK (already included from initial setup) -->
    <script src="https://app.mapsindoors.com/mapsindoors/js/sdk/4.41.0/mapsindoors-4.41.0.js.gz"
            integrity="sha384-3lk3cwVPj5MpUyo5T605mB0PMHLLisIhNrSREQsQHjD9EXkHBjz9ETgopmTbfMDc"
            crossorigin="anonymous"></script>
    <!-- Mapbox GL JS -->
    <script src='https://api.mapbox.com/mapbox-gl-js/v3.10.0/mapbox-gl.js'></script>
</head>
<body>
    <!-- This div will hold your map -->
    <div id="map"></div>
    <script src="script.js"></script>
</body>
</html>
```

{% endcode %}

**Explanation of index.html updates:**

* The `<link href='https://api.mapbox.com/mapbox-gl-js/v3.10.0/mapbox-gl.css' rel='stylesheet' />` tag in the `<head>` includes the necessary CSS for Mapbox GL JS. This styles the map elements provided by Mapbox.
* The `<script src='https://api.mapbox.com/mapbox-gl-js/v3.10.0/mapbox-gl.js'></script>` tag in the `<head>` includes the Mapbox GL JS library. **Note**: We are using version `3.10.0` in this example; you should verify this is the currently recommended version or check the [Mapbox documentation](https://docs.mapbox.com/mapbox-gl-js/guides/) for the latest.
* The MapsIndoors SDK script (`mapsindoors-4.41.0.js.gz`) should already be present from the initial setup guide. You can always check the [MapsIndoors SDK reference documentation](https://app.mapsindoors.com/mapsindoors/js/sdk/latest/docs/index.html) for the latest SDK version.
* An empty `<div>` with the attribute `id="map"` was added inside the `<body>`. This `div` is crucial as it serves as the container where both the Mapbox base map and the MapsIndoors layers will be rendered.

#### Update style.css

Update your `style.css` file to ensure the `#map` element fills the available space. This is necessary for the map to be visible.

{% code lineNumbers="true" %}

```css
/* style.css */

/* Use flexbox for the main layout (from initial setup) */
html, body {
    height: 100%;
    margin: 0;
    padding: 0;
    overflow: hidden; /* Prevent scrollbars if map is full size */
    display: flex;
    flex-direction: column; /* Stack children vertically if needed later */
}

/* Style for the map container */
#map {
  /* Make map fill available space within its flex parent (body) */
  flex-grow: 1;
  width: 100%; /* Make map fill width */
  margin: 0;
  padding: 0;
}
```

{% endcode %}

**Explanation of style.css updates:**

* The styles for the `#map` container are added. These styles define how the map container behaves within the flexbox layout established in the initial setup (`html, body` styles).
* `flex-grow: 1;` is a key flexbox property that allows the map container to expand and fill the available vertical space within its parent (`body`).
* `width: 100%;` ensures the map fills the full horizontal width of its container.
* `margin: 0;` and `padding: 0;` remove any default browser spacing around the map container, ensuring it fits snugly.

#### Add JavaScript to script.js

Open your `script.js` file and add the following JavaScript code. This code will initialize the Mapbox map, then create the MapsIndoors view and instance, and finally add a Floor Selector.

Remember to replace `YOUR_MAPBOX_ACCESS_TOKEN` with your actual Mapbox access token if you are not using the demo one, and `YOUR_MAPSINDOORS_API_KEY` with your MapsIndoors API key if not using the demo key. For testing, the demo MapsIndoors API key `02c329e6777d431a88480a09` and the Austin office venue ID `dfea941bb3694e728df92d3d` are used.

{% code lineNumbers="true" %}

```javascript
// script.js

// Define options for the MapsIndoors Mapbox view
const mapViewOptions = {
    accessToken: 'YOUR_MAPBOX_ACCESS_TOKEN', // Replace with your Mapbox token
    element: document.getElementById('map'),
    center: { lng: -97.74204591828197, lat: 30.36022358949809 }, // Example: MapsPeople Austin Office
    zoom: 17,
    maxZoom: 22,
    mapsIndoorsTransitionLevel: 16,
};

// Set the MapsIndoors API key
mapsindoors.MapsIndoors.setMapsIndoorsApiKey('YOUR_MAPSINDOORS_API_KEY'); // Replace with your MapsIndoors API key

// Create a new instance of the MapsIndoors Mapbox view
const mapViewInstance = new mapsindoors.mapView.MapboxV3View(mapViewOptions);

// Create a new MapsIndoors instance, passing the map view
const mapsIndoorsInstance = new mapsindoors.MapsIndoors({
    mapView: mapViewInstance,
    // Set the venue ID to load the map for a specific venue
    venue: 'YOUR_MAPSINDOORS_VENUE_ID', // Replace with your actual venue ID
});

/** Floor Selector **/

// Create a new HTML div element to host the floor selector
const floorSelectorElement = document.createElement('div');

// Create a new FloorSelector instance, linking it to the HTML element and the main MapsIndoors instance.
new mapsindoors.FloorSelector(floorSelectorElement, mapsIndoorsInstance);

// Get the underlying Mapbox map instance
const mapboxInstance = mapViewInstance.getMap();

// Add the floor selector HTML element to the Mapbox map using Mapbox's addControl method
// We wrap the element in an object implementing the IControl interface expected by addControl
mapboxInstance.addControl({
    onAdd: function () {
        // This function is called when the control is added to the map.
        // It should return the control's DOM element.
        return floorSelectorElement;
    },
    onRemove: function () {
        // This function is called when the control is removed from the map.
        // Clean up any event listeners or resources here.
        floorSelectorElement.parentNode.removeChild(floorSelectorElement);
    },
}, 'top-right'); // Optional: Specify a position ('top-left', 'top-right', 'bottom-left', 'bottom-right')

/** Handle Location Clicks **/

// Handle Location Clicks on Map
function handleLocationClick(location) {
    if (location && location.id) {
        mapsIndoorsInstance.goTo(location); // Center the map on the clicked location
    }
}

// Add an event listener to the MapsIndoors instance for click events on locations
mapsIndoorsInstance.on('click', handleLocationClick);
```

{% endcode %}

**Explanation of script.js updates:**

* `const mapViewOptions = { ... }`: This object defines essential configuration options for the MapsIndoors Mapbox view.
  * `accessToken`: Your Mapbox access token, required by Mapbox GL JS.
  * `element`: The HTML DOM element (our `<div id="map">`) where the map will be rendered.
  * `center`, `zoom`, `maxZoom`: Standard map parameters to set the initial view.
  * `mapsIndoorsTransitionLevel`: The zoom level at which MapsIndoors will start showing indoor details.
  * For more details on all available options, see the [mapsindoors.mapView.MapboxV3View class documentation](https://app.mapsindoors.com/mapsindoors/js/sdk/latest/docs/mapsindoors.mapView.MapboxV3View.html).
* `mapsindoors.MapsIndoors.setMapsIndoorsApiKey('YOUR_MAPSINDOORS_API_KEY');`: This static method sets your MapsIndoors API key globally for the SDK. This key authenticates your requests to MapsIndoors services. See the [`mapsindoors.MapsIndoors` class reference](https://app.mapsindoors.com/mapsindoors/js/sdk/latest/docs/MapsIndoors.html).
* `const mapViewInstance = new mapsindoors.mapView.MapboxV3View(mapViewOptions);`: This line creates an instance of `MapboxV3View`, which is responsible for integrating MapsIndoors data and rendering with a Mapbox GL JS v3 map. For more details on `MapboxV3View`, see its [class reference](https://app.mapsindoors.com/mapsindoors/js/sdk/latest/docs/mapsindoors.mapView.MapboxV3View.html).
* `const mapsIndoorsInstance = new mapsindoors.MapsIndoors({ mapView: mapViewInstance, venue: 'YOUR_MAPSINDOORS_VENUE_ID' });`: This creates the main `MapsIndoors` instance. This object is your primary interface for interacting with MapsIndoors functionalities like displaying locations, getting directions, etc. See the [`mapsindoors.MapsIndoors` class documentation](https://app.mapsindoors.com/mapsindoors/js/sdk/latest/docs/MapsIndoors.html).
* **Floor Selector Integration:**
  * `const floorSelectorElement = document.createElement('div');`: A new HTML `div` element is dynamically created. This element will serve as the container for the Floor Selector UI.
  * `new mapsindoors.FloorSelector(floorSelectorElement, mapsIndoorsInstance);`: This instantiates the `FloorSelector` control. It takes the HTML element to render into and the `mapsIndoorsInstance` to interact with (e.g., to know available floors and change the current floor). For more details on `FloorSelector`, see its [class reference](https://app.mapsindoors.com/mapsindoors/js/sdk/latest/docs/mapsindoors.FloorSelector.html).
  * `const mapboxInstance = mapViewInstance.getMap();`: The `getMap()` method on our `mapViewInstance` returns the underlying native Mapbox `Map` object. This is necessary to use Mapbox-specific functionalities.
  * `mapboxInstance.addControl({ ... }, 'top-right');`: This uses the native Mapbox `addControl` method to add our `floorSelectorElement` to the map UI in the top-right corner. For more details, refer to the [Mapbox GL JS documentation on controls](https://docs.mapbox.com/mapbox-gl-js/api/markers/#icontrol).
* **Click-to-Center Functionality:**
  * `function handleLocationClick(location) { ... }`: This function is called whenever a location (POI) on the map is clicked. It checks that the clicked object is a valid MapsIndoors location and then calls `mapsIndoorsInstance.goTo(location)` to center the map on that location.
  * `mapsIndoorsInstance.on('click', handleLocationClick);`: This line registers the click handler so that clicking any POI on the map will smoothly center the map on that location. This pattern will be reused and expanded in later steps.

### Expected Outcome

After completing these steps and opening your `index.html` file in a web browser, you should see:

* An interactive map centered on the MapsPeople Austin Office.
* A Floor Selector control visible in the top-right corner of the map, allowing you to switch between different floors of the venue.
* Clicking on any POI or location marker on the map will center the map on that location.

### Troubleshooting

* **Map doesn't load / blank page:**
  * Check your browser's developer console (usually F12) for any error messages.
  * Ensure you have replaced `YOUR_MAPBOX_ACCESS_TOKEN` with a valid token in `script.js` (or are using the provided demo token correctly).
  * Verify that `YOUR_MAPSINDOORS_API_KEY` is correctly set (or the demo key is used).
  * Double-check all CDN links in `index.html` are correct and accessible.
* **Floor selector doesn't appear:**
  * Verify the JavaScript code for creating and adding the floor selector has no typos.
  * Check the console for errors related to `FloorSelector` or `addControl`.
* **Clicking a location does not center the map:**
  * Ensure the `handleLocationClick` function is correctly defined and registered as an event listener.
  * Check for any JavaScript errors in the console that might indicate issues with the click handling code.

### Here's a CodeSandbox demonstrating the result you should have by now:

{% embed url="<https://codesandbox.io/p/sandbox/github/MapsPeople/mapsindoors-getting-started-for-web/tree/main/sdk/mapbox/1-display-a-map>" %}

### Next Steps

You have successfully displayed a MapsIndoors map with Mapbox GL JS and added a floor selector! This is the foundational step for building more complex indoor mapping applications.

Next, you will learn how to add search functionality to your map:

* Step 2: [Create a Search Experience](/sdks-and-frameworks/web/tutorial/using-mapbox/create-a-search-experience)


# Create a Search Experience

**Goal:** This guide will show you how to add a search input field to your map application, allowing users to find locations within your venue. Search results will be displayed in a list and highlighted on the map.

**SDK Concepts Introduced:**

* Using `mapsindoors.services.LocationsService.getLocations()` to fetch locations based on a query.
* Interacting with the map based on search results:
  * Highlighting multiple locations: `mapsIndoorsInstance.highlight()`.
  * Setting the floor: `mapsIndoorsInstance.setFloor()`.
  * Selecting a specific location: `mapsIndoorsInstance.selectLocation()`.
* Clearing previous highlights and selections: `mapsIndoorsInstance.highlight()` (with no arguments) and `mapsIndoorsInstance.deselectLocation()`.
* Getting current venue information: `mapsIndoorsInstance.getVenue()`.

### Prerequisites

* Completion of [Step 1: Displaying a Map with Mapbox GL JS](/sdks-and-frameworks/web/tutorial/using-mapbox/display-a-map).
* Your MapsIndoors API Key and Mapbox Access Token should be correctly set up as per Step 1. We will continue using the demo API key `02c329e6777d431a88480a09` and venue ID `dfea941bb3694e728df92d3d` for this example.

### The Code

This guide details the modifications to HTML, CSS, and JavaScript needed to add a search input field, display search results, and dynamically interact with the map based on user searches.

#### Update index.html

Open your `index.html` file. The primary structural change to your HTML is the introduction of a dedicated search panel. This panel will house the input field where users type their search queries and an unordered list where the corresponding search results will appear.

{% code lineNumbers="true" %}

```html
<!-- index.html -->
<!DOCTYPE html>
<html lang="en">

<head>
    <meta charset="UTF-8">
    <meta name="viewport" content="width=device-width, initial-scale=1.0">
    <title>MapsIndoors</title>
    <link rel="stylesheet" href="style.css">
    <link href='https://api.mapbox.com/mapbox-gl-js/v3.10.0/mapbox-gl.css' rel='stylesheet' />
    <script src="https://app.mapsindoors.com/mapsindoors/js/sdk/4.41.0/mapsindoors-4.41.0.js.gz"
            integrity="sha384-3lk3cwVPj5MpUyo5T605mB0PMHLLisIhNrSREQsQHjD9EXkHBjz9ETgopmTbfMDc"
            crossorigin="anonymous"></script>
    <script src='https://api.mapbox.com/mapbox-gl-js/v3.10.0/mapbox-gl.js'></script>
</head>

<body>
    <div id="map"></div>

    <!-- New search panel for user interaction -->
    <div class="panel">
        <div id="search-ui" class="flex-column">
            <!-- Input field for users to type search queries -->
            <input type="text" id="search-input" placeholder="Search for a location...">
            <!-- Unordered list to display search results dynamically -->
            <ul id="search-results"></ul>
        </div>
    </div>

    <script src="script.js"></script>
</body>

</html>
```

{% endcode %}

**Explanation of index.html updates:**

* A new `div` element with the class `panel` is added. This `div` serves as the main container for all search-related UI elements.
* Inside the `panel`, another `div` with the id `search-ui` and the class `flex-column` is introduced to arrange the search input and results list vertically.
* An `<input>` element with `id="search-input"` is the text field for user search queries.
* An `<ul>` (unordered list) element with `id="search-results"` will be dynamically populated with locations matching the user's query.

### Update style.css

Modify your `style.css` file to incorporate styles for the newly added search panel and its contents. These styles are crucial for ensuring the search interface is user-friendly, visually appealing, and correctly positioned over the map without obstructing it entirely.

{% code lineNumbers="true" %}

```css
/* style.css */

/* Use flexbox for the main layout */
html, body {
    height: 100%;
    margin: 0;
    padding: 0;
    overflow: hidden; /* Prevent scrollbars if map is full size */
    display: flex;
    flex-direction: column; /* Stack children vertically if needed later */
}

/* Style for the map container */
#map {
  /* Make map fill available space */
  flex-grow: 1;
  width: 100%; /* Make map fill width */
  margin: 0;
  padding: 0;
}


/* Style for the information panel container */
.panel {
    position: absolute; /* Positions the panel relative to the nearest positioned ancestor (or body if none). This allows it to float over the map. */
    top: 10px; /* Adds a 10px margin from the top edge of its containing element. */
    left: 10px; /* Adds a 10px margin from the left edge of its containing element, placing it in the top-left corner. */
    z-index: 10; /* Ensures the panel appears on top of other elements, like the map itself, which might have lower z-index values. */
    background-color: white; /* Sets a solid white background for the panel, making text readable. */
    padding: 10px; /* Adds 10px of space inside the panel, around its content. */
    border-radius: 5px; /* Rounds the corners of the panel for a softer look. */
    box-shadow: 0 2px 5px rgba(0,0,0,0.2); /* Adds a subtle shadow effect, giving the panel a sense of depth. */
    max-height: 80%; /* Limits max-height to prevent overflow with details */
    overflow-y: auto; /* Adds a vertical scrollbar if the content inside the panel exceeds its max-height. */
    border: 1px solid #ccc; /* Adds a light gray border around the panel for better visual separation. */
    width: 300px; /* Sets a fixed width for the panel. */
}

/* Class to apply flex display and column direction */
.flex-column {
    display: flex; /* Enables flexbox layout for this element. */
    flex-direction: column; /* Arranges child elements in a vertical column. */
    gap: 10px; /* Adds a 10px gap between child elements within the flex container. */
}

/* Class to hide elements */
.hidden {
    display: none; /* Makes elements with this class invisible and removes them from the layout. */
}

/* Style for the search input field */
#search-input {
    padding: 8px; /* Adds 8px of internal padding to the input field for better text spacing. */
    border: 1px solid #ccc; /* Adds a light gray border around the input field. */
    border-radius: 4px; /* Slightly rounds the corners of the input field. */
    font-size: 1rem; /* Sets the font size within the input field to a standard readable size. */
}

/* Style for the search results list */
#search-results {
    list-style: none; /* Removes the default bullet points from the unordered list. */
    padding: 0; /* Removes default padding from the list. */
    margin: 0; /* Removes default margins from the list. */
}

/* Style for individual search result items */
#search-results li {
    padding: 8px 0; /* Adds vertical padding to each list item for spacing. */
    cursor: pointer; /* Changes the mouse cursor to a pointer on hover, indicating the item is clickable. */
    border-bottom: 1px solid #eee; /* Adds a light gray line below each list item, acting as a separator. */
}

/* Style for the last search result item (no bottom border) */
#search-results li:last-child {
    border-bottom: none; /* Removes the bottom border from the last item in the list for a cleaner look. */
}

/* Hover effect for search result items */
#search-results li:hover {
    background-color: #f0f0f0; /* Changes the background color of a list item when hovered, providing visual feedback. */
}
```

{% endcode %}

**Explanation of style.css updates:**

* **`.panel`**: Styles the search panel to float over the map in the top-left corner, with a white background, padding, rounded corners, and a shadow for a modern look. `max-height` and `overflow-y: auto` ensure it's scrollable if results are numerous.
* **`.flex-column`**: A utility class using Flexbox to stack child elements (search input, results list) vertically with a small gap.
* **`.hidden`**: A utility class to hide elements (`display: none;`), used initially for the search results list.
* **`#search-input`**: Styles the search input field with padding, border, and font size for readability.
* **`#search-results`**: Styles the unordered list for search results, removing default list styling.
* **`#search-results li`**: Styles individual list items with padding, a bottom border for separation, and a pointer cursor to indicate clickability.
* **`#search-results li:last-child`**: Removes the bottom border from the last list item.
* **`#search-results li:hover`**: Provides a hover effect for list items for better user feedback.

### Update script.js

The `script.js` file sees the most significant changes as it houses the logic for the search functionality.

{% code lineNumbers="true" %}

```javascript
// script.js

// Define options for the MapsIndoors Mapbox view
const mapViewOptions = {
    accessToken: 'YOUR_MAPBOX_ACCESS_TOKEN', // Replace with your Mapbox token
    element: document.getElementById('map'),
    center: { lng: -97.74204591828197, lat: 30.36022358949809 }, // Example: MapsPeople Austin Office
    zoom: 17,
    maxZoom: 22,
    mapsIndoorsTransitionLevel: 16,
};

// Set the MapsIndoors API key
mapsindoors.MapsIndoors.setMapsIndoorsApiKey('YOUR_MAPSINDOORS_API_KEY'); // Replace with your MapsIndoors API key

// Create a new instance of the MapsIndoors Mapbox view
const mapViewInstance = new mapsindoors.mapView.MapboxV3View(mapViewOptions);

// Create a new MapsIndoors instance, passing the map view
const mapsIndoorsInstance = new mapsindoors.MapsIndoors({
    mapView: mapViewInstance,
    // Set the venue ID to load the map for a specific venue
    venue: 'YOUR_MAPSINDOORS_VENUE_ID', // Replace with your actual venue ID
});

/** Floor Selector **/

// Create a new HTML div element to host the floor selector
const floorSelectorElement = document.createElement('div');

// Create a new FloorSelector instance, linking it to the HTML element and the main MapsIndoors instance.
new mapsindoors.FloorSelector(floorSelectorElement, mapsIndoorsInstance);

// Get the underlying Mapbox map instance
const mapboxInstance = mapViewInstance.getMap();

// Add the floor selector HTML element to the Mapbox map using Mapbox's addControl method
// We wrap the element in an object implementing the IControl interface expected by addControl
mapboxInstance.addControl({
    onAdd: function () {
        // This function is called when the control is added to the map.
        // It should return the control's DOM element.
        return floorSelectorElement;
    },
    onRemove: function () {
        // This function is called when the control is removed from the map.
        // Clean up any event listeners or resources here.
        floorSelectorElement.parentNode.removeChild(floorSelectorElement);
    },
}, 'top-right'); // Optional: Specify a position ('top-left', 'top-right', 'bottom-left', 'bottom-right')

/** Handle Location Clicks **/

// Function to handle clicks on MapsIndoors locations
function handleLocationClick(location) {
    if (location && location.id) {
        // Move the map to the selected location
        mapsIndoorsInstance.goTo(location);
        // Ensure that the map shows the correct floor
        mapsIndoorsInstance.setFloor(location.properties.floor);
        // Select the location on the map
        mapsIndoorsInstance.selectLocation(location);
    }
}

// Add an event listener to the MapsIndoors instance for click events on locations
mapsIndoorsInstance.on('click', handleLocationClick);

/** Search Functionality **/

// Get references to the search input and results list elements
const searchInputElement = document.getElementById('search-input');
const searchResultsElement = document.getElementById('search-results');

// Initially hide the search results list
searchResultsElement.classList.add('hidden');

// Add an event listener to the search input for 'input' events
// This calls the onSearch function every time the user types in the input field
searchInputElement.addEventListener('input', onSearch);

// Function to perform the search and update the results list and map highlighting
function onSearch() {
    // Get the current value from the search input
    const query = searchInputElement.value;
    // Get the current venue from the MapsIndoors instance
    const currentVenue = mapsIndoorsInstance.getVenue();

    // Clear map highlighting
    mapsIndoorsInstance.highlight();
    // Deselect any selected location
    mapsIndoorsInstance.deselectLocation();

    // Check if the query is too short (less than 3 characters) or empty
    if (query.length < 3) {
        // Hide the results list if the query is too short or empty
        searchResultsElement.classList.add('hidden');
        return; // Stop here
    }

    // Define search parameters with the current input value
    // Include the current venue name in the search parameters
    const searchParameters = { q: query, venue: currentVenue ? currentVenue.name : undefined };

    // Call the MapsIndoors LocationsService to get locations based on the search query
    mapsindoors.services.LocationsService.getLocations(searchParameters).then(locations => {
        // Clear previous search results
        searchResultsElement.innerHTML = null;

        // If no locations are found, display a "No results found" message
        if (locations.length === 0) {
            const noResultsItem = document.createElement('li');
            noResultsItem.textContent = 'No results found';
            searchResultsElement.appendChild(noResultsItem);
            // Ensure the results list is visible to show the "No results found" message
            searchResultsElement.classList.remove('hidden');
            return; // Stop here if no results
        }

        // Append new search results to the list
        locations.forEach(location => {
            const listElement = document.createElement('li');
            // Display the location name
            listElement.innerHTML = location.properties.name;
            // Store the location ID on the list item for easy access
            listElement.dataset.locationId = location.id;

            // Add a click event listener to each list item
            listElement.addEventListener('click', function () {
                // Call the handleLocationClick function when a location in the search results is clicked.
                handleLocationClick(location);
            });

            searchResultsElement.appendChild(listElement);
        });

        // Show the results list now that it has content
        searchResultsElement.classList.remove('hidden');

        // Filter map to only display search results by highlighting them
        mapsIndoorsInstance.highlight(locations.map(location => location.id));
    })
        .catch(error => {
            console.error("Error fetching locations:", error);
            const errorItem = document.createElement('li');
            errorItem.textContent = 'Error performing search.';
            searchResultsElement.appendChild(errorItem);
            searchResultsElement.classList.remove('hidden');
        });
}
```

{% endcode %}

**Explanation of script.js updates:**

* **DOM Element References**: `searchInputElement` and `searchResultsElement` get references to the HTML input field and the unordered list for displaying results, respectively.
* **Initial State**: The `searchResultsElement` is hidden by default using the `.hidden` CSS class.
* **Event Listener**: An `input` event listener is attached to `searchInputElement`. This calls the `onSearch` function each time the user types into the search field.
* **`onSearch()` Function**: This is the core of the search logic:
  * It retrieves the current `query` from the input field and gets the `currentVenue` using `mapsIndoorsInstance.getVenue()`. For more details on venue information, see the [`getVenue()` reference](https://app.mapsindoors.com/mapsindoors/js/sdk/latest/docs/MapsIndoors.html#getVenue).
  * It clears any existing highlights from the map using `mapsIndoorsInstance.highlight()` (called without arguments). See its [API documentation](https://app.mapsindoors.com/mapsindoors/js/sdk/latest/docs/MapsIndoors.html#highlight) for more on clearing highlights.
  * It deselects any currently selected location using `mapsIndoorsInstance.deselectLocation()` (called without arguments). Refer to its [API documentation](https://app.mapsindoors.com/mapsindoors/js/sdk/latest/docs/MapsIndoors.html#deselectLocation) for deselection behavior.
  * If the `query` length is less than 3 characters, it hides the `searchResultsElement` and exits to prevent overly broad or empty searches.
  * It prepares `searchParameters` with the `q` (query) and scopes the search to the `currentVenue.name`. For a comprehensive list of search options, check out the [LocationsService.getLocations() documentation](https://app.mapsindoors.com/mapsindoors/js/sdk/latest/docs/mapsindoors.services.LocationsService.html#.getLocations)
  * It calls `mapsindoors.services.LocationsService.getLocations(searchParameters)` to fetch locations. This asynchronous method returns a Promise.
  * **`.then(locations => { ... })`**: This block handles the successful response from the LocationsService. `locations` is an array of objects, where each object conforms to the [Location interface](https://app.mapsindoors.com/mapsindoors/js/sdk/latest/docs/mapsindoors.Location.html).
    * It clears previous search results by setting `searchResultsElement.innerHTML = null`.
    * If no `locations` are found, it displays a "No results found" message in the list.
    * Otherwise, it iterates through each `location` object:
      * Creates an `<li>` element.
      * Sets its `innerHTML` to `location.properties.name`. The `properties` object on an object conforming to the `Location` interface contains various details about the location. For more information, see the [Location documentation](https://app.mapsindoors.com/mapsindoors/js/sdk/latest/docs/mapsindoors.Location.html).
      * Stores `location.id` in `listElement.dataset.locationId` for potential future use.
      * Adds a `click` event listener to the list item. When clicked:
        * `mapsIndoorsInstance.goTo(location)`: Pans and zooms the map to the clicked location. For more details on `goTo()`, see its [reference](https://app.mapsindoors.com/mapsindoors/js/sdk/latest/docs/MapsIndoors.html#goTo).
        * `mapsIndoorsInstance.setFloor(location.properties.floor)`: Changes the map to the location's floor. To understand floor management, check the [`setFloor()` documentation](https://app.mapsindoors.com/mapsindoors/js/sdk/latest/docs/MapsIndoors.html#setFloor).
        * `mapsIndoorsInstance.selectLocation(location)`: Selects and highlights this specific location on the map. For further information, refer to the [`selectLocation()` API documentation](https://app.mapsindoors.com/mapsindoors/js/sdk/latest/docs/MapsIndoors.html#selectLocation).
      * Appends the new list item to `searchResultsElement`.
      * Collects all `location.id`s into `locationIdsToHighlight`.
    * Makes the `searchResultsElement` visible by removing the `.hidden` class.
    * Calls `mapsIndoorsInstance.highlight(locationIdsToHighlight)` to highlight all found locations on the map simultaneously. The `highlight()` method accepts an array of location IDs. See its [API documentation](https://app.mapsindoors.com/mapsindoors/js/sdk/latest/docs/MapsIndoors.html#highlight) for details on batch highlighting.
  * **`.catch(error => { ... })`**: Handles potential errors during the search request, logging them to the console and displaying an error message in the list.
* The `handleLocationClick` function is now used for both map clicks and search result clicks, ensuring consistent behavior and code reuse.
* When a user clicks a search result or a POI on the map, the map will center on that location, switch to the correct floor, and select the location.
* This pattern will be reused and expanded in later steps.

### Expected Outcome

After implementing these changes:

* A search panel will be visible in the top-left corner of your map.
* Typing 3 or more characters into the search input will trigger a search.
* Matching locations will appear as a clickable list below the search input.
* All matching locations will be highlighted on the map.
* Clicking a location in the list will:
  * Pan and zoom the map to that location.
  * Switch to the correct floor if necessary.
  * Select and distinctively highlight that specific location on the map.

### Troubleshooting

* **Search not working / No results:**
  * Check the browser's developer console (F12) for errors.
  * Ensure your MapsIndoors API Key (`02c329e6777d431a88480a09` for demo) is correct and the MapsIndoors SDK is loaded.
  * Verify `YOUR_MAPBOX_ACCESS_TOKEN` is correct.
  * Confirm the `venue` ID (`dfea941bb3694e728df92d3d` for demo) is valid and the venue has searchable locations.
  * Make sure the `onSearch` function is being called (e.g., add a `console.log` at the beginning of `onSearch`).
* **Results list doesn't appear or looks wrong:**
  * Check CSS for the `.panel`, `#search-results`, and `li` elements. Ensure the `.hidden` class is being correctly added/removed.
* **Map interactions (goTo, highlight, selectLocation) not working:**
  * Verify `mapsIndoorsInstance` is correctly initialized.
  * Ensure the `location` objects passed to these methods are valid objects conforming to the `Location` interface.
  * Check for console errors when clicking a search result.

{% embed url="<https://codesandbox.io/p/sandbox/github/MapsPeople/mapsindoors-getting-started-for-web/tree/main/sdk/mapbox/2-create-a-search-experience>" %}

### Next Steps

You've now successfully added a powerful search feature to your indoor map! Users can easily find their way to specific points of interest.

Next, learn how to display detailed information about a selected location:

* Step 3: [Show the Details](/sdks-and-frameworks/web/tutorial/using-mapbox/show-the-details)


# Show the Details

**Goal:** This guide demonstrates how to display detailed information about a location when a user selects it from the search results or clicks a POI on the map. The details will include the location's name and description, and the map will navigate to and highlight the selected location.

**SDK Classes and Methods Introduced:**

* Retrieving and displaying specific location properties (e.g., `location.properties.name`, `location.properties.description`) within a dedicated details panel.
* Applying `mapsIndoorsInstance.deselectLocation()` to manage map state when closing the details view.

**Implementation Patterns:**

* Expanding the unified click handler to show location details
* Implementing UI state management between search and details views
* Creating a responsive details panel UI
* Handling transitions between different UI states

### Prerequisites

* Completion of [Step 2: Create a Search Experience](/sdks-and-frameworks/web/tutorial/using-mapbox/create-a-search-experience).
* Your MapsIndoors API Key and Mapbox Access Token should be correctly set up. We will continue using the demo API key `02c329e6777d431a88480a09` and venue ID `dfea941bb3694e728df92d3d` for this example.

### The Code

This step involves modifications to `index.html` to add elements for displaying details, `style.css` to style these new elements, and `script.js` to handle the logic of fetching and displaying location details and interacting with the map.

#### Unified Click Handler Pattern

In Step 1, we introduced a reusable click handler (`handleLocationClick`) for POIs on the map. In Step 2, we reused this handler for search result clicks. In this step, we expand the handler to show a details panel with more information about the selected location, and manage the UI state.

#### Update index.html

Open your `index.html` file. We will add a new `div` within the existing `.panel` to hold the location details. This `div` will be hidden by default and shown when a location is selected.

{% code lineNumbers="true" %}

```html
<!-- index.html -->
<!DOCTYPE html>
<html lang="en">

<head>
    <meta charset="UTF-8">
    <meta name="viewport" content="width=device-width, initial-scale=1.0">
    <title>MapsIndoors</title>
    <link rel="stylesheet" href="style.css">
    <link href='https://api.mapbox.com/mapbox-gl-js/v3.10.0/mapbox-gl.css' rel='stylesheet' />
    <script src="https://app.mapsindoors.com/mapsindoors/js/sdk/4.41.0/mapsindoors-4.41.0.js.gz"
            integrity="sha384-tFHttWqE6qOoX8etJurRBBXpH6puWNTgC8Ilq477ltu4EcpHk9ZwFPJDIli9wAS7"
            crossorigin="anonymous"></script>
    <script src='https://api.mapbox.com/mapbox-gl-js/v3.10.0/mapbox-gl.js'></script>
</head>

<body>
    <div id="map"></div>

    <div class="panel">
        <!-- Search UI elements from Step 2 -->
        <div id="search-ui" class="flex-column"> <!-- Wrap search elements -->
            <input type="text" id="search-input" placeholder="Search for a location...">
            <ul id="search-results"></ul>
        </div>

        <!-- New Details UI - initially hidden -->
        <div id="details-ui" class="hidden flex-column">
            <h3 id="details-name"></h3>
            <p id="details-description"></p>
            <button id="details-close" class="details-button">Close</button>
        </div>
    </div>

    <script src="script.js"></script>
</body>

</html>
```

{% endcode %}

**Explanation of index.html updates:**

* The existing search input and results list are wrapped in a `div` with `id="search-ui"` and class `flex-column`. This helps in managing the visibility of the entire search section.
* A new `div` with `id="details-ui"` is added within the `.panel`. This container will hold the location's name, description, and a close button.
  * It has the class `hidden` to be invisible by default.
  * It also has `flex-column` for layout consistency.
* Inside `#details-ui`:
  * `<h3 id="details-name"></h3>`: For displaying the location name.
  * `<p id="details-description"></p>`: For displaying the location description.
  * `<button id="details-close" class="details-button">Close</button>`: A button to close the details view and return to the search results.

#### Update style.css

Modify your `style.css` file to add styles for the new location details UI elements.

{% code lineNumbers="true" %}

```css
/* style.css */

/* Use flexbox for the main layout */
html, body {
    height: 100%;
    margin: 0;
    padding: 0;
    overflow: hidden; /* Prevent scrollbars if map is full size */
    display: flex;
    flex-direction: column; /* Stack children vertically if needed later */
}

/* Style for the map container */
#map {
  /* Make map fill available space */
  flex-grow: 1;
  width: 100%; /* Make map fill width */
  margin: 0;
  padding: 0;
}

/* Style for the information panel container */
.panel {
    position: absolute; /* Position over the map */
    top: 10px; /* Distance from the top */
    left: 10px; /* Distance from the left */
    z-index: 10; /* Ensure it's above the map and other elements */
    background-color: white; /* White background for readability */
    padding: 10px;
    border-radius: 5px;
    box-shadow: 0 2px 5px rgba(0,0,0,0.2); /* Add a subtle shadow */
    max-height: 80%; /* Limits max-height to prevent overflow with details */
    overflow-y: auto; /* Add scroll if content exceeds max-height */
    border: 1px solid #ccc; /* Add border for clarity */
    width: 300px;
}

/* Class to apply flex display and column direction */
.flex-column {
    display: flex;
    flex-direction: column;
    gap: 10px; /* Space between elements */
}

/* Class to hide elements */
.hidden {
    display: none;
}

/* Style for the search input field */
#search-input {
    padding: 8px;
    border: 1px solid #ccc;
    border-radius: 4px;
    font-size: 1rem;
}

/* Style for the search results list */
#search-results {
    list-style: none; /* Remove default list bullets */
    padding: 0;
    margin: 0;
}

/* Style for individual search result items */
#search-results li {
    padding: 8px 0;
    cursor: pointer; /* Indicate clickable items */
    border-bottom: 1px solid #eee; /* Separator line */
}

/* Style for the last search result item (no bottom border) */
#search-results li:last-child {
    border-bottom: none;
}

/* Hover effect for search result items */
#search-results li:hover {
    background-color: #f0f0f0; /* Highlight on hover */
}

/* --- New Styles for Location Details UI elements --- */

/* Styles for the new UI wrappers within #search-container */
#search-ui,
#details-ui {
    width: 100%; /* Ensure they fill the container's width */
    /* display: flex and flex-direction are controlled by .flex-column-container class via JS */
}

/* Style for the location name in details */
#details-name {
    margin-top: 0;
    margin-bottom: 10px;
    font-size: 1.2rem;
    border-bottom: 1px solid #eee;
    padding-bottom: 5px;
}

/* Style for the location description in details */
#details-description {
    margin-bottom: 15px;
    font-size: 0.9rem;
    color: #555;
}

/* Style for general buttons within details */
.details-button {
     padding: 8px;
     border: none;
     border-radius: 4px;
     font-size: 0.9rem;
     cursor: pointer;
     margin-bottom: 8px; /* Space between buttons */
     transition: background-color 0.3s ease;
}

 .details-button:last-child {
     margin-bottom: 0;
 }

/* Specific style for the Close button */
#details-close {
    background-color: #ccc; /* Grey */
    color: #333;
}
#details-close:hover {
 background-color: #bbb;
}
```

{% endcode %}

**Explanation of style.css updates:**

* `#search-ui`, `#details-ui`: Basic styling to ensure they take full width. The `flex-column` class will handle their internal layout.
* `#details-name`: Styles for the location name heading (font size, margin, border).
* `#details-description`: Styles for the description text (font size, color, `white-space: pre-wrap` to respect newlines from the data, `max-height` and `overflow-y` for scrollability).
* `.details-button`: General styling for buttons in the details view (padding, border-radius, full width).
* `#details-close`: Specific styling for the "Close" button (background color, text color, hover effect).

#### Update script.js

The `script.js` file will be updated to handle showing/hiding the details panel, populating it with location data, and interacting with the map.

{% code lineNumbers="true" %}

```javascript
// script.js

// Define options for the MapsIndoors Mapbox view
const mapViewOptions = {
    accessToken: 'YOUR_MAPBOX_ACCESS_TOKEN', // Replace with your Mapbox token
    element: document.getElementById('map'),
    // Initial map center (MapsPeople - Austin Office example)
    center: { lng: -97.74204591828197, lat: 30.36022358949809 },
    // Initial zoom level
    zoom: 17,
    // Maximum zoom level
    maxZoom: 22,
    // The zoom level at which MapsIndoors transitions
    mapsIndoorsTransitionLevel: 16
};

// Set the MapsIndoors API key
mapsindoors.MapsIndoors.setMapsIndoorsApiKey('YOUR_MAPSINDOORS_API_KEY'); // Replace with your MapsIndoors API key

// Create a new instance of the MapsIndoors Mapbox view
const mapViewInstance = new mapsindoors.mapView.MapboxV3View(mapViewOptions);

// Create a new MapsIndoors instance, passing the map view
const mapsIndoorsInstance = new mapsindoors.MapsIndoors({
    mapView: mapViewInstance,
    // Set the venue ID to load the map for a specific venue
    venue: 'YOUR_MAPSINDOORS_VENUE_ID', // Replace with your actual venue ID
});

/** Floor Selector **/

// Create a new HTML div element to host the floor selector
const floorSelectorElement = document.createElement('div');

// Create a new FloorSelector instance, linking it to the HTML element and the main MapsIndoors instance.
new mapsindoors.FloorSelector(floorSelectorElement, mapsIndoorsInstance);

// Get the underlying Mapbox map instance
const mapboxInstance = mapViewInstance.getMap();

// Add the floor selector HTML element to the Mapbox map using Mapbox's addControl method
// We wrap the element in an object implementing the IControl interface expected by addControl
mapboxInstance.addControl({
    onAdd: function () {
        // This function is called when the control is added to the map.
        // It should return the control's DOM element.
        return floorSelectorElement;
    },
    onRemove: function () {
        // This function is called when the control is removed from the map.
        // Clean up any event listeners or resources here.
        floorSelectorElement.parentNode.removeChild(floorSelectorElement);
    },
}, 'top-right'); // Optional: Specify a position ('top-left', 'top-right', 'bottom-left', 'bottom-right')

/** Handle Location Clicks **/

// Function to handle clicks on MapsIndoors locations
function handleLocationClick(location) {
    if (location && location.id) {
        // Move the map to the selected location
        mapsIndoorsInstance.goTo(location);
        // Ensure that the map shows the correct floor
        mapsIndoorsInstance.setFloor(location.properties.floor);
        // Select the location on the map
        mapsIndoorsInstance.selectLocation(location);

        // Show the details UI for the clicked location
        showDetails(location);
    }
}

// Add an event listener to the MapsIndoors instance for click events on locations
mapsIndoorsInstance.on('click', handleLocationClick);

/** Search Functionality **/

// Get references to the search input and results list elements
const searchInputElement = document.getElementById('search-input');
const searchResultsElement = document.getElementById('search-results');

// Initially hide the search results list
searchResultsElement.classList.add('hidden');

// Add an event listener to the search input for 'input' events
// This calls the onSearch function every time the user types in the input field
searchInputElement.addEventListener('input', onSearch);

// Function to perform the search and update the results list and map highlighting
function onSearch() {
    // Get the current value from the search input
    const query = searchInputElement.value;
    // Get the current venue from the MapsIndoors instance
    const currentVenue = mapsIndoorsInstance.getVenue();

    // Clear map highlighting
    mapsIndoorsInstance.highlight();
    // Deselect any selected location
    mapsIndoorsInstance.deselectLocation();

    // Check if the query is too short (less than 3 characters) or empty
    if (query.length < 3) {
        // Hide the results list if the query is too short or empty
        searchResultsElement.classList.add('hidden');
        return; // Stop here
    }

    // Define search parameters with the current input value
    // Include the current venue name in the search parameters
    const searchParameters = { q: query, venue: currentVenue ? currentVenue.name : undefined };

    // Call the MapsIndoors LocationsService to get locations based on the search query
    mapsindoors.services.LocationsService.getLocations(searchParameters).then(locations => {
        // Clear previous search results
        searchResultsElement.innerHTML = null;

        // If no locations are found, display a "No results found" message
        if (locations.length === 0) {
            const noResultsItem = document.createElement('li');
            noResultsItem.textContent = 'No results found';
            searchResultsElement.appendChild(noResultsItem);
            // Ensure the results list is visible to show the "No results found" message
            searchResultsElement.classList.remove('hidden');
            return; // Stop here if no results
        }

        // Append new search results to the list
        locations.forEach(location => {
            const listElement = document.createElement('li');
            // Display the location name
            listElement.innerHTML = location.properties.name;
            // Store the location ID on the list item for easy access
            listElement.dataset.locationId = location.id;

            // Add a click event listener to each list item
            listElement.addEventListener('click', function () {
                // Call the handleLocationClick function when a location in the search results is clicked.
                handleLocationClick(location);
            });

            searchResultsElement.appendChild(listElement);
        });

        // Show the results list now that it has content
        searchResultsElement.classList.remove('hidden');

        // Filter map to only display search results by highlighting them
        mapsIndoorsInstance.highlight(locations.map(location => location.id));
    })
        .catch(error => {
            console.error("Error fetching locations:", error);
            const errorItem = document.createElement('li');
            errorItem.textContent = 'Error performing search.';
            searchResultsElement.appendChild(errorItem);
            searchResultsElement.classList.remove('hidden');
        });
}

/** UI state management **/

const searchUIElement = document.getElementById('search-ui');
const detailsUIElement = document.getElementById('details-ui');

function showSearchUI() {
    hideDetailsUI();
    searchUIElement.classList.remove('hidden');
    searchInputElement.focus();
}

function showDetailsUI() {
    hideSearchUI();
    detailsUIElement.classList.remove('hidden');
}

function hideSearchUI() {
    searchUIElement.classList.add('hidden');
}

function hideDetailsUI() {
    detailsUIElement.classList.add('hidden');
}

/** Location Details **/

// Get references to the static details view elements
const detailsNameElement = document.getElementById('details-name');
const detailsDescriptionElement = document.getElementById('details-description');
const detailsCloseButton = document.getElementById('details-close');

detailsCloseButton.addEventListener('click', () => {
    mapsIndoorsInstance.deselectLocation(); // Deselect any selected location
    showSearchUI();
});

// Show the details of a location
function showDetails(location) {
    detailsNameElement.textContent = location.properties.name;
    detailsDescriptionElement.textContent = location.properties.description || 'No description available.';
    showDetailsUI();
}

// Initial call to set up the search UI when the page loads
showSearchUI();
```

{% endcode %}

**Explanation of script.js updates:**

* **Unified Click Handler Implementation**:
  * Building upon our approach in previous steps, we've implemented a comprehensive click handler system.
  * The `handleLocationClick` function manages map interactions (selecting a location, zooming, and changing floors).
  * This function then calls the `showDetails` function to update the UI presentation.
  * This separation of concerns makes the code more maintainable and easier to understand.
* **UI State Management Functions**:
  * `showSearchUI()`: Shows the search interface and hides the details panel.
  * `showDetailsUI()`: Shows the details interface and hides the search panel.
  * `hideSearchUI()` and `hideDetailsUI()`: Helper functions to manage UI visibility.
  * `showDetails(location)`: Updates the details UI with the location's name and description.
  * The close button in the details panel has an event listener that returns to the search UI.
* **Map Interaction Methods**:
  * `mapsIndoorsInstance.goTo(location)`: Pans and zooms the map to the selected location.
  * `mapsIndoorsInstance.setFloor(location.properties.floor)`: Switches to the floor where the location exists.
  * `mapsIndoorsInstance.selectLocation(location)`: Visually highlights the selected location on the map.
* **Location Properties Access**:
  * We access `location.properties.name` and `location.properties.description` to display detailed information.
  * The fallback text "No description available" is shown when description is missing.
* **Search Result Click Handler**:
  * Search result clicks now trigger the same handler as map POI clicks, providing a consistent experience.
  * This unified approach ensures the same behavior whether a user interacts with the map or search results.
  * The separation between `handleLocationClick` (for map operations) and `showDetails` (for UI updates) creates a cleaner architecture that's easier to maintain and extend.
* **Initial Setup**:
  * `showSearchUI()` is called at the end to ensure the application starts with the search interface visible.

### Expected Outcome

After implementing these changes:

* When you search for locations and click on a result in the list:
  * The search input and results list will be hidden.
  * A details panel will appear showing the selected location's name and description.
  * The map will pan and zoom to the selected location.
  * The selected location will be highlighted on the map.
  * The map will switch to the correct floor of the selected location.
* Clicking the "Close" button in the details panel will hide the details and show the search input and results list again.
* When you click a POI on the map:
  * The details panel will appear showing the location's name and description.
  * The map will pan and zoom to the selected location.
  * The selected location will be highlighted on the map.
  * The map will switch to the correct floor of the selected location.

### Troubleshooting

* **Details panel doesn't show or shows incorrect data:**
  * Check browser console for errors.
  * Verify IDs in `index.html` match those used in `script.js` for `getElementById`.
  * Ensure `location.properties.name` and `location.properties.description` exist for the selected location or that default text is handled.
  * Confirm CSS for `.hidden`, `#search-ui`, and `#details-ui` is correctly applied and toggled.
* **Map doesn't navigate or select location:**
  * Ensure `mapsIndoorsInstance` is correctly initialized.
  * Verify the `location` object passed to `handleLocationClick` is a valid object conforming to the `Location` interface.
  * Check for console errors when `selectLocation`, `goTo`, or `setFloor` are called.
* **"Close" button doesn't work:**
  * Ensure the event listener is correctly attached to `detailsCloseButton` and that `showSearchUI` is called.

{% embed url="<https://codesandbox.io/p/sandbox/github/MapsPeople/mapsindoors-getting-started-for-web/tree/main/sdk/mapbox/3-show-the-details>" %}

### Next Steps

You've now enhanced your application to display detailed information about locations using a unified click handler. Next, you'll learn how to get and display directions between locations:

* Step 4: [Getting Directions](/sdks-and-frameworks/web/tutorial/using-mapbox/getting-directions)


# Getting Directions

**Goal:** This guide will show you how to add directions functionality to your application. Users will be able to select an origin and destination, get a route between them, and step through the directions on the map. This step builds on the search and details UI from Step 3, introducing a new directions panel and integrating the MapsIndoors DirectionsService and DirectionsRenderer.

**SDK Concepts Introduced:**

* Using the [DirectionsService](https://app.mapsindoors.com/mapsindoors/js/sdk/latest/docs/mapsindoors.services.DirectionsService.html) to calculate routes between locations.
* Using the [DirectionsRenderer](https://app.mapsindoors.com/mapsindoors/js/sdk/latest/docs/mapsindoors.directions.DirectionsRenderer.html) to display and step through routes on the map.
* Using `directionsRenderer.setRoute()` to display a calculated route on the map.
* Using `directionsRenderer.setStepIndex()` to navigate to a specific step in the route.
* Using `directionsRenderer.nextStep()` and `directionsRenderer.previousStep()` for step navigation.
* Using `directionsRenderer.getLegIndex()` and `directionsRenderer.getStepIndex()` to track current position.

### Prerequisites

* Completion of [Step 3: Show Location Details](/sdks-and-frameworks/web/tutorial/using-mapbox/show-the-details). Your app should already support searching for locations and viewing details.
* Your MapsIndoors API Key and Mapbox Access Token should be correctly set up. We will continue using the demo API key 02c329e6777d431a88480a09 and venue ID dfea941bb3694e728df92d3d for this example.

### Update index.html

Open your `index.html` file. Add a new directions panel inside the existing `.panel` container:

{% code lineNumbers="true" %}

```html
<!-- index.html -->
<!DOCTYPE html>
<html lang="en">
<head>
    <meta charset="UTF-8">
    <meta name="viewport" content="width=device-width, initial-scale=1.0">
    <title>MapsIndoors</title>
    <link rel="stylesheet" href="style.css">
    <link href='https://api.mapbox.com/mapbox-gl-js/v3.10.0/mapbox-gl.css' rel='stylesheet' />
    <script src="https://app.mapsindoors.com/mapsindoors/js/sdk/4.41.0/mapsindoors-4.41.0.js.gz"
            integrity="sha384-3lk3cwVPj5MpUyo5T605mB0PMHLLisIhNrSREQsQHjD9EXkHBjz9ETgopmTbfMDc"
            crossorigin="anonymous"></script>
    <script src='https://api.mapbox.com/mapbox-gl-js/v3.10.0/mapbox-gl.js'></script>
</head>
<body>
    <div id="map"></div>
    <div class="panel">
        <div id="search-ui" class="flex-column">
            <input type="text" id="search-input" placeholder="Search for a location...">
            <ul id="search-results"></ul>
        </div>
        <div id="details-ui" class="hidden">
            <h3 id="details-name"></h3>
            <p id="details-description"></p>
            <button id="details-directions" class="details-button details-action-button">Get Directions</button>
            <button id="details-close" class="details-button">Close</button>
        </div>
        <div id="directions-ui" class="hidden flex-column">
            <h3>Directions</h3>
            <div class="directions-inputs">
                <input type="text" id="origin-input" placeholder="Choose origin...">
                <ul id="origin-results" class="directions-results-list"></ul>
                <input type="text" id="destination-input" placeholder="Choose destination..." disabled>
            </div>
            <button id="get-directions" class="details-button details-action-button">Show Route</button>
            <div class="directions-step-nav">
                <span id="step-indicator"></span>
                <button id="prev-step" class="details-button">Previous</button>
                <button id="next-step" class="details-button">Next</button>
            </div>
            <button id="directions-close" class="details-button">Close Directions</button>
        </div>
    </div>
    <script src="script.js"></script>
</body>
</html>
```

{% endcode %}

#### Explanation of index.html updates

* The `#details-ui` panel now includes a "Get Directions" button, allowing users to open the directions panel for the selected location.
* The `#directions-ui` panel is added to the `.panel` container. This new panel contains:
  * Input fields for origin and destination.
  * A button to get directions.
  * Step navigation controls (step indicator, previous/next buttons).
  * A close button for the directions panel.
* All panels (`#search-ui`, `#details-ui`, `#directions-ui`) use consistent class and ID naming, and only one is visible at a time, managed by the show/hide functions in the JavaScript.

### Update style.css

Add styles for the new directions UI elements:

{% code lineNumbers="true" %}

```css
/* style.css */

/* Use flexbox for the main layout */
html, body {
    height: 100%;
    margin: 0;
    padding: 0;
    overflow: hidden; /* Prevent scrollbars if map is full size */
    display: flex;
    flex-direction: column; /* Stack children vertically if needed later */
}

/* Style for the map container */
#map {
  /* Make map fill available space */
  flex-grow: 1;
  width: 100%; /* Make map fill width */
  margin: 0;
  padding: 0;
}

/* Style for the information panel container */
.panel {
    position: absolute; /* Position over the map */
    top: 10px; /* Distance from the top */
    left: 10px; /* Distance from the left */
    z-index: 10; /* Ensure it's above the map and other elements */
    background-color: white; /* White background for readability */
    padding: 10px;
    border-radius: 5px;
    box-shadow: 0 2px 5px rgba(0,0,0,0.2); /* Add a subtle shadow */
    max-height: 80%; /* Limits max-height to prevent overflow with details */
    overflow-y: auto; /* Add scroll if content exceeds max-height */
    border: 1px solid #ccc; /* Add border for clarity */
    width: 300px;
}

/* Class to apply flex display and column direction */
.flex-column {
    display: flex;
    flex-direction: column;
    gap: 10px; /* Space between elements */
}

/* Class to hide elements */
.hidden {
    display: none;
}

/* Style for the search input field */
#search-input {
    padding: 8px;
    border: 1px solid #ccc;
    border-radius: 4px;
    font-size: 1rem;
}

/* Style for the search results list */
#search-results {
    list-style: none; /* Remove default list bullets */
    padding: 0;
    margin: 0;
}

/* Style for individual search result items */
#search-results li {
    padding: 8px 0;
    cursor: pointer; /* Indicate clickable items */
    border-bottom: 1px solid #eee; /* Separator line */
}

/* Style for the last search result item (no bottom border) */
#search-results li:last-child {
    border-bottom: none;
}

/* Hover effect for search result items */
#search-results li:hover {
    background-color: #f0f0f0; /* Highlight on hover */
}

/* --- New Styles for Location Details UI elements --- */

/* Styles for the new UI wrappers within #search-container */
#search-ui,
#details-ui {
    width: 100%; /* Ensure they fill the container's width */
    /* display: flex and flex-direction are controlled by .flex-column-container class via JS */
}

/* Style for the location name in details */
#details-name {
    margin-top: 0;
    margin-bottom: 10px;
    font-size: 1.2rem;
    border-bottom: 1px solid #eee;
    padding-bottom: 5px;
}

/* Style for the location description in details */
#details-description {
    margin-bottom: 15px;
    font-size: 0.9rem;
    color: #555;
}

/* Style for general buttons within details */
.details-button {
     padding: 8px;
     border: none;
     border-radius: 4px;
     font-size: 0.9rem;
     cursor: pointer;
     transition: background-color 0.3s ease;
}

/* Specific style for the Close button */
#details-close {
    background-color: #ccc; /* Grey */
    color: #333;
}
 #details-close:hover {
     background-color: #bbb;
 }

/* Directions panel specific */
#directions-ui {
    width: 100%;
}
.directions-inputs {
    display: flex;
    flex-direction: column;
    gap: 4px;
    margin-bottom: 8px;
}
.directions-results-list {
    list-style: none;
    padding: 0;
    margin: 0;
    max-height: 120px;
    overflow-y: auto;
}
.directions-results-list li {
    padding: 8px 0;
    cursor: pointer;
    border-bottom: 1px solid #eee;
}
.directions-results-list li:last-child {
    border-bottom: none;
}
.directions-results-list li:hover {
    background-color: #f0f0f0;
}

.directions-step-nav {
    display: grid;
    grid-template-columns: 1fr 1fr;
    gap: 10px;
}

#step-indicator {
    grid-column: span 2;
}
```

{% endcode %}

#### Explanation of style.css updates

* Styles for the new `#directions-ui` panel and its child elements are added:
  * `.directions-inputs` styles the input fields and results list for selecting origin and destination.
  * `.directions-results-list` styles the list of search results for the origin input.
  * `.directions-step-nav` and `#step-indicator` style the step navigation controls.

### Update script.js

Add the following logic for directions and UI state management:

{% code lineNumbers="true" %}

```javascript
// script.js

// Define options for the MapsIndoors Mapbox view
const mapViewOptions = {
    accessToken: 'YOUR_MAPBOX_ACCESS_TOKEN', // Replace with your Mapbox token
    element: document.getElementById('map'),
    // Initial map center (MapsPeople - Austin Office example)
    center: { lng: -97.74204591828197, lat: 30.36022358949809 },
    // Initial zoom level
    zoom: 17,
    // Maximum zoom level
    maxZoom: 22,
    // The zoom level at which MapsIndoors transitions
    mapsIndoorsTransitionLevel: 16
};

// Set the MapsIndoors API key
mapsindoors.MapsIndoors.setMapsIndoorsApiKey('YOUR_MAPSINDOORS_API_KEY'); // Replace with your MapsIndoors API key

// Create a new instance of the MapsIndoors Mapbox view
const mapViewInstance = new mapsindoors.mapView.MapboxV3View(mapViewOptions);

// Create a new MapsIndoors instance, passing the map view
const mapsIndoorsInstance = new mapsindoors.MapsIndoors({
    mapView: mapViewInstance,
    // Set the venue ID to load the map for a specific venue
    venue: 'YOUR_MAPSINDOORS_VENUE_ID', // Replace with your actual venue ID
});

/** Floor Selector **/

// Create a new HTML div element to host the floor selector
const floorSelectorElement = document.createElement('div');

// Create a new FloorSelector instance, linking it to the HTML element and the main MapsIndoors instance.
new mapsindoors.FloorSelector(floorSelectorElement, mapsIndoorsInstance);

// Get the underlying Mapbox map instance
const mapboxInstance = mapViewInstance.getMap();

// Add the floor selector HTML element to the Mapbox map using Mapbox's addControl method
// We wrap the element in an object implementing the IControl interface expected by addControl
mapboxInstance.addControl({
    onAdd: function () {
        // This function is called when the control is added to the map.
        // It should return the control's DOM element.
        return floorSelectorElement;
    },
    onRemove: function () {
        // This function is called when the control is removed from the map.
        // Clean up any event listeners or resources here.
        floorSelectorElement.parentNode.removeChild(floorSelectorElement);
    },
}, 'top-right'); // Optional: Specify a position ('top-left', 'top-right', 'bottom-left', 'bottom-right')

/** Handle Location Clicks **/

// Function to handle clicks on MapsIndoors locations
function handleLocationClick(location) {
    if (location && location.id) {
        // Move the map to the selected location
        mapsIndoorsInstance.goTo(location);
        // Ensure that the map shows the correct floor
        mapsIndoorsInstance.setFloor(location.properties.floor);
        // Select the location on the map
        mapsIndoorsInstance.selectLocation(location);

        // Show the details UI for the clicked location
        showDetails(location);
    }
}

// Add an event listener to the MapsIndoors instance for click events on locations
mapsIndoorsInstance.on('click', handleLocationClick);

/** Search Functionality **/

// Get references to the search input and results list elements
const searchInputElement = document.getElementById('search-input');
const searchResultsElement = document.getElementById('search-results');

// Initially hide the search results list
searchResultsElement.classList.add('hidden');

// Add an event listener to the search input for 'input' events
// This calls the onSearch function every time the user types in the input field
searchInputElement.addEventListener('input', onSearch);

// Function to perform the search and update the results list and map highlighting
function onSearch() {
    // Get the current value from the search input
    const query = searchInputElement.value;
    // Get the current venue from the MapsIndoors instance
    const currentVenue = mapsIndoorsInstance.getVenue();

    // Clear map highlighting
    mapsIndoorsInstance.highlight();
    // Deselect any selected location
    mapsIndoorsInstance.deselectLocation();

    // Check if the query is too short (less than 3 characters) or empty
    if (query.length < 3) {
        // Hide the results list if the query is too short or empty
        searchResultsElement.classList.add('hidden');
        return; // Stop here
    }

    // Define search parameters with the current input value
    // Include the current venue name in the search parameters
    const searchParameters = { q: query, venue: currentVenue ? currentVenue.name : undefined };

    // Call the MapsIndoors LocationsService to get locations based on the search query
    mapsindoors.services.LocationsService.getLocations(searchParameters).then(locations => {
        // Clear previous search results
        searchResultsElement.innerHTML = null;

        // If no locations are found, display a "No results found" message
        if (locations.length === 0) {
            const noResultsItem = document.createElement('li');
            noResultsItem.textContent = 'No results found';
            searchResultsElement.appendChild(noResultsItem);
            // Ensure the results list is visible to show the "No results found" message
            searchResultsElement.classList.remove('hidden');
            return; // Stop here if no results
        }

        // Append new search results to the list
        locations.forEach(location => {
            const listElement = document.createElement('li');
            // Display the location name
            listElement.innerHTML = location.properties.name;
            // Store the location ID on the list item for easy access
            listElement.dataset.locationId = location.id;

            // Add a click event listener to each list item
            listElement.addEventListener('click', function () {
                // Call the handleLocationClick function when a location in the search results is clicked.
                handleLocationClick(location);
            });

            searchResultsElement.appendChild(listElement);
        });

        // Show the results list now that it has content
        searchResultsElement.classList.remove('hidden');

        // Filter map to only display search results by highlighting them
        mapsIndoorsInstance.highlight(locations.map(location => location.id));
    })
        .catch(error => {
            console.error("Error fetching locations:", error);
            const errorItem = document.createElement('li');
            errorItem.textContent = 'Error performing search.';
            searchResultsElement.appendChild(errorItem);
            searchResultsElement.classList.remove('hidden');
        });
}

/** UI state management **/

const searchUIElement = document.getElementById('search-ui');
const detailsUIElement = document.getElementById('details-ui');
const directionsUIElement = document.getElementById('directions-ui');

function showSearchUI() {
    hideDetailsUI();
    hideDirectionsUI(); // Ensure directions UI is hidden
    searchUIElement.classList.remove('hidden');
    searchInputElement.focus();
}

function showDetailsUI() {
    hideSearchUI();
    hideDirectionsUI(); // Ensure directions UI is hidden
    detailsUIElement.classList.remove('hidden');
}

function hideSearchUI() {
    searchUIElement.classList.add('hidden');
}

function hideDetailsUI() {
    detailsUIElement.classList.add('hidden');
}

function showDirectionsUI() {
    hideSearchUI();
    hideDetailsUI();

    directionsUIElement.classList.remove('hidden');
}

function hideDirectionsUI() {

    directionsUIElement.classList.add('hidden');
}

/** Location Details **/

// Get references to the static details view elements
const detailsNameElement = document.getElementById('details-name');
const detailsDescriptionElement = document.getElementById('details-description');
const detailsCloseButton = document.getElementById('details-close');

detailsCloseButton.addEventListener('click', () => {
    mapsIndoorsInstance.deselectLocation(); // Deselect any selected location
    showSearchUI();
});

// Variable to store the location currently shown in details
let currentDetailsLocation = null;

// Show the details of a location
function showDetails(location) {
    // Keep track of the currently selected location
    currentDetailsLocation = location;
    detailsNameElement.textContent = location.properties.name;
    detailsDescriptionElement.textContent = location.properties.description || 'No description available.';
    showDetailsUI();
}

// Initial call to set up the search UI when the page loads
showSearchUI();

/** Directions Functionality **/

// Handles origin/destination selection, route calculation, and step navigation
const originInputElement = document.getElementById('origin-input');
const originResultsElement = document.getElementById('origin-results');
const destinationInputElement = document.getElementById('destination-input');
const getDirectionsButton = document.getElementById('get-directions');
const prevStepButton = document.getElementById('prev-step');
const nextStepButton = document.getElementById('next-step');
const stepIndicator = document.getElementById('step-indicator');
const directionsCloseButton = document.getElementById('directions-close');

let selectedOrigin = null;
let selectedDestination = null;
let currentRoute = null;
let directionsRenderer = null;

// Reference the details-directions button defined in the HTML
const detailsDirectionsButton = document.getElementById('details-directions');

detailsDirectionsButton.addEventListener('click', () => {
    showDirectionsPanel(currentDetailsLocation);
});

detailsCloseButton.addEventListener('click', showSearchUI);

directionsCloseButton.addEventListener('click', () => {
    hideDirectionsUI();
    showDetailsUI();
    if (directionsRenderer) directionsRenderer.setVisible(false);
});

// Show the directions panel and reset state for a new route
function showDirectionsPanel(destinationLocation) {
    selectedOrigin = null;
    selectedDestination = destinationLocation;
    currentRoute = null;
    destinationInputElement.value = destinationLocation.properties.name;
    originInputElement.value = '';
    originResultsElement.innerHTML = '';
    hideSearchUI();
    hideDetailsUI();
    showDirectionsUI();
    stepIndicator.textContent = '';
}

// Search for origin locations as the user types
originInputElement.addEventListener('input', onOriginSearch);
function onOriginSearch() {
    const query = originInputElement.value;
    const currentVenue = mapsIndoorsInstance.getVenue();
    originResultsElement.innerHTML = '';
    if (query.length < 3) return;
    const searchParameters = { q: query, venue: currentVenue ? currentVenue.name : undefined };
    mapsindoors.services.LocationsService.getLocations(searchParameters).then(locations => {
        if (locations.length === 0) {
            const noResultsItem = document.createElement('li');
            noResultsItem.textContent = 'No results found';
            originResultsElement.appendChild(noResultsItem);
            return;
        }
        locations.forEach(location => {
            const listElement = document.createElement('li');
            listElement.textContent = location.properties.name;
            listElement.addEventListener('click', () => {
                selectedOrigin = location;
                originInputElement.value = location.properties.name;
                originResultsElement.innerHTML = '';
            });
            originResultsElement.appendChild(listElement);
        });
    });
}

// Calculate and display the route when both origin and destination are selected
getDirectionsButton.addEventListener('click', async () => {
    if (!selectedOrigin || !selectedDestination) {
        // Optionally, show an alert or update stepIndicator instead
        stepIndicator.textContent = 'Please select both origin and destination.';
        return;
    }
    // Use anchor property for LatLngLiteral (anchor is always a point)
    const origin = {
        lat: selectedOrigin.properties.anchor.coordinates[1],
        lng: selectedOrigin.properties.anchor.coordinates[0],
        floor: selectedOrigin.properties.floor
    };
    const destination = {
        lat: selectedDestination.properties.anchor.coordinates[1],
        lng: selectedDestination.properties.anchor.coordinates[0],
        floor: selectedDestination.properties.floor
    };
    const directionsService = new mapsindoors.services.DirectionsService();
    const route = await directionsService.getRoute({ origin, destination });
    currentRoute = route;
    if (directionsRenderer) {
        directionsRenderer.setVisible(false);
    }

    directionsRenderer = new mapsindoors.directions.DirectionsRenderer({
        mapsIndoors: mapsIndoorsInstance,
        fitBounds: true,
        strokeColor: '#4285f4',
        strokeWeight: 5
    });

    await directionsRenderer.setRoute(route);
    directionsRenderer.setStepIndex(0, 0);
    showCurrentStep();
});

// Update the step indicator and enable/disable navigation buttons
function showCurrentStep() {
    if (currentRoute?.legs?.length < 1) return;
    const currentLegIndex = directionsRenderer.getLegIndex();
    const currentStepIndex = directionsRenderer.getStepIndex();
    const legs = currentRoute.legs;
    const steps = legs[currentLegIndex].steps;
    if (steps.length === 0) {
        stepIndicator.textContent = '';
        return;
    }
    stepIndicator.textContent = `Leg ${currentLegIndex + 1} of ${legs.length}, Step ${currentStepIndex + 1} of ${steps.length}`;
    prevStepButton.disabled = currentLegIndex === 0 && currentStepIndex === 0;
    nextStepButton.disabled = currentLegIndex === legs.length - 1 && currentStepIndex === steps.length - 1;
}

// Step navigation event listeners
prevStepButton.addEventListener('click', () => {
    if (!directionsRenderer) {
        return;
    }
    directionsRenderer.previousStep();
    showCurrentStep();

});
nextStepButton.addEventListener('click', () => {
    if (!directionsRenderer) {
        return;
    }
    directionsRenderer.nextStep();
    showCurrentStep();
});
```

{% endcode %}

**Explanation of script.js updates:**

* **UI State Management:**
  * New constants like `directionsUIElement` are added to reference the new directions panel in the DOM.
  * The existing UI state management functions (`showSearchUI()`, `showDetailsUI()`) are updated to explicitly hide the `directionsUIElement`.
  * New functions `showDirectionsUI()` and `hideDirectionsUI()` are introduced to manage the visibility of the directions panel, ensuring it's mutually exclusive with the search and details panels.
  * The "Get Directions" button (`detailsDirectionsButton`) in the details panel now has an event listener that calls `showDirectionsPanel()`, passing the `currentDetailsLocation` to pre-fill the destination.
  * The `directionsCloseButton` listener is added to hide the directions UI, show the details UI, and make the `directionsRenderer` invisible when directions are closed, providing a clear exit path.
* **Location Click Handling:**
  * The script maintains the unified click handler pattern established in previous steps. The `handleLocationClick` function continues to serve as the central entry point for user interactions with locations, responding to both map POI clicks and search result clicks.
  * This consistent pattern ensures that when a user clicks on a location (either on the map or in search results), the following actions always occur:
    * The map pans to the selected location using `mapsIndoorsInstance.goTo(location)`
    * The floor is set to the location's floor with `mapsIndoorsInstance.setFloor(location.properties.floor)`
    * The location is visually selected on the map using `mapsIndoorsInstance.selectLocation(location)`
    * The location details panel is shown via `showDetails(location)`
  * This unified approach ensures a consistent user experience regardless of how locations are selected.
* **Directions Panel and Origin/Destination Selection:**
  * New DOM element references are established for directions-related UI elements: `originInputElement`, `originResultsElement`, `destinationInputElement`, `getDirectionsButton`, `prevStepButton`, `nextStepButton`, `stepIndicator`, and `directionsCloseButton`.
  * State variables `selectedOrigin`, `selectedDestination`, `currentRoute`, and `directionsRenderer` are declared to manage the directions workflow state.
  * The `showDirectionsPanel(destinationLocation)` function resets the directions state, pre-fills the destination input with the selected location's name, and shows the directions UI.
  * An origin search is implemented with an `input` event listener on `originInputElement`, which calls the `onOriginSearch()` function. This function uses `mapsindoors.services.LocationsService.getLocations()` to search for origin locations, similar to the main search functionality.
* **Route Calculation:**
  * When the user clicks the "Show Route" button (`getDirectionsButton`), the script checks if both `selectedOrigin` and `selectedDestination` are set.
  * It extracts coordinates and floor information from the location objects' `properties.anchor` and `properties.floor`.
  * A new instance of `mapsindoors.services.DirectionsService()` is created.
  * The `getRoute()` method is called with origin and destination parameters to calculate the route.
  * The route is stored in the `currentRoute` variable for later reference.
* **Route Display and Step Navigation:**
  * Any existing `directionsRenderer` is hidden before creating a new one.
  * A new `mapsindoors.directions.DirectionsRenderer` is instantiated with the `mapsIndoorsInstance`, `fitBounds: true` for automatic map adjustment, and styling options.
  * The renderer is configured with the calculated route via `directionsRenderer.setRoute(route)`.
  * The renderer is set to display the first step of the first leg with `directionsRenderer.setStepIndex(0, 0)`.
  * The `showCurrentStep()` function updates the step indicator text and enables/disables the navigation buttons based on the current position in the route.
  * Event listeners for the navigation buttons call `directionsRenderer.previousStep()` and `directionsRenderer.nextStep()` respectively, followed by `showCurrentStep()` to update the UI.
* **Workflow Integration:**
  * The script carefully integrates the directions functionality with the existing search and details features.
  * The details panel now includes a "Get Directions" button that transitions to the directions workflow.
  * The directions panel allows users to return to the details view via the close button.
  * All three UI states (search, details, directions) are mutually exclusive, providing a clear and focused user interface.

These updates allow users to search for a location, view its details, and get step-by-step directions between two locations within your venue, all within a clear and interactive UI.

### Expected Outcome

* Users can search for a location, view its details, and click "Get Directions" to open the directions panel.
* When the directions panel opens from the details view, the destination input is pre-filled with the selected location's name and is disabled.
* The user can type in the origin input to search for and select an origin location.
* After both origin and destination are selected, clicking "Show Route" calculates and displays the route on the map.
* The map updates to show the full route, and the step navigation controls become active.
* Users can use the "Previous" and "Next" buttons to step through the route, with the map highlighting the current step and the `step-indicator` updating accordingly.
* Only one panel (search, details, or directions) is visible at a time.
* Clicking the "Close Directions" button returns to the details panel and hides the route from the map.

### Troubleshooting

* If the route is not shown after clicking "Show Route", ensure both origin and destination are selected and that the locations have valid anchor coordinates.
* If the map does not update, check for errors in the browser console and verify your API keys and venue ID.
* If the UI panels do not switch as expected, ensure the show/hide functions are called correctly and that the correct classes are applied.

{% embed url="<https://codesandbox.io/p/sandbox/github/MapsPeople/mapsindoors-getting-started-for-web/tree/main/sdk/mapbox/4-getting-directions>" %}


# Using Google Maps


# Display a map

**Goal:** This guide will walk you through initializing the MapsIndoors SDK and displaying your first interactive indoor map using Google Maps as the map provider.

**SDK Concepts Introduced:**

* Setting the MapsIndoors API Key using `mapsindoors.MapsIndoors.setMapsIndoorsApiKey()`
* Initializing the Google Maps map view using `mapsindoors.mapView.GoogleMapsView`.
* Creating the main `mapsindoors.MapsIndoors` instance.
* Adding a `mapsindoors.FloorSelector` control.
* Using `mapsIndoorsInstance.goTo()` to pan and zoom the map to the selected location.
* Handling map clicks to center the map on a clicked POI (location) using `mapsIndoorsInstance.on('click', callback)`

### Prerequisites

* Completion of the [Set Up Your Environment](/sdks-and-frameworks/web/tutorial/set-up-your-environment) guide.
* You will need a **Google Maps JavaScript API Key**. If you don't have one, you can create one in the [Google Cloud Console](https://console.cloud.google.com/).
* You will need a **MapsIndoors API Key**. For this tutorial, you can use the demo API key: `02c329e6777d431a88480a09`.

### The Code

To display the map, you'll need to update your `index.html`, `style.css`, and `script.js` files as follows.

#### Update index.html

Open your `index.html` file. You need to include the Google Maps JavaScript API and ensure there's a `<div>` element to contain the map.

```html
<!-- index.html -->
<!DOCTYPE html>
<html lang="en">
<head>
    <meta charset="UTF-8">
    <meta name="viewport" content="width=device-width, initial-scale=1.0">
    <title>MapsIndoors</title>
    <link rel="stylesheet" href="style.css">
    <!-- Google Maps JavaScript API -->
    <script src="https://maps.googleapis.com/maps/api/js?libraries=geometry&key=YOUR_GOOGLE_MAPS_API_KEY"></script>
    <!-- MapsIndoors SDK (already included from initial setup) -->
    <script src="https://app.mapsindoors.com/mapsindoors/js/sdk/4.41.0/mapsindoors-4.41.0.js.gz"
            integrity="sha384-3lk3cwVPj5MpUyo5T605mB0PMHLLisIhNrSREQsQHjD9EXkHBjz9ETgopmTbfMDc"
            crossorigin="anonymous"></script>

</head>
<body>
    <!-- This div will hold your map -->
    <div id="map"></div>
    <script src="script.js"></script>
</body>
</html>
```

**Explanation of index.html updates:**

* The Google Maps JavaScript API is included with your API key. Replace `YOUR_GOOGLE_MAPS_API_KEY` with your actual key.
* The MapsIndoors SDK script (`mapsindoors-4.41.0.js.gz`) should already be present from the initial setup guide. You can always check the [MapsIndoors SDK reference documentation](https://app.mapsindoors.com/mapsindoors/js/sdk/latest/docs/index.html) for the latest SDK version.
* An empty `<div>` with the attribute `id="map"` was added inside the `<body>`. This `div` is crucial as it serves as the container where both the Google base map and the MapsIndoors layers will be rendered.

#### Update style.css

Update your `style.css` file to ensure the `#map` element fills the available space. This is necessary for the map to be visible.

```css
/* style.css */

/* Use flexbox for the main layout (from initial setup) */
html, body {
    height: 100%;
    margin: 0;
    padding: 0;
    overflow: hidden; /* Prevent scrollbars if map is full size */
    display: flex;
    flex-direction: column; /* Stack children vertically if needed later */
}

/* Style for the map container */
#map {
  /* Make map fill available space within its flex parent (body) */
  flex-grow: 1;
  width: 100%; /* Make map fill width */
  margin: 0;
  padding: 0;
}
```

**Explanation of style.css updates:**

* The styles for the `#map` container are added. These styles define how the map container behaves within the flexbox layout established in the initial setup (`html, body` styles).
* `flex-grow: 1;` is a key flexbox property that allows the map container to expand and fill the available vertical space within its parent (`body`).
* `width: 100%;` ensures the map fills the full horizontal width of its container.
* `margin: 0;` and `padding: 0;` remove any default browser spacing around the map container, ensuring it fits snugly.

#### Add JavaScript to script.js

Open your `script.js` file and add the following JavaScript code. This code will initialize the Google Map, then create the MapsIndoors view and instance, and finally add a Floor Selector.

Remember to replace `YOUR_MAPSINDOORS_API_KEY` with your MapsIndoors API key if not using the demo key. For testing, the demo MapsIndoors API key `02c329e6777d431a88480a09` and the Austin office venue ID `dfea941bb3694e728df92d3d` are used.

```javascript
// script.js

// Define options for the MapsIndoors Google Maps view
const mapViewOptions = {
    element: document.getElementById('map'),
    // Initial map center (MapsPeople - Austin Office example)
    center: { lng: -97.74204591828197, lat: 30.36022358949809 },
    zoom: 17,
    maxZoom: 22,
};

// Set the MapsIndoors API key
mapsindoors.MapsIndoors.setMapsIndoorsApiKey('YOUR_MAPSINDOORS_API_KEY');

// Create a new instance of the MapsIndoors Google Maps view
const mapViewInstance = new mapsindoors.mapView.GoogleMapsView(mapViewOptions);

// Create a new MapsIndoors instance, linking it to the map view.
// This is the main object for interacting with MapsIndoors functionalities.
const mapsIndoorsInstance = new mapsindoors.MapsIndoors({
    mapView: mapViewInstance,
    // Set the venue ID to load the map for a specific venue
    venue: 'YOUR_MAPSINDOORS_VENUE_ID', // Replace with your actual venue ID
});

/** Floor Selector **/

// Create a new HTML div element to host the floor selector
const floorSelectorElement = document.createElement('div');

// Create a new FloorSelector instance, linking it to the HTML element and the main MapsIndoors instance.
new mapsindoors.FloorSelector(floorSelectorElement, mapsIndoorsInstance);

// Get the underlying Google Maps instance
const googleMapInstance = mapViewInstance.getMap();

// Add the floor selector HTML element to the Google Maps controls.
googleMapInstance.controls[google.maps.ControlPosition.TOP_RIGHT].push(floorSelectorElement);

/** Handle Location Clicks on Map **/

// Handle Location Clicks on Map
function handleLocationClick(location) {
    if (location && location.id) {
        mapsIndoorsInstance.goTo(location); // Center the map on the clicked location
    }
}

// Add an event listener to the MapsIndoors instance for click events on locations
mapsIndoorsInstance.on('click', handleLocationClick);
```

**Explanation of script.js updates:**

* `const mapViewOptions = { ... }`: This object defines essential configuration options for the MapsIndoors Google Maps view.
  * `element`: The HTML DOM element (our `<div id="map">`) where the map will be rendered.
  * `center`, `zoom`, `maxZoom`: Standard map parameters to set the initial view.
  * For more details on all available options, see the [`mapsindoors.mapView.GoogleMapsView` class documentation](https://app.mapsindoors.com/mapsindoors/js/sdk/latest/docs/mapsindoors.mapView.GoogleMapsView.html).
* `mapsindoors.MapsIndoors.setMapsIndoorsApiKey('YOUR_MAPSINDOORS_API_KEY');`: This static method sets your MapsIndoors API key globally for the SDK. This key authenticates your requests to MapsIndoors services. See the [`mapsindoors.MapsIndoors` class reference](https://app.mapsindoors.com/mapsindoors/js/sdk/latest/docs/MapsIndoors.html).
* `const mapViewInstance = new mapsindoors.mapView.GoogleMapsView(mapViewOptions);`: This line creates an instance of `GoogleMapsView`, which is responsible for integrating MapsIndoors data and rendering with a Google Map. For more details on `GoogleMapsView`, see its [class reference](https://app.mapsindoors.com/mapsindoors/js/sdk/latest/docs/mapsindoors.mapView.GoogleMapsView.html).
* `const mapsIndoorsInstance = new mapsindoors.MapsIndoors({ mapView: mapViewInstance, venue: 'YOUR_MAPSINDOORS_VENUE_ID' });`: This creates the main `MapsIndoors` instance. This object is your primary interface for interacting with MapsIndoors functionalities like displaying locations, getting directions, etc. See the [`mapsindoors.MapsIndoors` class documentation](https://app.mapsindoors.com/mapsindoors/js/sdk/latest/docs/MapsIndoors.html).
* **Floor Selector Integration:**
  * `const floorSelectorElement = document.createElement('div');`: A new HTML `div` element is dynamically created. This element will serve as the container for the Floor Selector UI.
  * `new mapsindoors.FloorSelector(floorSelectorElement, mapsIndoorsInstance);`: This instantiates the `FloorSelector` control. It takes the HTML element to render into and the `mapsIndoorsInstance` to interact with (e.g., to know available floors and change the current floor). For more details on `FloorSelector`, see its [class reference](https://app.mapsindoors.com/mapsindoors/js/sdk/latest/docs/mapsindoors.FloorSelector.html).
  * `const googleMapInstance = mapViewInstance.getMap();`: The `getMap()` method on our `mapViewInstance` returns the underlying native Google Maps `Map` object. This is necessary to use Google Maps-specific functionalities.
  * `googleMapInstance.controls[google.maps.ControlPosition.TOP_RIGHT].push(floorSelectorElement);`: This uses the native Google Maps controls API to add our `floorSelectorElement` to the map UI in the top-right corner. For more details, refer to the [Google Maps JavaScript API documentation on controls](https://developers.google.com/maps/documentation/javascript/controls).
  * **Click-to-Center Functionality:**
  * `function handleLocationClick(location) { ... }`: This function is called whenever a location (POI) on the map is clicked. It checks that the clicked object is a valid MapsIndoors location and then calls `mapsIndoorsInstance.goTo(location)` to center the map on that location.
  * `mapsIndoorsInstance.on('click', handleLocationClick);`: This line registers the click handler so that clicking any POI on the map will smoothly center the map on that location. This pattern will be reused and expanded in later steps.

### Expected Outcome

After completing these steps and opening your `index.html` file in a web browser, you should see:

* An interactive map centered on the MapsPeople Austin Office.
* A Floor Selector control visible in the top-right corner of the map, allowing you to switch between different floors of the venue.
* Clicking on any POI or location marker on the map will center the map on that location.

### Troubleshooting

* **Map doesn't load / blank page:**
  * Check your browser's developer console (usually F12) for any error messages.
  * Verify that `YOUR_MAPSINDOORS_API_KEY` is correctly set (or the demo key is used).
  * Double-check all CDN links in `index.html` are correct and accessible.
* **Floor selector doesn't appear:**
  * Verify the JavaScript code for creating and adding the floor selector has no typos.
  * Check the console for errors related to `FloorSelector` or Google Maps controls.
* **Clicking a location does not center the map:**
  * Ensure the `handleLocationClick` function is correctly defined and registered as an event listener.
  * Check for any JavaScript errors in the console that might indicate issues with the click handling code.

{% embed url="<https://codesandbox.io/p/sandbox/github/MapsPeople/mapsindoors-getting-started-for-web/tree/main/sdk/google.maps/1-display-a-map>" %}

### Next Steps

You have successfully displayed a MapsIndoors map with Google Maps and added a floor selector! This is the foundational step for building more complex indoor mapping applications.

Next, you will learn how to add search functionality to your map:

* Step 2: [Create a Search Experience](/sdks-and-frameworks/web/tutorial/using-google-maps/create-a-search-experience)


# Create a Search Experience

**Goal:** This guide will show you how to add a search input field to your map application, allowing users to find locations within your venue. Search results will be displayed in a list and highlighted on the map.

**SDK Concepts Introduced:**

* Using `mapsindoors.services.LocationsService.getLocations()` to fetch locations based on a query.
* Interacting with the map based on search results:
  * Highlighting multiple locations: `mapsIndoorsInstance.highlight()`.
  * Setting the floor: `mapsIndoorsInstance.setFloor()`.
  * Selecting a specific location: `mapsIndoorsInstance.selectLocation()`.
* Clearing previous highlights and selections: `mapsIndoorsInstance.highlight()` (with no arguments) and `mapsIndoorsInstance.deselectLocation()`.
* Getting current venue information: `mapsIndoorsInstance.getVenue()`.

### Prerequisites

* Completion of [Step 1: Display a Map](/sdks-and-frameworks/web/tutorial/using-google-maps/display-a-map).
* Your MapsIndoors API Key and Google Maps JavaScript API Key should be correctly set up as per Step 1. We will continue using the demo API key `02c329e6777d431a88480a09` and venue ID `dfea941bb3694e728df92d3d` for this example.

### The Code

This guide details the modifications to HTML, CSS, and JavaScript needed to add a search input field, display search results, and dynamically interact with the map based on user searches.

#### Update index.html

Open your `index.html` file. The primary structural change to your HTML is the introduction of a dedicated search panel. This panel will house the input field where users type their search queries and an unordered list where the corresponding search results will appear.

{% code lineNumbers="true" %}

```html
<!-- index.html -->
<!DOCTYPE html>
<html lang="en">

<head>
    <meta charset="UTF-8">
    <meta name="viewport" content="width=device-width, initial-scale=1.0">
    <title>MapsIndoors</title>
    <link rel="stylesheet" href="style.css">
    <script src="https://maps.googleapis.com/maps/api/js?libraries=geometry&key=YOUR_GOOGLE_MAPS_API_KEY"></script>
    <script src="https://app.mapsindoors.com/mapsindoors/js/sdk/4.41.0/mapsindoors-4.41.0.js.gz"
            integrity="sha384-3lk3cwVPj5MpUyo5T605mB0PMHLLisIhNrSREQsQHjD9EXkHBjz9ETgopmTbfMDc"
            crossorigin="anonymous"></script>
</head>

<body>
    <div id="map"></div>

    <!-- New search panel for user interaction -->
    <div class="panel">
        <div id="search-ui" class="flex-column">
            <!-- Input field for users to type search queries -->
            <input type="text" id="search-input" placeholder="Search for a location...">
            <!-- Unordered list to display search results dynamically -->
            <ul id="search-results"></ul>
        </div>
    </div>

    <script src="script.js"></script>
</body>

</html>
```

{% endcode %}

**Explanation of index.html updates:**

* A new `div` element with the class `panel` is added. This `div` serves as the main container for all search-related UI elements.
* Inside the `panel`, another `div` with the id `search-ui` and the class `flex-column` is introduced to arrange the search input and results list vertically.
* An `<input>` element with `id="search-input"` is the text field for user search queries.
* An `<ul>` (unordered list) element with `id="search-results"` will be dynamically populated with locations matching the user's query.

### Update style.css

Modify your `style.css` file to incorporate styles for the newly added search panel and its contents. These styles are crucial for ensuring the search interface is user-friendly, visually appealing, and correctly positioned over the map without obstructing it entirely.

{% code lineNumbers="true" %}

```css
/* style.css */

/* Use flexbox for the main layout */
html, body {
    height: 100%;
    margin: 0;
    padding: 0;
    overflow: hidden; /* Prevent scrollbars if map is full size */
    display: flex;
    flex-direction: column; /* Stack children vertically if needed later */
}

/* Style for the map container */
#map {
  /* Make map fill available space */
  flex-grow: 1;
  width: 100%; /* Make map fill width */
  margin: 0;
  padding: 0;
}


/* Style for the information panel container */
.panel {
    position: absolute; /* Positions the panel relative to the nearest positioned ancestor (or body if none). This allows it to float over the map. */
    top: 10px; /* Adds a 10px margin from the top edge of its containing element. */
    left: 10px; /* Adds a 10px margin from the left edge of its containing element, placing it in the top-left corner. */
    z-index: 10; /* Ensures the panel appears on top of other elements, like the map itself, which might have lower z-index values. */
    background-color: white; /* Sets a solid white background for the panel, making text readable. */
    padding: 10px; /* Adds 10px of space inside the panel, around its content. */
    border-radius: 5px; /* Rounds the corners of the panel for a softer look. */
    box-shadow: 0 2px 5px rgba(0,0,0,0.2); /* Adds a subtle shadow effect, giving the panel a sense of depth. */
    max-height: 80%; /* Limits max-height to prevent overflow with details */
    overflow-y: auto; /* Adds a vertical scrollbar if the content inside the panel exceeds its max-height. */
    border: 1px solid #ccc; /* Adds a light gray border around the panel for better visual separation. */
    width: 300px; /* Sets a fixed width for the panel. */
}

/* Class to apply flex display and column direction */
.flex-column {
    display: flex; /* Enables flexbox layout for this element. */
    flex-direction: column; /* Arranges child elements in a vertical column. */
    gap: 10px; /* Adds a 10px gap between child elements within the flex container. */
}

/* Class to hide elements */
.hidden {
    display: none; /* Makes elements with this class invisible and removes them from the layout. */
}

/* Style for the search input field */
#search-input {
    padding: 8px; /* Adds 8px of internal padding to the input field for better text spacing. */
    border: 1px solid #ccc; /* Adds a light gray border around the input field. */
    border-radius: 4px; /* Slightly rounds the corners of the input field. */
    font-size: 1rem; /* Sets the font size within the input field to a standard readable size. */
}

/* Style for the search results list */
#search-results {
    list-style: none; /* Removes the default bullet points from the unordered list. */
    padding: 0; /* Removes default padding from the list. */
    margin: 0; /* Removes default margins from the list. */
}

/* Style for individual search result items */
#search-results li {
    padding: 8px 0; /* Adds vertical padding to each list item for spacing. */
    cursor: pointer; /* Changes the mouse cursor to a pointer on hover, indicating the item is clickable. */
    border-bottom: 1px solid #eee; /* Adds a light gray line below each list item, acting as a separator. */
}

/* Style for the last search result item (no bottom border) */
#search-results li:last-child {
    border-bottom: none; /* Removes the bottom border from the last item in the list for a cleaner look. */
}

/* Hover effect for search result items */
#search-results li:hover {
    background-color: #f0f0f0; /* Changes the background color of a list item when hovered, providing visual feedback. */
}
```

{% endcode %}

**Explanation of style.css updates:**

* **`.panel`**: Styles the search panel to float over the map in the top-left corner, with a white background, padding, rounded corners, and a shadow for a modern look. `max-height` and `overflow-y: auto` ensure it's scrollable if results are numerous.
* **`.flex-column`**: A utility class using Flexbox to stack child elements (search input, results list) vertically with a small gap.
* **`.hidden`**: A utility class to hide elements (`display: none;`), used initially for the search results list.
* **`#search-input`**: Styles the search input field with padding, border, and font size for readability.
* **`#search-results`**: Styles the unordered list for search results, removing default list styling.
* **`#search-results li`**: Styles individual list items with padding, a bottom border for separation, and a pointer cursor to indicate clickability.
* **`#search-results li:last-child`**: Removes the bottom border from the last list item.
* **`#search-results li:hover`**: Provides a hover effect for list items for better user feedback.

### Update script.js

The `script.js` file sees the most significant changes as it houses the logic for the search functionality.

{% code lineNumbers="true" %}

```javascript
// script.js

// Define options for the MapsIndoors Google Maps view
const mapViewOptions = {
    element: document.getElementById('map'),
    center: { lng: -97.74204591828197, lat: 30.36022358949809 },
    zoom: 17,
    maxZoom: 22,
};

// Set the MapsIndoors API key
mapsindoors.MapsIndoors.setMapsIndoorsApiKey('YOUR_MAPSINDOORS_API_KEY'); // Replace with your MapsIndoors API key

// Create a new instance of the MapsIndoors Google Maps view
const mapViewInstance = new mapsindoors.mapView.GoogleMapsView(mapViewOptions);

// Create a new MapsIndoors instance, passing the map view
const mapsIndoorsInstance = new mapsindoors.MapsIndoors({
    mapView: mapViewInstance,
    // Set the venue ID to load the map for a specific venue
    venue: 'YOUR_MAPSINDOORS_VENUE_ID', // Replace with your actual venue ID
});

/** Floor Selector **/

// Create a new HTML div element to host the floor selector
const floorSelectorElement = document.createElement('div');

// Create a new FloorSelector instance, linking it to the HTML element and the main MapsIndoors instance.
new mapsindoors.FloorSelector(floorSelectorElement, mapsIndoorsInstance);

// Get the underlying Google Maps instance
const googleMapInstance = mapViewInstance.getMap();

// Add the floor selector HTML element to the Google Maps controls.
googleMapInstance.controls[google.maps.ControlPosition.TOP_RIGHT].push(floorSelectorElement);

/** Handle Location Clicks **/

// Function to handle clicks on MapsIndoors locations
function handleLocationClick(location) {
    if (location && location.id) {
        // Move the map to the selected location
        mapsIndoorsInstance.goTo(location);
        // Ensure that the map shows the correct floor
        mapsIndoorsInstance.setFloor(location.properties.floor);
        // Select the location on the map
        mapsIndoorsInstance.selectLocation(location);
    }
}

// Add an event listener to the MapsIndoors instance for click events on locations
mapsIndoorsInstance.on('click', handleLocationClick);

/** Search Functionality **/

// Get references to the search input and results list elements
const searchInputElement = document.getElementById('search-input');
const searchResultsElement = document.getElementById('search-results');

// Initially hide the search results list
searchResultsElement.classList.add('hidden');

// Add an event listener to the search input for 'input' events
// This calls the onSearch function every time the user types in the input field
searchInputElement.addEventListener('input', onSearch);

// Function to perform the search and update the results list and map highlighting
function onSearch() {
    // Get the current value from the search input
    const query = searchInputElement.value;
    // Get the current venue from the MapsIndoors instance
    const currentVenue = mapsIndoorsInstance.getVenue();

    // Clear map highlighting
    mapsIndoorsInstance.highlight();
    // Deselect any selected location
    mapsIndoorsInstance.deselectLocation();

    // Check if the query is too short (less than 3 characters) or empty
    if (query.length < 3) {
        // Hide the results list if the query is too short or empty
        searchResultsElement.classList.add('hidden');
        return; // Stop here
    }

    // Define search parameters with the current input value
    // Include the current venue name in the search parameters
    const searchParameters = { q: query, venue: currentVenue ? currentVenue.name : undefined };

    // Call the MapsIndoors LocationsService to get locations based on the search query
    mapsindoors.services.LocationsService.getLocations(searchParameters).then(locations => {
        // Clear previous search results
        searchResultsElement.innerHTML = null;

        // If no locations are found, display a "No results found" message
        if (locations.length === 0) {
            const noResultsItem = document.createElement('li');
            noResultsItem.textContent = 'No results found';
            searchResultsElement.appendChild(noResultsItem);
            // Ensure the results list is visible to show the "No results found" message
            searchResultsElement.classList.remove('hidden');
            return; // Stop here if no results
        }

        // Append new search results to the list
        locations.forEach(location => {
            const listElement = document.createElement('li');
            // Display the location name
            listElement.innerHTML = location.properties.name;
            // Store the location ID on the list item for easy access
            listElement.dataset.locationId = location.id;

            // Add a click event listener to each list item
            listElement.addEventListener('click', function () {
                // Call the handleLocationClick function when a location in the search results is clicked.
                handleLocationClick(location);
            });

            searchResultsElement.appendChild(listElement);
        });

        // Show the results list now that it has content
        searchResultsElement.classList.remove('hidden');

        // Filter map to only display search results by highlighting them
        mapsIndoorsInstance.highlight(locations.map(location => location.id));
    })
        .catch(error => {
            console.error("Error fetching locations:", error);
            const errorItem = document.createElement('li');
            errorItem.textContent = 'Error performing search.';
            searchResultsElement.appendChild(errorItem);
            searchResultsElement.classList.remove('hidden');
        });
}
```

{% endcode %}

**Explanation of script.js updates:**

* **DOM Element References**: `searchInputElement` and `searchResultsElement` get references to the HTML input field and the unordered list for displaying results, respectively.
* **Initial State**: The `searchResultsElement` is hidden by default using the `.hidden` CSS class.
* **Event Listener**: An `input` event listener is attached to `searchInputElement`. This calls the `onSearch` function each time the user types into the search field.
* **`onSearch()` Function**: This is the core of the search logic:
  * It retrieves the current `query` from the input field and gets the `currentVenue` using `mapsIndoorsInstance.getVenue()`. For more details on venue information, see the [`getVenue()` reference](https://app.mapsindoors.com/mapsindoors/js/sdk/latest/docs/MapsIndoors.html#getVenue).
  * It clears any existing highlights from the map using `mapsIndoorsInstance.highlight()` (called without arguments). See its [API documentation](https://app.mapsindoors.com/mapsindoors/js/sdk/latest/docs/MapsIndoors.html#highlight) for more on clearing highlights.
  * It deselects any currently selected location using `mapsIndoorsInstance.deselectLocation()`. Refer to its [API documentation](https://app.mapsindoors.com/mapsindoors/js/sdk/latest/docs/MapsIndoors.html#deselectLocation) for deselection behavior.
  * If the `query` length is less than 3 characters, it hides the `searchResultsElement` and exits to prevent overly broad or empty searches.
  * It prepares `searchParameters` with the `q` (query) and scopes the search to the `currentVenue.name`. For a comprehensive list of search options, check out the [LocationsService.getLocations() documentation](https://app.mapsindoors.com/mapsindoors/js/sdk/latest/docs/mapsindoors.services.LocationsService.html#.getLocations)
  * It calls `mapsindoors.services.LocationsService.getLocations(searchParameters)` to fetch locations. This asynchronous method returns a Promise.
  * **`.then(locations => { ... })`**: This block handles the successful response from the LocationsService. `locations` is an array of objects, where each object conforms to the [Location interface](https://app.mapsindoors.com/mapsindoors/js/sdk/latest/docs/mapsindoors.Location.html).
    * It clears previous search results by setting `searchResultsElement.innerHTML = null`.
    * If no `locations` are found, it displays a "No results found" message in the list.
    * Otherwise, it iterates through each `location` object:
      * Creates an `<li>` element.
      * Sets its `innerHTML` to `location.properties.name`. The `properties` object on an object conforming to the `Location` interface contains various details about the location. For more information, see the [Location documentation](https://app.mapsindoors.com/mapsindoors/js/sdk/latest/docs/mapsindoors.Location.html).
      * Stores `location.id` in `listElement.dataset.locationId` for potential future use.
      * Adds a `click` event listener to the list item. When clicked:
        * `mapsIndoorsInstance.goTo(location)`: Pans and zooms the map to the clicked location. For more details on `goTo()`, see its [reference](https://app.mapsindoors.com/mapsindoors/js/sdk/latest/docs/MapsIndoors.html#goTo).
        * `mapsIndoorsInstance.setFloor(location.properties.floor)`: Changes the map to the location's floor. To understand floor management, check the [`setFloor()` documentation](https://app.mapsindoors.com/mapsindoors/js/sdk/latest/docs/MapsIndoors.html#setFloor).
        * `mapsIndoorsInstance.selectLocation(location)`: Selects and highlights this specific location on the map. For further information, refer to the [`selectLocation()` API documentation](https://app.mapsindoors.com/mapsindoors/js/sdk/latest/docs/MapsIndoors.html#selectLocation).
      * Appends the new list item to `searchResultsElement`.
      * Collects all `location.id`s into `locationIdsToHighlight`.
    * Makes the `searchResultsElement` visible by removing the `.hidden` class.
    * Calls `mapsIndoorsInstance.highlight(locationIdsToHighlight)` to highlight all found locations on the map simultaneously. The `highlight()` method accepts an array of location IDs. See its [API documentation](https://app.mapsindoors.com/mapsindoors/js/sdk/latest/docs/MapsIndoors.html#highlight) for details on batch highlighting.
  * **`.catch(error => { ... })`**: Handles potential errors during the search request, logging them to the console and displaying an error message in the list.
* The `handleLocationClick` function is now used for both map clicks and search result clicks, ensuring consistent behavior and code reuse.
* When a user clicks a search result or a POI on the map, the map will center on that location, switch to the correct floor, and select the location.
* This pattern will be reused and expanded in later steps.

### Expected Outcome

After implementing these changes:

* A search panel will be visible in the top-left corner of your map.
* Typing 3 or more characters into the search input will trigger a search.
* Matching locations will appear as a clickable list below the search input.
* All matching locations will be highlighted on the map.
* Clicking a location in the list will:
  * Pan and zoom the map to that location.
  * Switch to the correct floor if necessary.
  * Select and distinctively highlight that specific location on the map.

### Troubleshooting

* **Search not working / No results:**
  * Check the browser's developer console (F12) for errors.
  * Ensure your MapsIndoors API Key (`02c329e6777d431a88480a09` for demo) is correct and the MapsIndoors SDK is loaded.
  * Verify `YOUR_GOOGLE_MAPS_API_KEY` is correct.
  * Confirm the `venue` ID (`dfea941bb3694e728df92d3d` for demo) is valid and the venue has searchable locations.
  * Make sure the `onSearch` function is being called (e.g., add a `console.log` at the beginning of `onSearch`).
* **Results list doesn't appear or looks wrong:**
  * Check CSS for the `.panel`, `#search-results`, and `li` elements. Ensure the `.hidden` class is being correctly added/removed.
* **Map interactions (goTo, highlight, selectLocation) not working:**
  * Verify `mapsIndoorsInstance` is correctly initialized.
  * Ensure the `location` objects passed to these methods are valid objects conforming to the `Location` interface.
  * Check for console errors when clicking a search result.

{% embed url="<https://codesandbox.io/p/sandbox/github/MapsPeople/mapsindoors-getting-started-for-web/tree/main/sdk/google.maps/2-create-a-search-experience>" %}

### Next Steps

You've now successfully added a powerful search feature to your indoor map! Users can easily find their way to specific points of interest.

Next, learn how to display detailed information about a selected location:

* Step 3: [Show the Details](/sdks-and-frameworks/web/tutorial/using-google-maps/show-the-details)


# Show the Details

**Goal:** This guide demonstrates how to display detailed information about a location when a user selects it from the search results or clicks a POI on the map. The details will include the location's name and description, and the map will navigate to and highlight the selected location.

**SDK Classes and Methods Introduced:**

* Retrieving and displaying specific location properties (e.g., `location.properties.name`, `location.properties.description`) within a dedicated details panel.
* Applying `mapsIndoorsInstance.deselectLocation()` to manage map state when closing the details view.

**Implementation Patterns:**

* Expanding the unified click handler to show location details
* Implementing UI state management between search and details views
* Creating a responsive details panel UI
* Handling transitions between different UI states

### Prerequisites

* Completion of [Step 2: Create a Search Experience](/sdks-and-frameworks/web/tutorial/using-google-maps/create-a-search-experience).
* Your MapsIndoors API Key and Google Maps API Key should be correctly set up. We will continue using the demo API key `02c329e6777d431a88480a09` and venue ID `dfea941bb3694e728df92d3d` for this example.

### The Code

This step involves modifications to `index.html` to add elements for displaying details, `style.css` to style these new elements, and `script.js` to handle the logic of fetching and displaying location details and interacting with the map.

#### Unified Click Handler Pattern

In Step 1, we introduced a reusable click handler (`handleLocationClick`) for POIs on the map. In Step 2, we reused this handler for search result clicks. In this step, we expand the handler to show a details panel with more information about the selected location, and manage the UI state.

#### Update index.html

Open your `index.html` file. We will add a new `div` within the existing `.panel` to hold the location details. This `div` will be hidden by default and shown when a location is selected.

{% code lineNumbers="true" %}

```html
<!-- index.html -->
<!DOCTYPE html>
<html lang="en">

<head>
    <meta charset="UTF-8">
    <meta name="viewport" content="width=device-width, initial-scale=1.0">
    <title>MapsIndoors</title>
    <link rel="stylesheet" href="style.css">
    <script src="https://maps.googleapis.com/maps/api/js?libraries=geometry&key=YOUR_GOOGLE_MAPS_API_KEY"></script>
    <script src="https://app.mapsindoors.com/mapsindoors/js/sdk/4.41.0/mapsindoors-4.41.0.js.gz"
            integrity="sha384-3lk3cwVPj5MpUyo5T605mB0PMHLLisIhNrSREQsQHjD9EXkHBjz9ETgopmTbfMDc"
            crossorigin="anonymous"></script>
</head>
<body>
    <div id="map"></div>
    <div class="panel">
        <div id="search-ui" class="flex-column">
            <input type="text" id="search-input" placeholder="Search for a location...">
            <ul id="search-results"></ul>
        </div>

        <!-- New Details UI - initially hidden -->
        <div id="details-ui" class="hidden flex-column">
            <h3 id="details-name"></h3>
            <p id="details-description"></p>
            <button id="details-close" class="details-button">Close</button>
        </div>
    </div>

    <script src="script.js"></script>
</body>

</html>
```

{% endcode %}

**Explanation of index.html updates:**

* The existing search input and results list are wrapped in a `div` with `id="search-ui"` and class `flex-column`. This helps in managing the visibility of the entire search section.
* A new `div` with `id="details-ui"` is added within the `.panel`. This container will hold the location's name, description, and a close button.
  * It has the class `hidden` to be invisible by default.
  * It also has `flex-column` for layout consistency.
* Inside `#details-ui`:
  * `<h3 id="details-name"></h3>`: For displaying the location name.
  * `<p id="details-description"></p>`: For displaying the location description.
  * `<button id="details-close" class="details-button">Close</button>`: A button to close the details view and return to the search results.

#### Update style.css

Modify your `style.css` file to add styles for the new location details UI elements.

{% code lineNumbers="true" %}

```css
/* style.css */

/* Use flexbox for the main layout */
html, body {
    height: 100%;
    margin: 0;
    padding: 0;
    overflow: hidden; /* Prevent scrollbars if map is full size */
    display: flex;
    flex-direction: column; /* Stack children vertically if needed later */
}

/* Style for the map container */
#map {
  /* Make map fill available space */
  flex-grow: 1;
  width: 100%; /* Make map fill width */
  margin: 0;
  padding: 0;
}

/* Style for the information panel container */
.panel {
    position: absolute; /* Position over the map */
    top: 10px; /* Distance from the top */
    left: 10px; /* Distance from the left */
    z-index: 10; /* Ensure it's above the map and other elements */
    background-color: white; /* White background for readability */
    padding: 10px;
    border-radius: 5px;
    box-shadow: 0 2px 5px rgba(0,0,0,0.2); /* Add a subtle shadow */
    max-height: 80%; /* Limits max-height to prevent overflow with details */
    overflow-y: auto; /* Add scroll if content exceeds max-height */
    border: 1px solid #ccc; /* Add border for clarity */
    width: 300px;
}

/* Class to apply flex display and column direction */
.flex-column {
    display: flex;
    flex-direction: column;
    gap: 10px; /* Space between elements */
}

/* Class to hide elements */
.hidden {
    display: none;
}

/* Style for the search input field */
#search-input {
    padding: 8px;
    border: 1px solid #ccc;
    border-radius: 4px;
    font-size: 1rem;
}

/* Style for the search results list */
#search-results {
    list-style: none; /* Remove default list bullets */
    padding: 0;
    margin: 0;
}

/* Style for individual search result items */
#search-results li {
    padding: 8px 0;
    cursor: pointer; /* Indicate clickable items */
    border-bottom: 1px solid #eee; /* Separator line */
}

/* Style for the last search result item (no bottom border) */
#search-results li:last-child {
    border-bottom: none;
}

/* Hover effect for search result items */
#search-results li:hover {
    background-color: #f0f0f0; /* Highlight on hover */
}

/* --- New Styles for Location Details UI elements --- */

/* Styles for the new UI wrappers within #search-container */
#search-ui,
#details-ui {
    width: 100%; /* Ensure they fill the container's width */
    /* display: flex and flex-direction are controlled by .flex-column-container class via JS */
}

/* Style for the location name in details */
#details-name {
    margin-top: 0;
    margin-bottom: 10px;
    font-size: 1.2rem;
    border-bottom: 1px solid #eee;
    padding-bottom: 5px;
}

/* Style for the location description in details */
#details-description {
    margin-bottom: 15px;
    font-size: 0.9rem;
    color: #555;
}

/* Style for general buttons within details */
.details-button {
     padding: 8px;
     border: none;
     border-radius: 4px;
     font-size: 0.9rem;
     cursor: pointer;
     margin-bottom: 8px; /* Space between buttons */
     transition: background-color 0.3s ease;
}

 .details-button:last-child {
     margin-bottom: 0;
 }

/* Specific style for the Close button */
#details-close {
    background-color: #ccc; /* Grey */
    color: #333;
}
#details-close:hover {
 background-color: #bbb;
}
```

{% endcode %}

**Explanation of style.css updates:**

* `#search-ui`, `#details-ui`: Basic styling to ensure they take full width. The `flex-column` class will handle their internal layout.
* `#details-name`: Styles for the location name heading (font size, margin, border).
* `#details-description`: Styles for the description text (font size, color, `white-space: pre-wrap` to respect newlines from the data, `max-height` and `overflow-y` for scrollability).
* `.details-button`: General styling for buttons in the details view (padding, border-radius, full width).
* `#details-close`: Specific styling for the "Close" button (background color, text color, hover effect).

#### Update script.js

The `script.js` file will be updated to handle showing/hiding the details panel, populating it with location data, and interacting with the map.

{% code lineNumbers="true" %}

```javascript
// script.js

// Define options for the MapsIndoors Google Maps view
const mapViewOptions = {
    element: document.getElementById('map'),
    // Initial map center (MapsPeople - Austin Office example)
    center: { lng: -97.74204591828197, lat: 30.36022358949809 },
    // Initial zoom level
    zoom: 17,
    // Maximum zoom level
    maxZoom: 22
};

// Set the MapsIndoors API key
mapsindoors.MapsIndoors.setMapsIndoorsApiKey('YOUR_MAPSINDOORS_API_KEY'); // Replace with your MapsIndoors API key

// Create a new instance of the MapsIndoors Google Maps view
const mapViewInstance = new mapsindoors.mapView.GoogleMapsView(mapViewOptions);

// Create a new MapsIndoors instance, passing the map view
const mapsIndoorsInstance = new mapsindoors.MapsIndoors({
    mapView: mapViewInstance,
    // Set the venue ID to load the map for a specific venue
    venue: 'YOUR_MAPSINDOORS_VENUE_ID', // Replace with your actual venue ID
});

/** Floor Selector **/

// Create a new HTML div element to host the floor selector
const floorSelectorElement = document.createElement('div');

// Create a new FloorSelector instance, linking it to the HTML element and the main MapsIndoors instance.
new mapsindoors.FloorSelector(floorSelectorElement, mapsIndoorsInstance);

// Get the underlying Google Maps instance
const googleMapInstance = mapViewInstance.getMap();

// Add the floor selector HTML element to the Google Maps controls.
googleMapInstance.controls[google.maps.ControlPosition.TOP_RIGHT].push(floorSelectorElement);

/** Handle Location Clicks **/

// Function to handle clicks on MapsIndoors locations
function handleLocationClick(location) {
    if (location && location.id) {
        // Move the map to the selected location
        mapsIndoorsInstance.goTo(location);
        // Ensure that the map shows the correct floor
        mapsIndoorsInstance.setFloor(location.properties.floor);
        // Select the location on the map
        mapsIndoorsInstance.selectLocation(location);

        // Show the details UI for the clicked location
        showDetails(location);
    }
}

// Add an event listener to the MapsIndoors instance for click events on locations
mapsIndoorsInstance.on('click', handleLocationClick);

/** Search Functionality **/

// Get references to the search input and results list elements
const searchInputElement = document.getElementById('search-input');
const searchResultsElement = document.getElementById('search-results');

// Initially hide the search results list
searchResultsElement.classList.add('hidden');

// Add an event listener to the search input for 'input' events
// This calls the onSearch function every time the user types in the input field
searchInputElement.addEventListener('input', onSearch);

// Function to perform the search and update the results list and map highlighting
function onSearch() {
    // Get the current value from the search input
    const query = searchInputElement.value;
    // Get the current venue from the MapsIndoors instance
    const currentVenue = mapsIndoorsInstance.getVenue();

    // Clear map highlighting
    mapsIndoorsInstance.highlight();
    // Deselect any selected location
    mapsIndoorsInstance.deselectLocation();

    // Check if the query is too short (less than 3 characters) or empty
    if (query.length < 3) {
        // Hide the results list if the query is too short or empty
        searchResultsElement.classList.add('hidden');
        return; // Stop here
    }

    // Define search parameters with the current input value
    // Include the current venue name in the search parameters
    const searchParameters = { q: query, venue: currentVenue ? currentVenue.name : undefined };

    // Call the MapsIndoors LocationsService to get locations based on the search query
    mapsindoors.services.LocationsService.getLocations(searchParameters).then(locations => {
        // Clear previous search results
        searchResultsElement.innerHTML = null;

        // If no locations are found, display a "No results found" message
        if (locations.length === 0) {
            const noResultsItem = document.createElement('li');
            noResultsItem.textContent = 'No results found';
            searchResultsElement.appendChild(noResultsItem);
            // Ensure the results list is visible to show the "No results found" message
            searchResultsElement.classList.remove('hidden');
            return; // Stop here if no results
        }

        // Append new search results to the list
        locations.forEach(location => {
            const listElement = document.createElement('li');
            // Display the location name
            listElement.innerHTML = location.properties.name;
            // Store the location ID on the list item for easy access
            listElement.dataset.locationId = location.id;

            // Add a click event listener to each list item
            listElement.addEventListener('click', function () {
                // Call the handleLocationClick function when a location in the search results is clicked.
                handleLocationClick(location);
            });

            searchResultsElement.appendChild(listElement);
        });

        // Show the results list now that it has content
        searchResultsElement.classList.remove('hidden');

        // Filter map to only display search results by highlighting them
        mapsIndoorsInstance.highlight(locations.map(location => location.id));
    })
        .catch(error => {
            console.error("Error fetching locations:", error);
            const errorItem = document.createElement('li');
            errorItem.textContent = 'Error performing search.';
            searchResultsElement.appendChild(errorItem);
            searchResultsElement.classList.remove('hidden');
        });
}

/** UI state management **/

const searchUIElement = document.getElementById('search-ui');
const detailsUIElement = document.getElementById('details-ui');

function showSearchUI() {
    hideDetailsUI();
    searchUIElement.classList.remove('hidden');
    searchInputElement.focus();
}

function showDetailsUI() {
    hideSearchUI();
    detailsUIElement.classList.remove('hidden');
}

function hideSearchUI() {
    searchUIElement.classList.add('hidden');
}

function hideDetailsUI() {
    detailsUIElement.classList.add('hidden');
}

/** Location Details **/

// Get references to the static details view elements
const detailsNameElement = document.getElementById('details-name');
const detailsDescriptionElement = document.getElementById('details-description');
const detailsCloseButton = document.getElementById('details-close');

detailsCloseButton.addEventListener('click', () => {
    mapsIndoorsInstance.deselectLocation(); // Deselect any selected location
    showSearchUI();
});

// Show the details of a location
function showDetails(location) {
    detailsNameElement.textContent = location.properties.name;
    detailsDescriptionElement.textContent = location.properties.description || 'No description available.';
    showDetailsUI();
}

// Initial call to set up the search UI when the page loads
showSearchUI();
```

{% endcode %}

**Explanation of script.js updates:**

* **Unified Click Handler Implementation**:
  * Building upon our approach in previous steps, we've implemented a comprehensive click handler system.
  * The `handleLocationClick` function manages map interactions (selecting a location, zooming, and changing floors).
  * This function then calls the `showDetails` function to update the UI presentation.
  * This separation of concerns makes the code more maintainable and easier to understand.
* **UI State Management Functions**:
  * `showSearchUI()`: Shows the search interface and hides the details panel.
  * `showDetailsUI()`: Shows the details interface and hides the search panel.
  * `hideSearchUI()` and `hideDetailsUI()`: Helper functions to manage UI visibility.
  * `showDetails(location)`: Updates the details UI with the location's name and description.
  * The close button in the details panel has an event listener that returns to the search UI.
* **Map Interaction Methods**:
  * `mapsIndoorsInstance.goTo(location)`: Pans and zooms the map to the selected location.
  * `mapsIndoorsInstance.setFloor(location.properties.floor)`: Switches to the floor where the location exists.
  * `mapsIndoorsInstance.selectLocation(location)`: Visually highlights the selected location on the map.
* **Location Properties Access**:
  * We access `location.properties.name` and `location.properties.description` to display detailed information.
  * The fallback text "No description available" is shown when description is missing.
* **Search Result Click Handler**:
  * Search result clicks now trigger the same handler as map POI clicks, providing a consistent experience.
  * This unified approach ensures the same behavior whether a user interacts with the map or search results.
  * The separation between `handleLocationClick` (for map operations) and `showDetails` (for UI updates) creates a cleaner architecture that's easier to maintain and extend.
* **Initial Setup**:
  * `showSearchUI()` is called at the end to ensure the application starts with the search interface visible.

### Expected Outcome

After implementing these changes:

* When you search for locations and click on a result in the list:
  * The search input and results list will be hidden.
  * A details panel will appear showing the selected location's name and description.
  * The map will pan and zoom to the selected location.
  * The selected location will be highlighted on the map.
  * The map will switch to the correct floor of the selected location.
* Clicking the "Close" button in the details panel will hide the details and show the search input and results list again.
* When you click a POI on the map:
  * The details panel will appear showing the location's name and description.
  * The map will pan and zoom to the selected location.
  * The selected location will be highlighted on the map.
  * The map will switch to the correct floor of the selected location.

### Troubleshooting

* **Details panel doesn't show or shows incorrect data:**
  * Check browser console for errors.
  * Verify IDs in `index.html` match those used in `script.js` for `getElementById`.
  * Ensure `location.properties.name` and `location.properties.description` exist for the selected location or that default text is handled.
  * Confirm CSS for `.hidden`, `#search-ui`, and `#details-ui` is correctly applied and toggled.
* **Map doesn't navigate or select location:**
  * Ensure `mapsIndoorsInstance` is correctly initialized.
  * Verify the `location` object passed to `handleLocationClick` is a valid object conforming to the `Location` interface.
  * Check for console errors when `selectLocation`, `goTo`, or `setFloor` are called.
* **"Close" button doesn't work:**
  * Ensure the event listener is correctly attached to `detailsCloseButton` and that `showSearchUI` is called.

{% embed url="<https://codesandbox.io/p/sandbox/github/MapsPeople/mapsindoors-getting-started-for-web/tree/main/sdk/google.maps/3-show-the-details>" %}

### Next Steps

You've now enhanced your application to display detailed information about locations. Users can not only find locations but also learn more about them.

Next, you'll learn how to get and display directions between locations:

* Step 4: [Getting Directions](/sdks-and-frameworks/web/tutorial/using-google-maps/getting-directions)


# Getting Directions

**Goal:** This guide will show you how to add directions functionality to your application. Users will be able to select an origin and destination, get a route between them, and step through the directions on the map. This step builds on the search and details UI from Step 3, introducing a new directions panel and integrating the MapsIndoors DirectionsService and DirectionsRenderer.

**SDK Concepts Introduced:**

* Using the [DirectionsService](https://app.mapsindoors.com/mapsindoors/js/sdk/latest/docs/mapsindoors.services.DirectionsService.html) to calculate routes between locations.
* Using the [DirectionsRenderer](https://app.mapsindoors.com/mapsindoors/js/sdk/latest/docs/mapsindoors.directions.DirectionsRenderer.html) to display and step through routes on the map.
* Using `directionsRenderer.setRoute()` to display a calculated route on the map.
* Using `directionsRenderer.setStepIndex()` to navigate to a specific step in the route.
* Using `directionsRenderer.nextStep()` and `directionsRenderer.previousStep()` for step navigation.
* Using `directionsRenderer.getLegIndex()` and `directionsRenderer.getStepIndex()` to track current position.

### Prerequisites

* Completion of [Step 3: Show the Details](/sdks-and-frameworks/web/tutorial/using-google-maps/show-the-details). Your app should already support searching for locations and viewing details.
* Your MapsIndoors API Key and Google Maps API Key should be correctly set up. We will continue using the demo API key `02c329e6777d431a88480a09` and venue ID `dfea941bb36964e728df92d3d` for this example.

### Update index.html

Open your `index.html` file. Add a new directions panel inside the existing `.panel` container:

{% code lineNumbers="true" %}

```html
<!-- index.html -->
<!DOCTYPE html>
<html lang="en">

<head>
    <meta charset="UTF-8">
    <meta name="viewport" content="width=device-width, initial-scale=1.0">
    <title>MapsIndoors</title>
    <link rel="stylesheet" href="style.css">
    <!-- Google Maps JavaScript API -->
    <script src="https://maps.googleapis.com/maps/api/js?key=YOUR_GOOGLE_MAPS_API_KEY"></script>
    <script src="https://app.mapsindoors.com/mapsindoors/js/sdk/4.41.0/mapsindoors-4.41.0.js.gz"
            xintegrity="sha384-3lk3cwVPj5MpUyo5T605mB0PMHLLisIhNrSREQsQHjD9EXkHBjz9ETgopmTbfMDc"
            crossorigin="anonymous"></script>
</head>

<body>
    <div id="map"></div>
    <div class="panel">
        <div id="search-ui" class="flex-column">
            <input type="text" id="search-input" placeholder="Search for a location...">
            <ul id="search-results"></ul>
        </div>
        <div id="details-ui" class="hidden">
            <h3 id="details-name"></h3>
            <p id="details-description"></p>
            <button id="details-directions" class="details-button details-action-button">Get Directions</button>
            <button id="details-close" class="details-button">Close</button>
        </div>
        <div id="directions-ui" class="hidden flex-column">
            <h3>Directions</h3>
            <div class="directions-inputs">
                <input type="text" id="origin-input" placeholder="Choose origin...">
                <ul id="origin-results" class="directions-results-list"></ul>
                <input type="text" id="destination-input" placeholder="Choose destination..." disabled>
            </div>
            <button id="get-directions" class="details-button details-action-button">Show Route</button>
            <div class="directions-step-nav">
                <span id="step-indicator"></span>
                <button id="prev-step" class="details-button">Previous</button>
                <button id="next-step" class="details-button">Next</button>
            </div>
            <button id="directions-close" class="details-button">Close Directions</button>
        </div>
    </div>
    <script src="script.js"></script>
</body>
</html>
```

{% endcode %}

#### Explanation of index.html updates

* The `#details-ui` panel now includes a "Get Directions" button, allowing users to open the directions panel for the selected location.
* The `#directions-ui` panel is added to the `.panel` container. This new panel contains:
  * Input fields for origin and destination.
  * A button to get directions.
  * Step navigation controls (step indicator, previous/next buttons).
  * A close button for the directions panel.
* All panels (`#search-ui`, `#details-ui`, `#directions-ui`) use consistent class and ID naming, and only one is visible at a time, managed by the show/hide functions in the JavaScript.

### Update style.css

Add styles for the new directions UI elements:

{% code lineNumbers="true" %}

```css
/* style.css */

/* Use flexbox for the main layout */
html, body {
    height: 100%;
    margin: 0;
    padding: 0;
    overflow: hidden; /* Prevent scrollbars if map is full size */
    display: flex;
    flex-direction: column; /* Stack children vertically if needed later */
}

/* Style for the map container */
#map {
  /* Make map fill available space */
  flex-grow: 1;
  width: 100%; /* Make map fill width */
  margin: 0;
  padding: 0;
}

/* Style for the information panel container */
.panel {
    position: absolute; /* Position over the map */
    top: 10px; /* Distance from the top */
    left: 10px; /* Distance from the left */
    z-index: 10; /* Ensure it's above the map and other elements */
    background-color: white; /* White background for readability */
    padding: 10px;
    border-radius: 5px;
    box-shadow: 0 2px 5px rgba(0,0,0,0.2); /* Add a subtle shadow */
    max-height: 80%; /* Limits max-height to prevent overflow with details */
    overflow-y: auto; /* Add scroll if content exceeds max-height */
    border: 1px solid #ccc; /* Add border for clarity */
    width: 300px;
}

/* Class to apply flex display and column direction */
.flex-column {
    display: flex;
    flex-direction: column;
    gap: 10px; /* Space between elements */
}

/* Class to hide elements */
.hidden {
    display: none;
}

/* Style for the search input field */
#search-input {
    padding: 8px;
    border: 1px solid #ccc;
    border-radius: 4px;
    font-size: 1rem;
}

/* Style for the search results list */
#search-results {
    list-style: none; /* Remove default list bullets */
    padding: 0;
    margin: 0;
}

/* Style for individual search result items */
#search-results li {
    padding: 8px 0;
    cursor: pointer; /* Indicate clickable items */
    border-bottom: 1px solid #eee; /* Separator line */
}

/* Style for the last search result item (no bottom border) */
#search-results li:last-child {
    border-bottom: none;
}

/* Hover effect for search result items */
#search-results li:hover {
    background-color: #f0f0f0; /* Highlight on hover */
}

/* --- New Styles for Location Details UI elements --- */

/* Styles for the new UI wrappers within #search-container */
#search-ui,
#details-ui {
    width: 100%; /* Ensure they fill the container's width */
    /* display: flex and flex-direction are controlled by .flex-column-container class via JS */
}

/* Style for the location name in details */
#details-name {
    margin-top: 0;
    margin-bottom: 10px;
    font-size: 1.2rem;
    border-bottom: 1px solid #eee;
    padding-bottom: 5px;
}

/* Style for the location description in details */
#details-description {
    margin-bottom: 15px;
    font-size: 0.9rem;
    color: #555;
}

/* Style for general buttons within details */
.details-button {
     padding: 8px;
     border: none;
     border-radius: 4px;
     font-size: 0.9rem;
     cursor: pointer;
     transition: background-color 0.3s ease;
}

/* Specific style for the Close button */
#details-close {
    background-color: #ccc; /* Grey */
    color: #333;
}
 #details-close:hover {
     background-color: #bbb;
 }

/* Directions panel specific */
#directions-ui {
    width: 100%;
}
.directions-inputs {
    display: flex;
    flex-direction: column;
    gap: 4px;
    margin-bottom: 8px;
}
.directions-results-list {
    list-style: none;
    padding: 0;
    margin: 0;
    max-height: 120px;
    overflow-y: auto;
}
.directions-results-list li {
    padding: 8px 0;
    cursor: pointer;
    border-bottom: 1px solid #eee;
}
.directions-results-list li:last-child {
    border-bottom: none;
}
.directions-results-list li:hover {
    background-color: #f0f0f0;
}

.directions-step-nav {
    display: grid;
    grid-template-columns: 1fr 1fr;
    gap: 10px;
}

#step-indicator {
    grid-column: span 2;
}
```

{% endcode %}

#### Explanation of style.css updates

* Styles for the new `#directions-ui` panel and its child elements are added:
  * `.directions-inputs` styles the input fields and results list for selecting origin and destination.
  * `.directions-results-list` styles the list of search results for the origin input.
  * `.directions-step-nav` and `#step-indicator` style the step navigation controls.

### Update script.js

Add the following logic for directions and UI state management.

{% code lineNumbers="true" %}

```javascript
// script.js

// Define options for the MapsIndoors Google Maps view
const mapViewOptions = {
    element: document.getElementById('map'),
    // Initial map center (MapsPeople - Austin Office example)
    center: { lng: -97.74204591828197, lat: 30.36022358949809 },
    // Initial zoom level
    zoom: 17,
    // Maximum zoom level
    maxZoom: 22
};

// Set the MapsIndoors API key
mapsindoors.MapsIndoors.setMapsIndoorsApiKey('YOUR_MAPSINDOORS_API_KEY'); // Replace with your MapsIndoors API key

// Create a new instance of the MapsIndoors Google Maps view
const mapViewInstance = new mapsindoors.mapView.GoogleMapsView(mapViewOptions);

// Create a new MapsIndoors instance, passing the map view
const mapsIndoorsInstance = new mapsindoors.MapsIndoors({
    mapView: mapViewInstance,
    // Set the venue ID to load the map for a specific venue
    venue: 'YOUR_MAPSINDOORS_VENUE_ID', // Replace with your actual venue ID
});

/** Floor Selector **/

// Create a new HTML div element to host the floor selector
const floorSelectorElement = document.createElement('div');

// Create a new FloorSelector instance, linking it to the HTML element and the main MapsIndoors instance.
new mapsindoors.FloorSelector(floorSelectorElement, mapsIndoorsInstance);

// Get the underlying Google Maps instance
const googleMapInstance = mapViewInstance.getMap();

// Add the floor selector HTML element to the Google Maps controls.
googleMapInstance.controls[google.maps.ControlPosition.TOP_RIGHT].push(floorSelectorElement);

/** Handle Location Clicks **/

// Function to handle clicks on MapsIndoors locations
function handleLocationClick(location) {
    if (location && location.id) {
        // Move the map to the selected location
        mapsIndoorsInstance.goTo(location);
        // Ensure that the map shows the correct floor
        mapsIndoorsInstance.setFloor(location.properties.floor);
        // Select the location on the map
        mapsIndoorsInstance.selectLocation(location);

        // Show the details UI for the clicked location
        showDetails(location);
    }
}

// Add an event listener to the MapsIndoors instance for click events on locations
mapsIndoorsInstance.on('click', handleLocationClick);

/** Search Functionality **/

// Get references to the search input and results list elements
const searchInputElement = document.getElementById('search-input');
const searchResultsElement = document.getElementById('search-results');

// Initially hide the search results list
searchResultsElement.classList.add('hidden');

// Add an event listener to the search input for 'input' events
// This calls the onSearch function every time the user types in the input field
searchInputElement.addEventListener('input', onSearch);

// Function to perform the search and update the results list and map highlighting
function onSearch() {
    // Get the current value from the search input
    const query = searchInputElement.value;
    // Get the current venue from the MapsIndoors instance
    const currentVenue = mapsIndoorsInstance.getVenue();

    // Clear map highlighting
    mapsIndoorsInstance.highlight();
    // Deselect any selected location
    mapsIndoorsInstance.deselectLocation();

    // Check if the query is too short (less than 3 characters) or empty
    if (query.length < 3) {
        // Hide the results list if the query is too short or empty
        searchResultsElement.classList.add('hidden');
        return; // Stop here
    }

    // Define search parameters with the current input value
    // Include the current venue name in the search parameters
    const searchParameters = { q: query, venue: currentVenue ? currentVenue.name : undefined };

    // Call the MapsIndoors LocationsService to get locations based on the search query
    mapsindoors.services.LocationsService.getLocations(searchParameters).then(locations => {
        // Clear previous search results
        searchResultsElement.innerHTML = null;

        // If no locations are found, display a "No results found" message
        if (locations.length === 0) {
            const noResultsItem = document.createElement('li');
            noResultsItem.textContent = 'No results found';
            searchResultsElement.appendChild(noResultsItem);
            // Ensure the results list is visible to show the "No results found" message
            searchResultsElement.classList.remove('hidden');
            return; // Stop here if no results
        }

        // Append new search results to the list
        locations.forEach(location => {
            const listElement = document.createElement('li');
            // Display the location name
            listElement.innerHTML = location.properties.name;
            // Store the location ID on the list item for easy access
            listElement.dataset.locationId = location.id;

            // Add a click event listener to each list item
            listElement.addEventListener('click', function () {
                // Call the handleLocationClick function when a location in the search results is clicked.
                handleLocationClick(location);
            });

            searchResultsElement.appendChild(listElement);
        });

        // Show the results list now that it has content
        searchResultsElement.classList.remove('hidden');

        // Filter map to only display search results by highlighting them
        mapsIndoorsInstance.highlight(locations.map(location => location.id));
    })
        .catch(error => {
            console.error("Error fetching locations:", error);
            const errorItem = document.createElement('li');
            errorItem.textContent = 'Error performing search.';
            searchResultsElement.appendChild(errorItem);
            searchResultsElement.classList.remove('hidden');
        });
}

/** UI state management **/

const searchUIElement = document.getElementById('search-ui');
const detailsUIElement = document.getElementById('details-ui');
const directionsUIElement = document.getElementById('directions-ui');

function showSearchUI() {
    hideDetailsUI();
    hideDirectionsUI(); // Ensure directions UI is hidden
    searchUIElement.classList.remove('hidden');
    searchInputElement.focus();
}

function showDetailsUI() {
    hideSearchUI();
    hideDirectionsUI(); // Ensure directions UI is hidden
    detailsUIElement.classList.remove('hidden');
}

function hideSearchUI() {
    searchUIElement.classList.add('hidden');
}

function hideDetailsUI() {
    detailsUIElement.classList.add('hidden');
}

function showDirectionsUI() {
    hideSearchUI();
    hideDetailsUI();

    directionsUIElement.classList.remove('hidden');
}

function hideDirectionsUI() {

    directionsUIElement.classList.add('hidden');
}

/** Location Details **/

// Get references to the static details view elements
const detailsNameElement = document.getElementById('details-name');
const detailsDescriptionElement = document.getElementById('details-description');
const detailsCloseButton = document.getElementById('details-close');

detailsCloseButton.addEventListener('click', () => {
    mapsIndoorsInstance.deselectLocation(); // Deselect any selected location
    showSearchUI();
});

// Variable to store the location currently shown in details
let currentDetailsLocation = null;

// Show the details of a location
function showDetails(location) {
    // Keep track of the currently selected location
    currentDetailsLocation = location;
    detailsNameElement.textContent = location.properties.name;
    detailsDescriptionElement.textContent = location.properties.description || 'No description available.';
    showDetailsUI();
}

// Initial call to set up the search UI when the page loads
showSearchUI();

/** Directions Functionality **/

// Handles origin/destination selection, route calculation, and step navigation
const originInputElement = document.getElementById('origin-input');
const originResultsElement = document.getElementById('origin-results');
const destinationInputElement = document.getElementById('destination-input');
const getDirectionsButton = document.getElementById('get-directions');
const prevStepButton = document.getElementById('prev-step');
const nextStepButton = document.getElementById('next-step');
const stepIndicator = document.getElementById('step-indicator');
const directionsCloseButton = document.getElementById('directions-close');

let selectedOrigin = null;
let selectedDestination = null;
let currentRoute = null;
let directionsRenderer = null;

// Reference the details-directions button defined in the HTML
const detailsDirectionsButton = document.getElementById('details-directions');

detailsDirectionsButton.addEventListener('click', () => {
    showDirectionsPanel(currentDetailsLocation);
});

detailsCloseButton.addEventListener('click', showSearchUI);

directionsCloseButton.addEventListener('click', () => {
    hideDirectionsUI();
    showDetailsUI();
    if (directionsRenderer) directionsRenderer.setVisible(false);
});

// Show the directions panel and reset state for a new route
function showDirectionsPanel(destinationLocation) {
    selectedOrigin = null;
    selectedDestination = destinationLocation;
    currentRoute = null;
    destinationInputElement.value = destinationLocation.properties.name;
    originInputElement.value = '';
    originResultsElement.innerHTML = '';
    hideSearchUI();
    hideDetailsUI();
    showDirectionsUI();
    stepIndicator.textContent = '';
}

// Search for origin locations as the user types
originInputElement.addEventListener('input', onOriginSearch);
function onOriginSearch() {
    const query = originInputElement.value;
    const currentVenue = mapsIndoorsInstance.getVenue();
    originResultsElement.innerHTML = '';
    if (query.length < 3) return;
    const searchParameters = { q: query, venue: currentVenue ? currentVenue.name : undefined };
    mapsindoors.services.LocationsService.getLocations(searchParameters).then(locations => {
        if (locations.length === 0) {
            const noResultsItem = document.createElement('li');
            noResultsItem.textContent = 'No results found';
            originResultsElement.appendChild(noResultsItem);
            return;
        }
        locations.forEach(location => {
            const listElement = document.createElement('li');
            listElement.textContent = location.properties.name;
            listElement.addEventListener('click', () => {
                selectedOrigin = location;
                originInputElement.value = location.properties.name;
                originResultsElement.innerHTML = '';
            });
            originResultsElement.appendChild(listElement);
        });
    });
}

// Calculate and display the route when both origin and destination are selected
getDirectionsButton.addEventListener('click', async () => {
    if (!selectedOrigin || !selectedDestination) {
        // Optionally, show an alert or update stepIndicator instead
        stepIndicator.textContent = 'Please select both origin and destination.';
        return;
    }
    // Use anchor property for LatLngLiteral (anchor is always a point)
    const origin = {
        lat: selectedOrigin.properties.anchor.coordinates[1],
        lng: selectedOrigin.properties.anchor.coordinates[0],
        floor: selectedOrigin.properties.floor
    };
    const destination = {
        lat: selectedDestination.properties.anchor.coordinates[1],
        lng: selectedDestination.properties.anchor.coordinates[0],
        floor: selectedDestination.properties.floor
    };
    const directionsService = new mapsindoors.services.DirectionsService();
    const route = await directionsService.getRoute({ origin, destination });
    currentRoute = route;
    if (directionsRenderer) {
        directionsRenderer.setVisible(false);
    }

    directionsRenderer = new mapsindoors.directions.DirectionsRenderer({
        mapsIndoors: mapsIndoorsInstance,
        fitBounds: true,
        strokeColor: '#4285f4',
        strokeWeight: 5
    });

    await directionsRenderer.setRoute(route);
    directionsRenderer.setStepIndex(0, 0);
    showCurrentStep();
});

// Update the step indicator and enable/disable navigation buttons
function showCurrentStep() {
    if (currentRoute?.legs?.length < 1) return;
    const currentLegIndex = directionsRenderer.getLegIndex();
    const currentStepIndex = directionsRenderer.getStepIndex();
    const legs = currentRoute.legs;
    const steps = legs[currentLegIndex].steps;
    if (steps.length === 0) {
        stepIndicator.textContent = '';
        return;
    }
    stepIndicator.textContent = `Leg ${currentLegIndex + 1} of ${legs.length}, Step ${currentStepIndex + 1} of ${steps.length}`;
    prevStepButton.disabled = currentLegIndex === 0 && currentStepIndex === 0;
    nextStepButton.disabled = currentLegIndex === legs.length - 1 && currentStepIndex === steps.length - 1;
}

// Step navigation event listeners
prevStepButton.addEventListener('click', () => {
    if (!directionsRenderer) {
        return;
    }
    directionsRenderer.previousStep();
    showCurrentStep();

});
nextStepButton.addEventListener('click', () => {
    if (!directionsRenderer) {
        return;
    }
    directionsRenderer.nextStep();
    showCurrentStep();
});
```

{% endcode %}

**Explanation of script.js updates:**

* **UI State Management:**
  * New constants like `directionsUIElement` are added to reference the new directions panel in the DOM.
  * The existing UI state management functions (`showSearchUI()`, `showDetailsUI()`) are updated to explicitly hide the `directionsUIElement`.
  * New functions `showDirectionsUI()` and `hideDirectionsUI()` are introduced to manage the visibility of the directions panel, ensuring it's mutually exclusive with the search and details panels.
  * The "Get Directions" button (`detailsDirectionsButton`) in the details panel now has an event listener that calls `showDirectionsPanel()`, passing the `currentDetailsLocation` to pre-fill the destination.
  * The `directionsCloseButton` listener is added to hide the directions UI, show the details UI, and make the `directionsRenderer` invisible when directions are closed, providing a clear exit path.
* **Location Click Handling:**
  * The script maintains the unified click handler pattern established in previous steps. The `handleLocationClick` function continues to serve as the central entry point for user interactions with locations, responding to both map POI clicks and search result clicks.
  * This consistent pattern ensures that when a user clicks on a location (either on the map or in search results), the following actions always occur:
    * The map pans to the selected location using `mapsIndoorsInstance.goTo(location)`
    * The floor is set to the location's floor with `mapsIndoorsInstance.setFloor(location.properties.floor)`
    * The location is visually selected on the map using `mapsIndoorsInstance.selectLocation(location)`
    * The location details panel is shown via `showDetails(location)`
  * This unified approach ensures a consistent user experience regardless of how locations are selected.
* **Directions Panel and Origin/Destination Selection:**
  * New DOM element references are established for directions-related UI elements: `originInputElement`, `originResultsElement`, `destinationInputElement`, `getDirectionsButton`, `prevStepButton`, `nextStepButton`, `stepIndicator`, and `directionsCloseButton`.
  * State variables `selectedOrigin`, `selectedDestination`, `currentRoute`, and `directionsRenderer` are declared to manage the directions workflow state.
  * The `showDirectionsPanel(destinationLocation)` function resets the directions state, pre-fills the destination input with the selected location's name, and shows the directions UI.
  * An origin search is implemented with an `input` event listener on `originInputElement`, which calls the `onOriginSearch()` function. This function uses `mapsindoors.services.LocationsService.getLocations()` to search for origin locations, similar to the main search functionality.
* **Route Calculation:**
  * When the user clicks the "Show Route" button (`getDirectionsButton`), the script checks if both `selectedOrigin` and `selectedDestination` are set.
  * It extracts coordinates and floor information from the location objects' `properties.anchor` and `properties.floor`.
  * A new instance of `mapsindoors.services.DirectionsService()` is created.
  * The `getRoute()` method is called with origin and destination parameters to calculate the route.
  * The route is stored in the `currentRoute` variable for later reference.
* **Route Display and Step Navigation:**
  * Any existing `directionsRenderer` is hidden before creating a new one.
  * A new `mapsindoors.directions.DirectionsRenderer` is instantiated with the `mapsIndoorsInstance`, `fitBounds: true` for automatic map adjustment, and styling options.
  * The renderer is configured with the calculated route via `directionsRenderer.setRoute(route)`.
  * The renderer is set to display the first step of the first leg with `directionsRenderer.setStepIndex(0, 0)`.
  * The `showCurrentStep()` function updates the step indicator text and enables/disables the navigation buttons based on the current position in the route.
  * Event listeners for the navigation buttons call `directionsRenderer.previousStep()` and `directionsRenderer.nextStep()` respectively, followed by `showCurrentStep()` to update the UI.
* **Workflow Integration:**
  * The script carefully integrates the directions functionality with the existing search and details features.
  * The details panel now includes a "Get Directions" button that transitions to the directions workflow.
  * The directions panel allows users to return to the details view via the close button.
  * All three UI states (search, details, directions) are mutually exclusive, providing a clear and focused user interface.

These updates allow users to search for a location, view its details, and get step-by-step directions between two locations within your venue, all within a clear and interactive UI.

### Expected Outcome

* Users can search for a location, view its details, and click "Get Directions" to open the directions panel.
* When the directions panel opens from the details view, the destination input is pre-filled with the selected location's name and is disabled.
* The user can type in the origin input to search for and select an origin location.
* After both origin and destination are selected, clicking "Show Route" calculates and displays the route on the map.
* The map updates to show the full route, and the step navigation controls become active.
* Users can use the "Previous" and "Next" buttons to step through the route, with the map highlighting the current step and the `step-indicator` updating accordingly.
* Only one panel (search, details, or directions) is visible at a time.
* Clicking the "Close Directions" button returns to the details panel and hides the route from the map.

### Troubleshooting

* If the route is not shown after clicking "Show Route", ensure both origin and destination are selected and that the locations have valid anchor coordinates.
* If the map does not update, check for errors in the browser console and verify your API keys and venue ID.
* If the UI panels do not switch as expected, ensure the show/hide functions are called correctly and that the correct classes are applied.

{% embed url="<https://codesandbox.io/p/sandbox/github/MapsPeople/mapsindoors-getting-started-for-web/tree/main/sdk/google.maps/4-getting-directions>" %}


# Getting Started: MapsIndoors

Throughout the Getting Started guide, you will modify and extend the same code to create your map. Let's start by creating the initial app.

## Step 1. Set Up Your Environment[​](https://docs.mapsindoors.com/getting-started/web/new-project#set-up-your-environment) <a href="#set-up-your-environment" id="set-up-your-environment"></a>

1. If you do not have prior development experience, you can install an Integrated Development Environment (IDE), e.g. [<mark style="color:purple;">Visual Studio Code</mark>](https://code.visualstudio.com/).
2. Start by creating a new project folder. The location is not important, just remember the location, and ensure your newly created project folder is empty.
3. Inside that, create two empty files: `index.html` and `main.js`.

   > The file `index.html` is the entry point for our application and contains the HTML code. The file `main.js` will be read by `index.html` and consists of the JavaScript code for the actual application to run. To try the app you will be creating, run `index.html` in your web browser.
4. Open `index.html`. Create a basic HTML structure and include the `main.js` file as follows:

```html
<!-- index.html -->

<!DOCTYPE html>
<html lang="en">
<head>
  <meta charset="UTF-8">
  <meta http-equiv="X-UA-Compatible" content="IE=edge">
  <meta name="viewport" content="width=device-width, initial-scale=1.0">
  <title>MapsIndoors</title>
</head>
<body>
  <script src="main.js"></script>
</body>
</html>
```

Both here, and in the following examples, you will always be able to see which of the two files the code should go in, by looking at the first line, where the name of the file is written.

Your environment is now fully configured, and you have the necessary API keys. Next, you will learn how to display a map with MapsIndoors.

## Step 2. Display a Map with MapsIndoors[​](https://docs.mapsindoors.com/getting-started/web/map#show-a-map-with-mapsindoors) <a href="#show-a-map-with-mapsindoors" id="show-a-map-with-mapsindoors"></a>

{% tabs %}
{% tab title="Google Maps - Manually" %}
The MapsIndoors SDK is hosted on a Content Delivery Network (CDN) and should be loaded using a script tag.

Insert the MapsIndoors SDK script tag into `<head>`, followed by the Google Maps script tag:

```html
<!-- index.html -->

<!DOCTYPE html>
<html lang="en">
<head>
  <meta charset="UTF-8">
  <meta http-equiv="X-UA-Compatible" content="IE=edge">
  <meta name="viewport" content="width=device-width, initial-scale=1.0">
  <title>MapsIndoors</title>
<script src="https://app.mapsindoors.com/mapsindoors/js/sdk/4.24.8/mapsindoors-4.24.8.js.gz?apikey=YOUR_MAPSINDOORS_API_KEY"></script>
<script src="https://maps.googleapis.com/maps/api/js?libraries=geometry&key=YOUR_GOOGLE_MAPS_API_KEY"></script>
</head>
<body>
  <script src="main.js"></script>
</body>
</html>
```

Remember to add your API keys to the links in your code. If you do not have your own API key, you can use the demo MapsIndoors API key: `d876ff0e60bb430b8fabb145`.

Add an empty `<div>` element to `<body>` with the `id` attribute set to `"map"`:

```html
<!-- index.html -->

<!DOCTYPE html>
<html lang="en">
<head>
  <meta charset="UTF-8">
  <meta http-equiv="X-UA-Compatible" content="IE=edge">
  <meta name="viewport" content="width=device-width, initial-scale=1.0">
  <title>MapsIndoors</title>
  <script src="https://app.mapsindoors.com/mapsindoors/js/sdk/4.24.8/mapsindoors-4.24.8.js.gz?apikey=YOUR_MAPSINDOORS_API_KEY"></script>
  <script src="https://maps.googleapis.com/maps/api/js?libraries=geometry&key=YOUR_GOOGLE_MAPS_API_KEY"></script>
</head>
<body>
<div id="map" style="width: 600px; height: 600px;"></div>
<script src="main.js"></script>
</body>
</html>
```

To load data and display it on the map, we need to create a new *instance* of the [`MapsIndoors` class](https://app.mapsindoors.com/mapsindoors/js/sdk/latest/docs/mapsindoors.MapsIndoors.html#MapsIndoors) with a [`mapView` instance](https://app.mapsindoors.com/mapsindoors/js/sdk/latest/docs/mapsindoors.mapView.GoogleMapsView.html#GoogleMapsView) with a few *properties* set. This is all done by placing the following code in the `main.js` file you created earlier:

```javascript
// main.js

const mapViewOptions = {
  element: document.getElementById('map'),
  center: { lat: 38.8974905, lng: -77.0362723 }, // The White House
  zoom: 17,
  maxZoom: 22,
};
const mapViewInstance = new mapsindoors.mapView.GoogleMapsView(mapViewOptions);
const mapsIndoorsInstance = new mapsindoors.MapsIndoors({
    mapView: mapViewInstance
});
```

What happens in this snippet is we create a `mapViewInstance` that pulls up a [`GoogleMapsView`](https://app.mapsindoors.com/mapsindoors/js/sdk/latest/docs/mapsindoors.mapView.GoogleMapsView.html) with some [`mapViewOptions`](https://app.mapsindoors.com/mapsindoors/js/sdk/latest/docs/mapsindoors.mapView.GoogleMapsView.html). The options define which element in the html-file to display the map in (in this case `<div id="map">`), where the map should center, what zoom level to display, and what the max zoom level is.

You should now see a map from your chosen map engine with MapsIndoors data loaded on top.

**Display a Floor Selector**

Next, we'll add a Floor Selector for changing between floors.

First, we add an empty `<div>` element programmatically. Then we create a new [`FloorSelector` *instance*](https://app.mapsindoors.com/mapsindoors/js/sdk/latest/docs/FloorSelector.html) and push the `floorSelectorElement` to the `googleMapsInstance` to position it as a map controller:

```javascript
// main.js

const mapViewOptions = {
  element: document.getElementById('map'),
  center: { lat: 38.8974905, lng: -77.0362723 }, // The White House
  zoom: 17,
  maxZoom: 22,
};
const mapViewInstance = new mapsindoors.mapView.GoogleMapsView(mapViewOptions);
const mapsIndoorsInstance = new mapsindoors.MapsIndoors({ mapView: mapViewInstance });
const googleMapsInstance = mapViewInstance.getMap();

// Floor Selector
const floorSelectorElement = document.createElement('div');
new mapsindoors.FloorSelector(floorSelectorElement, mapsIndoorsInstance);
googleMapsInstance.controls[google.maps.ControlPosition.RIGHT_TOP].push(floorSelectorElement);
```

You should now be able to switch between floors.

Here's a JSFiddle demonstrating the result you should have by now:

{% embed url="<https://jsfiddle.net/mapspeople/wgvdjpsu/2/>" %}
{% endtab %}

{% tab title="Google Maps - MI Components" %}
Using the `<mi-map-googlemaps>` component, the MapsIndoors JS SDK is automatically inserted into the DOM when initialized.

The MapsIndoors Web Components library can be loaded using [unpkg](https://unpkg.com/), a widely used CDN for everything on [npm](https://npmjs.com/).

Insert script tag into `<head>`:

```html
<!-- index.html -->

<!DOCTYPE html>
<html lang="en">
<head>
  <meta charset="UTF-8">
  <meta http-equiv="X-UA-Compatible" content="IE=edge">
  <meta name="viewport" content="width=device-width, initial-scale=1.0">
  <title>MapsIndoors</title>
<script src="https://unpkg.com/@mapsindoors/components@latest/dist/mi-components/mi-components.esm.js"></script>
</head>
<body>
  <script src="main.js"></script>
</body>
</html>
```

Check [@mapsindoors/components](https://www.npmjs.com/package/@mapsindoors/components) for latest version.

After you added the script tag into `<head>`, add the `<mi-map-googlemaps>` custom element into `<body>`. We need to add and populate the `gm-api-key` and `mi-api-key` attributes with your API keys as well:

```html
<!-- index.html -->

<!DOCTYPE html>
<html lang="en">
<head>
  <meta charset="UTF-8">
  <meta http-equiv="X-UA-Compatible" content="IE=edge">
  <meta name="viewport" content="width=device-width, initial-scale=1.0">
  <title>MapsIndoors</title>
  <script src="https://unpkg.com/@mapsindoors/components@8.2.0/dist/mi-components/mi-components.js"></script>
</head>
<body>
<mi-map-googlemaps
  style="width: 600px;
  height: 600px;"
  gm-api-key="YOUR_GOOGLE_MAPS_API_KEY"
  mi-api-key="YOUR_MAPSINDOORS_API_KEY">
</mi-map-googlemaps>
  <script src="main.js"></script>
</body>
</html>
```

Remember to add your API keys where indicated. You can use the demo MapsIndoors API key: `d876ff0e60bb430b8fabb145`

To center the map correctly, you need need the Google Maps *instance* in your JavaScript-file.

First, we get a reference to the `<mi-map-googlemaps>` element. Then we attach the [`mapsIndoorsReady`](https://app.mapsindoors.com/mapsindoors/js/sdk/latest/docs/mapsindoors.MapsIndoors.html#event:ready) event listener so we'll know when MapsIndoors is ready after loading. Lastly, on the `mapsIndoorsReady` event, get the Google Maps *instance* and call its [`setCenter` method](https://developers.google.com/maps/documentation/javascript/reference/map#Map.setCenter) to center the map on the loaded data:

```javascript
// main.js

const miMapElement = document.querySelector('mi-map-googlemaps');

miMapElement.addEventListener('mapsIndoorsReady', () => {
  miMapElement.getMapInstance().then((mapInstance) => {
    mapInstance.setCenter({ lat: 38.8974905, lng: -77.0362723 }); // The White House
  });
})
```

> For more information on how to configure the `<mi-map-googlemaps>` component, see [components.mapsindoors.com/map-googlemaps](https://components.mapsindoors.com/map-googlemaps/).

You should now see a map from your chosen map engine with MapsIndoors data loaded on top.

**Display a Floor Selector**[**​**](https://docs.mapsindoors.com/getting-started/web/map#show-a-floor-selector)

Next, we'll add a Floor Selector for changing between floors.

Using the `<mi-map-googlemaps>` element, you can add the [floorSelectorControlPosition attribute](https://components.mapsindoors.com/map-googlemaps/) to your existing element. In this case with the value `"TOP_RIGHT"`:

```html
<!-- index.html -->

<!DOCTYPE html>
<html lang="en">
<head>
  <meta charset="UTF-8">
  <meta http-equiv="X-UA-Compatible" content="IE=edge">
  <meta name="viewport" content="width=device-width, initial-scale=1.0">
  <title>MapsIndoors</title>
  <script src="https://unpkg.com/@mapsindoors/components@8.2.0/dist/mi-components/mi-components.js"></script>
</head>
<body>
  <mi-map-googlemaps
  style="width: 600px;
  height: 600px;"
  gm-api-key="YOUR_GOOGLE_MAPS_API_KEY"
  mi-api-key="YOUR_MAPSINDOORS_API_KEY"
  floor-selector-control-position="TOP_RIGHT">
  </mi-map-googlemaps>
  <script src="main.js"></script>
</body>
</html>
```

You should now be able to switch between floors.

Here's a JSFiddle demonstrating the result you should have by now:

{% embed url="<https://jsfiddle.net/mapspeople/h0gdbmo4/1/>" %}
{% endtab %}

{% tab title="Mapbox - Manually" %}
The MapsIndoors SDK is hosted on a Content Delivery Network (CDN) and should be loaded using a script tag.

Insert the MapsIndoors SDK script tag into `<head>`, followed by the Mapbox `script` and `style` tag:

```html
<!-- index.html -->

<!DOCTYPE html>
<html lang="en">
<head>
  <meta charset="UTF-8">
  <meta http-equiv="X-UA-Compatible" content="IE=edge">
  <meta name="viewport" content="width=device-width, initial-scale=1.0">
  <title>MapsIndoors</title>
<script src="https://app.mapsindoors.com/mapsindoors/js/sdk/4.24.8/mapsindoors-4.24.8.js.gz?apikey=YOUR_MAPSINDOORS_API_KEY"></script>
<script src='https://api.mapbox.com/mapbox-gl-js/v2.14.1/mapbox-gl.js'></script>
<link href='https://api.mapbox.com/mapbox-gl-js/v2.14.1/mapbox-gl.css' rel='stylesheet' />
</head>
<body>
  <script src="main.js"></script>
</body>
</html>
```

> Remember to add your API keys to the links in your code. You can use the demo MapsIndoors API key: `d876ff0e60bb430b8fabb145`.

Add an empty `<div>` element to `<body>` with the `id` attribute set to "map":

```html
<!-- index.html -->

<!DOCTYPE html>
<html lang="en">
<head>
  <meta charset="UTF-8">
  <meta http-equiv="X-UA-Compatible" content="IE=edge">
  <meta name="viewport" content="width=device-width, initial-scale=1.0">
  <title>MapsIndoors</title>
<script src="https://app.mapsindoors.com/mapsindoors/js/sdk/4.24.8/mapsindoors-4.24.8.js.gz?apikey=YOUR_MAPSINDOORS_API_KEY"></script>
<script src='https://api.mapbox.com/mapbox-gl-js/v2.14.1/mapbox-gl.js'></script>
<link href='https://api.mapbox.com/mapbox-gl-js/v2.14.1/mapbox-gl.css' rel='stylesheet' />
</head>
<body>
<div id="map" style="width: 600px; height: 600px;"></div>
  <script src="main.js"></script>
</body>
</html>
```

To load data and display it on the map, we need to create a new *instance* of the [`MapsIndoors` class](https://app.mapsindoors.com/mapsindoors/js/sdk/latest/docs/mapsindoors.MapsIndoors.html#MapsIndoors) with a [`mapView` instance](https://app.mapsindoors.com/mapsindoors/js/sdk/latest/docs/mapsindoors.mapView.MapboxView.html) with a few *properties* set. This is all done by placing the following code in the `main.js` file you created earlier:

```javascript
// main.js

const mapViewOptions = {
    accessToken: 'YOUR_MAPBOX_ACCESS_TOKEN',
    element: document.getElementById('map'),
    center: { lat: 38.8974905, lng: -77.0362723 }, // The White House
    zoom: 17,
    maxZoom: 22
};
const mapViewInstance = new mapsindoors.mapView.MapboxView(mapViewOptions);
const mapsIndoorsInstance = new mapsindoors.MapsIndoors({
    mapView: mapViewInstance,
});
```

What happens in this snippet is we create a `mapViewInstance` that pulls up a [`MapboxView`](https://app.mapsindoors.com/mapsindoors/js/sdk/latest/docs/mapsindoors.mapView.MapboxView.html) with some [`mapViewOptions`](https://app.mapsindoors.com/mapsindoors/js/sdk/latest/docs/mapsindoors.mapView.MapboxView.html). The options define which element in the html-file to display the map in (in this case `<div id="map">`), where the map should center, what zoom level to display, and what the max zoom level is.

You should now see a map from your chosen map engine with MapsIndoors data loaded on top.

**Display a Floor Selector**

Next, we'll add a Floor Selector for changing between floors.

First, we add an empty `<div>` element programmatically. Then we create a new [`FloorSelector` *instance*](https://app.mapsindoors.com/mapsindoors/js/sdk/latest/docs/FloorSelector.html) and push the `floorSelectorElement` to the `mapboxInstance` to position it as a map controller:

```javascript
// main.js

const mapViewOptions = {
  accessToken: 'YOUR_MAPBOX_ACCESS_TOKEN',
  element: document.getElementById('map'),
  center: { lat: 38.8974905, lng: -77.0362723 }, // The White House
  zoom: 17,
  maxZoom: 22
};

const mapViewInstance = new mapsindoors.mapView.MapboxView(mapViewOptions);
const mapsIndoorsInstance = new mapsindoors.MapsIndoors({ mapView: mapViewInstance });
const mapboxInstance = mapViewInstance.getMap();

// Floor Selector
const floorSelectorElement = document.createElement('div');
new mapsindoors.FloorSelector(floorSelectorElement, mapsIndoorsInstance);
mapboxInstance.addControl({ onAdd: function () { return floorSelectorElement }, onRemove: function () { } });
```

{% embed url="<https://docs.mapbox.com/mapbox-gl-js/api/map/#map#addcontrol>" %}

> See all available control positions in the [Mapbox Documentation](https://docs.mapbox.com/mapbox-gl-js/api/map/#map#addcontrol).

You should now be able to switch between floors.

Here's a JSFiddle demonstrating the result you should have by now:

<https://jsfiddle.net/mapspeople/o12hrcL8/6/>
{% endtab %}

{% tab title="Mapbox v3 - Manually" %}
The MapsIndoors SDK is hosted on a Content Delivery Network (CDN) and should be loaded using a script tag.

Insert the MapsIndoors SDK script tag into `<head>`, followed by the Mapbox `script` and `style` tag:

```html
<!-- index.html -->

<!DOCTYPE html>
<html lang="en">
<head>
  <meta charset="UTF-8">
  <meta http-equiv="X-UA-Compatible" content="IE=edge">
  <meta name="viewport" content="width=device-width, initial-scale=1.0">
  <title>MapsIndoors</title>
<script src="https://app.mapsindoors.com/mapsindoors/js/sdk/4.33.0/mapsindoors-4.33.0.js.gz?apiKey=YOUR_MAPSINDOORS_API_KEY"></script>
<script src='https://api.mapbox.com/mapbox-gl-js/v3.3.0/mapbox-gl.js'></script>
<link href='https://api.mapbox.com/mapbox-gl-js/v3.3.0/mapbox-gl.css' rel='stylesheet' />
</head>
<body>
  <script src="main.js"></script>
</body>
</html>
```

> Remember to add your API keys to the links in your code. You can use the demo MapsIndoors API key: `d876ff0e60bb430b8fabb145`.

Add an empty `<div>` element to `<body>` with the `id` attribute set to "map":

```html
<!-- index.html -->

<!DOCTYPE html>
<html lang="en">
<head>
  <meta charset="UTF-8">
  <meta http-equiv="X-UA-Compatible" content="IE=edge">
  <meta name="viewport" content="width=device-width, initial-scale=1.0">
  <title>MapsIndoors</title>
<script src="https://app.mapsindoors.com/mapsindoors/js/sdk/4.33.0/mapsindoors-4.33.0.js.gz?apiKey=YOUR_MAPSINDOORS_API_KEY"></script>
<script src='https://api.mapbox.com/mapbox-gl-js/v3.3.0/mapbox-gl.js'></script>
<link href='https://api.mapbox.com/mapbox-gl-js/v3.3.0/mapbox-gl.css' rel='stylesheet' />
</head>
<body>
<div id="map" style="width: 600px; height: 600px;"></div>
  <script src="main.js"></script>
</body>
</html>
```

To load data and display it on the map, we need to create a new *instance* of the [`MapsIndoors` class](https://app.mapsindoors.com/mapsindoors/js/sdk/latest/docs/mapsindoors.MapsIndoors.html#MapsIndoors) with a [`mapView` instance](https://app.mapsindoors.com/mapsindoors/js/sdk/latest/docs/mapsindoors.mapView.MapboxV3View.html) with a few *properties* set. This is all done by placing the following code in the `main.js` file you created earlier:

```javascript
// main.js

const mapViewOptions = {
    accessToken: 'YOUR_MAPBOX_ACCESS_TOKEN',
    element: document.getElementById('map'),
    center: { lat: 38.8974905, lng: -77.0362723 }, // The White House
    zoom: 17,
    maxZoom: 22,
    mapsIndoorsTransitionLevel: 17,
    lightPreset: 'dusk',
    showMapMarkers: false
};
const mapViewInstance = new mapsindoors.mapView.MapboxV3View(mapViewOptions);
const mapsIndoorsInstance = new mapsindoors.MapsIndoors({
    mapView: mapViewInstance,
});
```

What happens in this snippet is we create a `mapViewInstance` that pulls up a [`MapboxView`](https://app.mapsindoors.com/mapsindoors/js/sdk/latest/docs/mapsindoors.mapView.MapboxV3View.html) with some [`mapViewOptions`](https://app.mapsindoors.com/mapsindoors/js/sdk/latest/docs/mapsindoors.mapView.MapboxV3View.html). The options define which element in the html-file to display the map in (in this case `<div id="map">`), where the map should center, what zoom level to display, and what the max zoom level is. You can also control `mapsIndoorsTransitionLevel` which defines when Mapbox' Extruded buildings disappear and MapsIndoors data is shown. `lightPreset` sets the global [light](/sdks-and-frameworks/web/tutorial/getting-started/prerequisites#mapbox-v3) for you application, while `showMapMarkers` property defines if Mapbox' Markers are shown on the map.

You should now see a map from your chosen map engine with MapsIndoors data loaded on top.

**Display a Floor Selector**

Next, we'll add a Floor Selector for changing between floors.

First, we add an empty `<div>` element programmatically. Then we create a new [`FloorSelector` *instance*](https://app.mapsindoors.com/mapsindoors/js/sdk/latest/docs/FloorSelector.html) and push the `floorSelectorElement` to the `mapboxInstance` to position it as a map controller:

```javascript
// main.js

const mapViewOptions = {
  accessToken: 'YOUR_MAPBOX_ACCESS_TOKEN',
  element: document.getElementById('map'),
  center: { lat: 38.8974905, lng: -77.0362723 }, // The White House
  zoom: 17,
  maxZoom: 22,
  mapsIndoorsTransitionLevel: 17,
  lightPreset: 'dusk',
  showMapMarkers: false
};

const mapViewInstance = new mapsindoors.mapView.MapboxV3View(mapViewOptions);
const mapsIndoorsInstance = new mapsindoors.MapsIndoors({ mapView: mapViewInstance });
const mapboxInstance = mapViewInstance.getMap();

// Floor Selector
const floorSelectorElement = document.createElement('div');
new mapsindoors.FloorSelector(floorSelectorElement, mapsIndoorsInstance);
mapboxInstance.addControl({ onAdd: function () { return floorSelectorElement }, onRemove: function () { } });
```

{% embed url="<https://docs.mapbox.com/mapbox-gl-js/api/map/#map#addcontrol>" %}

> See all available control positions in the [Mapbox Documentation](https://docs.mapbox.com/mapbox-gl-js/api/map/#map#addcontrol).

You should now be able to switch between floors.
{% endtab %}

{% tab title="Mapbox - MI Components" %}
Using the `<mi-map-mapbox>` component, the MapsIndoors JS SDK is automatically inserted into the DOM when initialized.

The MapsIndoors Web Components library can be loaded using [unpkg](https://unpkg.com/), a widely used CDN for everything on [npm](https://npmjs.com/).

Insert script tag into `<head>`:

```html
<!-- index.html -->

<!DOCTYPE html>
<html lang="en">
<head>
  <meta charset="UTF-8">
  <meta http-equiv="X-UA-Compatible" content="IE=edge">
  <meta name="viewport" content="width=device-width, initial-scale=1.0">
  <title>MapsIndoors</title>
<script src="https://unpkg.com/@mapsindoors/components@latest/dist/mi-components/mi-components.esm.js"></script>
</head>
<body>
  <script src="main.js"></script>
</body>
</html>
```

Check [@mapsindoors/components](https://www.npmjs.com/package/@mapsindoors/components) for latest version.

After you added the script tag into `<head>`, add the `<mi-map-mapbox>` custom element into `<body>`. We need to add and populate the `accessToken` and `mi-api-key` attributes with your access token and API key as well:

```html
<!-- index.html -->
<!DOCTYPE html>
<html lang="en">
<head>
  <meta charset="UTF-8">
  <meta http-equiv="X-UA-Compatible" content="IE=edge">
  <meta name="viewport" content="width=device-width, initial-scale=1.0">
  <title>MapsIndoors</title>
  <script src="https://unpkg.com/@mapsindoors/components@latest/dist/mi-components/mi-components.esm.js"></script>
</head>
<body>
<mi-map-mapbox style="width: 600px; height: 600px;" access-token="YOUR_MAPBOX_ACCESS_TOKEN" mi-api-key="YOUR_MAPSINDOORS_API_KEY">
</mi-map-mapbox>
  <script src="main.js"></script>
</body>
</html>
```

Remember to add your API keys where indicated. You can use the demo MapsIndoors API key: `d876ff0e60bb430b8fabb145`.

To center the map correctly, you need need the Mapbox *instance* in your JavaScript-file.

First we get a reference to the `<mi-map-mapbox>` element. Then we attach the [`mapsIndoorsReady`](https://app.mapsindoors.com/mapsindoors/js/sdk/latest/docs/mapsindoors.MapsIndoors.html#event:ready) event listener so we'll know when MapsIndoors is ready after loading. Lastly, on the `mapsIndoorsReady` event, get the Mapbox *instance* and call its [`setCenter` method](https://docs.mapbox.com/mapbox-gl-js/api/map/#map#setcenter) to center the map on the loaded data:

```javascript
// main.js
const miMapElement = document.querySelector('mi-map-mapbox');
miMapElement.addEventListener('mapsIndoorsReady', () => {
    miMapElement.getMapInstance().then((mapInstance) => {
        mapInstance.setCenter([-77.0362723, 38.8974905]); // The White House
    });
});
```

For more information on how to configure the `<mi-map-mapbox>` component, see [components.mapsindoors.com/map-mapbox](https://components.mapsindoors.com/map-mapbox/).

You should now see a map from your chosen map engine with MapsIndoors data loaded on top.

**Display a Floor Selector**

Next, we'll add a Floor Selector for changing between floors.

Using the `<mi-map-mapbox>` element, you can add the [floorSelectorControlPosition attribute](https://components.mapsindoors.com/map-mapbox/) to your existing element. In this case with the value `"TOP_RIGHT"`:

```html
<!-- index.html -->

<!DOCTYPE html>
<html lang="en">
<head>
  <meta charset="UTF-8">
  <meta http-equiv="X-UA-Compatible" content="IE=edge">
  <meta name="viewport" content="width=device-width, initial-scale=1.0">
  <title>MapsIndoors</title>
  <script src="https://unpkg.com/@mapsindoors/components@latest/dist/mi-components/mi-components.esm.js"></script>
</head>

<body>
<mi-map-mapbox style="width: 600px; height: 600px;" access-token="YOUR_MAPBOX_ACCESS_TOKEN" mi-api-key="YOUR_MAPSINDOORS_API_KEY" floor-selector-control-position="TOP_RIGHT">
  </mi-map-mapbox>
  <script src="main.js"></script>
</body>
</html>
```

> See all available control positions in the [Mapbox Documentation](https://docs.mapbox.com/mapbox-gl-js/api/map/#map#addcontrol).

You should now be able to switch between floors.

Here's a JSFiddle demonstrating the result you should have by now:

{% embed url="<https://jsfiddle.net/mapspeople/vr1wkmho/1/>" %}
{% endtab %}
{% endtabs %}

## Step 3. Create a Search Experience

In this step, you'll create a simple search and display the search results in a list. You'll also learn how to filter the data displayed on the map.

{% tabs %}
{% tab title="Google Maps - Manually" %}
**Create a Simple Query Search**

MapsIndoors Locations can be retrieved in the MapsIndoors namespace using the [`LocationsService.getLocations()` method](https://app.mapsindoors.com/mapsindoors/js/sdk/latest/docs/mapsindoors.services.LocationsService.html#.getLocations) but first you need to add a `<input>` and `<button>` element to the DOM.

* Create an `<input>` and `<button>` element in `<body>`.
* Attach an `onclick` event to the `<button>` element and call a `onSearch` method, which you will create next.

```html
<!-- index.html -->

<!DOCTYPE html>
<html lang="en">
<head>
  <meta charset="UTF-8">
  <meta http-equiv="X-UA-Compatible" content="IE=edge">
  <meta name="viewport" content="width=device-width, initial-scale=1.0">
  <title>MapsIndoors</title>
  <script src="https://app.mapsindoors.com/mapsindoors/js/sdk/4.24.8/mapsindoors-4.24.8.js.gz?apikey=YOUR_MAPSINDOORS_API_KEY"></script>
  <script src="https://maps.googleapis.com/maps/api/js?libraries=geometry&key=YOUR_GOOGLE_MAPS_API_KEY"></script>
</head>
<body>
  <div id="map" style="width: 600px; height: 600px;"></div>
  <script src="main.js"></script>
  <input type="text" placeholder="Search">
  <button onclick="onSearch()">Search</button>
</body>
</html>
```

* Create the `onSearch` method.
* Get a reference to the search `<input>` element.
* Define a new object with the search parameter `q` and the value of `searchInputElement`.
* Call the `getLocations` method and log out the results to the console.

```javascript
// main.js

const mapViewOptions = {
  element: document.getElementById('map'),
  center: { lat: 38.8974905, lng: -77.0362723 }, // The White House
  zoom: 17,
  maxZoom: 22,
};
const mapViewInstance = new mapsindoors.mapView.GoogleMapsView(mapViewOptions);
const mapsIndoorsInstance = new mapsindoors.MapsIndoors({ mapView: mapViewInstance });
const googleMapsInstance = mapViewInstance.getMap();

// Floor Selector
const floorSelectorElement = document.createElement('div');
new mapsindoors.FloorSelector(floorSelectorElement, mapsIndoorsInstance);
googleMapsInstance.controls[google.maps.ControlPosition.RIGHT_TOP].push(floorSelectorElement);

  function onSearch() {
    const searchInputElement = document.querySelector('input');

    const searchParameters = { q: searchInputElement.value };
    mapsindoors.services.LocationsService.getLocations(searchParameters).then(locations => {
      console.log(locations);
    });
  });
}
```

See all available search parameters in the [reference documentation](https://app.mapsindoors.com/mapsindoors/js/sdk/latest/docs/mapsindoors.services.LocationsService.html#.getLocations).

**Display a List of Search Results**

To display a list of search results you can append each search result to a list element.

* Add the `<ul>` list element below the search field in `<body>` with the `id` attribute set to "search-results".

```html
<!-- index.html -->

<!DOCTYPE html>
<html lang="en">
<head>
  <meta charset="UTF-8">
  <meta http-equiv="X-UA-Compatible" content="IE=edge">
  <meta name="viewport" content="width=device-width, initial-scale=1.0">
  <title>MapsIndoors</title>
  <script src="https://app.mapsindoors.com/mapsindoors/js/sdk/4.24.8/mapsindoors-4.24.8.js.gz?apikey=YOUR_MAPSINDOORS_API_KEY"></script>
  <script src="https://maps.googleapis.com/maps/api/js?libraries=geometry&key=YOUR_GOOGLE_MAPS_API_KEY"></script>
</head>
<body>
  <div id="map" style="width: 600px; height: 600px;"></div>
  <script src="main.js"></script>
  <input type="text" placeholder="Search">
  <button onclick="onSearch()">Search</button>
  <ul id="search-results"></ul>
</body>
</html>
```

* Get a reference to the list element.
* Reset the list on every complete search.

```javascript
// main.js

const mapViewOptions = {
  element: document.getElementById('map'),
  center: { lat: 38.8974905, lng: -77.0362723 }, // The White House
  zoom: 17,
  maxZoom: 22,
};
const mapViewInstance = new mapsindoors.mapView.GoogleMapsView(mapViewOptions);
const mapsIndoorsInstance = new mapsindoors.MapsIndoors({ mapView: mapViewInstance });
const googleMapsInstance = mapViewInstance.getMap();

// Floor Selector
const floorSelectorElement = document.createElement('div');
new mapsindoors.FloorSelector(floorSelectorElement, mapsIndoorsInstance);
googleMapsInstance.controls[google.maps.ControlPosition.RIGHT_TOP].push(floorSelectorElement);

function onSearch() {
  const searchInputElement = document.querySelector('input');
 // Get list element reference
  const searchResultsElement = document.getElementById('search-results');

  const searchParameters = { q: searchInputElement.value };
  mapsindoors.services.LocationsService.getLocations(searchParameters).then(locations => {
   // Reset search results list
    searchResultsElement.innerHTML = null;
  });
}
```

* Add a *for* loop and append every result to the search results list element.

```javascript
// main.js

const mapViewOptions = {
  element: document.getElementById('map'),
  center: { lat: 38.8974905, lng: -77.0362723 }, // The White House
  zoom: 17,
  maxZoom: 22,
};
const mapViewInstance = new mapsindoors.mapView.GoogleMapsView(mapViewOptions);
const mapsIndoorsInstance = new mapsindoors.MapsIndoors({ mapView: mapViewInstance });
const googleMapsInstance = mapViewInstance.getMap();

// Floor Selector
const floorSelectorElement = document.createElement('div');
new mapsindoors.FloorSelector(floorSelectorElement, mapsIndoorsInstance);
googleMapsInstance.controls[google.maps.ControlPosition.RIGHT_TOP].push(floorSelectorElement);

function onSearch() {
  const searchInputElement = document.querySelector('input');
  // Get list element reference
  const searchResultsElement = document.getElementById('search-results');

  const searchParameters = { q: searchInputElement.value };
  mapsindoors.services.LocationsService.getLocations(searchParameters).then(locations => {
    // Reset search results list
    searchResultsElement.innerHTML = null;

  // Append new search results
  locations.forEach(location => {
    const listElement = document.createElement('li');
    listElement.innerHTML = location.properties.name;
    searchResultsElement.appendChild(listElement);
  });
  });
}
```

**Filter Locations on Map Based on Search Results**[**​**](https://docs.mapsindoors.com/getting-started/web/search#filter-locations-on-map-based-on-search-results)

To filter the map to only display the search results you can use the `filter` method.

* Call `mapsIndoorsInstance.filter` with an array of Location IDs.

```javascript
// main.js

const mapViewOptions = {
  element: document.getElementById('map'),
  center: { lat: 38.8974905, lng: -77.0362723 }, // The White House
  zoom: 17,
  maxZoom: 22,
};
const mapViewInstance = new mapsindoors.mapView.GoogleMapsView(mapViewOptions);
const mapsIndoorsInstance = new mapsindoors.MapsIndoors({ mapView: mapViewInstance });
const googleMapsInstance = mapViewInstance.getMap();

// Floor Selector
const floorSelectorElement = document.createElement('div');
new mapsindoors.FloorSelector(floorSelectorElement, mapsIndoorsInstance);
googleMapsInstance.controls[google.maps.ControlPosition.RIGHT_TOP].push(floorSelectorElement);

function onSearch() {
  const searchInputElement = document.querySelector('input');
  // Get list element reference
  const searchResultsElement = document.getElementById('search-results');

  const searchParameters = { q: searchInputElement.value };
  mapsindoors.services.LocationsService.getLocations(searchParameters).then(locations => {
    // Reset search results list
    searchResultsElement.innerHTML = null;

    // Append new search results
    locations.forEach(location => {
      const listElement = document.createElement('li');
      listElement.innerHTML = location.properties.name;
      searchResultsElement.appendChild(listElement);
    });

   // Filter map to only display search results
    mapsIndoorsInstance.filter(locations.map(location => location.id), false);
}
```

To remove the location filter again, call `mapsIndoorsInstance.filter(null)`.

Here's a JSFiddle demonstrating the result you should have by now:

{% embed url="<https://jsfiddle.net/mapspeople/cwg9eumd/2/>" %}
{% endtab %}

{% tab title="Google Maps - MI Components" %}
**Create a Simple Query Search**

Using the `<mi-search>` component you get a `<input>`element tied tightly together with the [Location Service](https://app.mapsindoors.com/mapsindoors/js/sdk/latest/docs/LocationsService.html).

* Insert the `<mi-search>` custom element into `<body>`.
* Add the `mapsindoors` and `placeholder` attributes.

```html
<!-- index.html -->

<!DOCTYPE html>
<html lang="en">
<head>
  <meta charset="UTF-8">
  <meta http-equiv="X-UA-Compatible" content="IE=edge">
  <meta name="viewport" content="width=device-width, initial-scale=1.0">
  <title>MapsIndoors</title>
  <script type="module" src="https://unpkg.com/@mapsindoors/components@latest/dist/mi-components/mi-components.esm.js"></script>
</head>
<body>
  <mi-map-googlemaps style="width: 600px; height: 600px;" gm-api-key="YOUR_GOOGLE_MAPS_API_KEY" mi-api-key="YOUR_MAPSINDOORS_API_KEY" floor-selector-control-position="TOP_RIGHT">
  </mi-map-googlemaps>
  <mi-search
  style="width: 600px;"
  mapsindoors="true"
  placeholder="Search">
  </mi-search>
  <script src="main.js"></script>
</body>
</html>
```

* Get a reference to the `<mi-search>` element.
* Attach an `results` event listener and log out the results to the console.

```javascript
// main.js

const miMapElement = document.querySelector('mi-map-googlemaps');
const miSearchElement = document.querySelector('mi-search');

miMapElement.addEventListener('mapsIndoorsReady', () => {
  miMapElement.getMapInstance().then((mapInstance) => {
    mapInstance.setCenter({ lat: 38.8974905, lng: -77.0362723 }); // The White House
  });
})

miSearchElement.addEventListener('results', (event) => {
    console.log(event.detail);
});
```

For more information on available events and how to configure the `<mi-search>` component, see [components.mapsindoors.com/search](https://components.mapsindoors.com/search/).

**Display a List of Search Results**[**​**](https://docs.mapsindoors.com/getting-started/web/search#show-a-list-of-search-results)

To display a list of search results you can append each search result to a list element.

* Insert the `<mi-list>` custom element below the search field in `<body>`.
* Add the `scroll-buttons-enabled` and `scroll-length` attributes.

```html
<!-- index.html -->

<!DOCTYPE html>
<html lang="en">
<head>
  <meta charset="UTF-8">
  <meta http-equiv="X-UA-Compatible" content="IE=edge">
  <meta name="viewport" content="width=device-width, initial-scale=1.0">
  <title>MapsIndoors</title>
  <script type="module" src="https://unpkg.com/@mapsindoors/components@13.7.1/dist/mi-components/mi-components.esm.js"></script>
</head>
<body>
  <mi-map-googlemaps style="width: 600px; height: 600px;" gm-api-key="YOUR_GOOGLE_MAPS_API_KEY" mi-api-key="YOUR_MAPSINDOORS_API_KEY" floor-selector-control-position="TOP_RIGHT">
  </mi-map-googlemaps>
  <mi-search style="width: 600px;" mapsindoors="true" placeholder="Search">
  </mi-search>
<mi-list
  style="width: 600px; height: 400px;"
  scroll-buttons-enabled="true"
  scroll-length="200">
</mi-list>
  <script src="main.js"></script>
</body>
</html>
```

For more information on how to configure the `<mi-list>` component, see [components.mapsindoors.com/list](https://components.mapsindoors.com/list/).

* Get a reference to the list element.
* Reset the list on every complete search.

```javascript
// main.js

const miMapElement = document.querySelector('mi-map-googlemaps');
const miSearchElement = document.querySelector('mi-search');
const miListElement = document.querySelector('mi-list');

miMapElement.addEventListener('mapsIndoorsReady', () => {
  miMapElement.getMapInstance().then((mapInstance) => {
    mapInstance.setCenter({ lat: 38.8974905, lng: -77.0362723 }); // The White House
  });
})

miSearchElement.addEventListener('results', (event) => {
  // Reset search results list
  miListElement.innerHTML = null;
});
```

* Add a *for* loop and append every result to the search results list element.

```javascript
// main.js

const miMapElement = document.querySelector('mi-map-googlemaps');
const miSearchElement = document.querySelector('mi-search');
const miListElement = document.querySelector('mi-list');

miMapElement.addEventListener('mapsIndoorsReady', () => {
  miMapElement.getMapInstance().then((mapInstance) => {
    mapInstance.setCenter({ lat: 38.8974905, lng: -77.0362723 }); // The White House
  });
})

miSearchElement.addEventListener('results', (event) => {
  // Reset search results list
  miListElement.innerHTML = null;

// Append new search results
event.detail.forEach(location => {
  const miListItemElement = document.createElement('mi-list-item-location');
  miListItemElement.location = location;
  miListElement.appendChild(miListItemElement);
});
});
```

**Filter Locations on Map Based on Search Results**[**​**](https://docs.mapsindoors.com/getting-started/web/search#filter-locations-on-map-based-on-search-results)

To filter the map to only display the search results you can use the `filter` method.

```javascript
// main.js

const miMapElement = document.querySelector('mi-map-googlemaps');
const miSearchElement = document.querySelector('mi-search');
const miListElement = document.querySelector('mi-list');

miMapElement.addEventListener('mapsIndoorsReady', () => {
  miMapElement.getMapInstance().then((mapInstance) => {
    mapInstance.setCenter({ lat: 38.8974905, lng: -77.0362723 }); // The White House
  });
})

miSearchElement.addEventListener('results', (event) => {
  // Reset search results list
  miListElement.innerHTML = null;

  // Append new search results
  event.detail.forEach(location => {
    const miListItemElement = document.createElement('mi-list-item-location');
    miListItemElement.location = location;
    miListElement.appendChild(miListItemElement);
  });

// Get the MapsIndoors instance
miMapElement.getMapsIndoorsInstance().then((mapsIndoorsInstance) => {
  // Filter map to only display search results
  mapsIndoorsInstance.filter(event.detail.map(location => location.id), false);
  });
});
```

To remove the location filter again, call `mapsIndoorsInstance.filter(null)`.

Here's a JSFiddle demonstrating the result you should have by now:

{% embed url="<https://jsfiddle.net/mapspeople/jtnw0u1y/1/>" fullWidth="false" %}
{% endtab %}

{% tab title="Mapbox - Manually" %}
**Create a Simple Query Search**

MapsIndoors Locations can be retrieved in the MapsIndoors namespace using the [`LocationsService.getLocations()` method](https://app.mapsindoors.com/mapsindoors/js/sdk/latest/docs/mapsindoors.services.LocationsService.html#.getLocations) but first you need to add an `<input>` and `<button>` element to the DOM.

* Create an `<input>` and `<button>` element in `<body>`.
* Attach an `onclick` event to the `<button>` element and call a `onSearch` method, which you will create next.

```html
<!-- index.html -->

<!DOCTYPE html>
<html lang="en">
<head>
  <meta charset="UTF-8">
  <meta http-equiv="X-UA-Compatible" content="IE=edge">
  <meta name="viewport" content="width=device-width, initial-scale=1.0">
  <title>MapsIndoors</title>
  <script src="https://app.mapsindoors.com/mapsindoors/js/sdk/4.24.8/mapsindoors-4.24.8.js.gz?apikey=YOUR_MAPSINDOORS_API_KEY"></script>
  <script src="https://api.mapbox.com/mapbox-gl-js/v2.14.1/mapbox-gl.js"></script>
  <link rel="stylesheet" href="https://api.mapbox.com/mapbox-gl-js/v2.14.1/mapbox-gl.css">
</head>
<body>
  <div id="map" style="width: 600px; height: 600px;"></div>
  <script src="main.js"></script>
  <input type="text" placeholder="Search">
  <button onclick="onSearch()">Search</button>
</body>
</html>
```

* Create the `onSearch` method.
* Get a reference to the search `<input>` element.
* Define a new object with the search parameter `q` and the value of `searchInputElement`.
* Call the `getLocations` method and log out the results to the console.

```javascript
// main.js

const mapViewOptions = {
    accessToken: 'YOUR_MAPBOX_ACCESS_TOKEN',
    element: document.getElementById('map'),
    center: { lat: 38.8974905, lng: -77.0362723 }, // The White House
    zoom: 17,
    maxZoom: 22,
};
const mapViewInstance = new mapsindoors.mapView.MapboxView(mapViewOptions);
const mapsIndoorsInstance = new mapsindoors.MapsIndoors({ mapView: mapViewInstance });

// Floor Selector
const floorSelectorElement = document.createElement('div');
new mapsindoors.FloorSelector(floorSelectorElement, mapsIndoorsInstance);
mapboxInstance.addControl({ onAdd: function () { return floorSelectorElement }, onRemove: function () { } });

  function onSearch() {
    const searchInputElement = document.querySelector('input');

    const searchParameters = { q: searchInputElement.value };
    mapsindoors.services.LocationsService.getLocations(searchParameters).then(locations => {
      console.log(locations);
    });
  }
```

See all available search parameters in the [reference documentation](https://app.mapsindoors.com/mapsindoors/js/sdk/latest/docs/mapsindoors.services.LocationsService.html#.getLocations).

**Display a List of Search Results**[**​**](https://docs.mapsindoors.com/getting-started/web/search#show-a-list-of-search-results)

To display a list of search results you can append each search result to a list element.

* Add the `<ul>` list element below the search field in `<body>` with the `id` attribute set to "search-results".

```html
<!-- index.html -->

<!DOCTYPE html>
<html lang="en">
<head>
  <meta charset="UTF-8">
  <meta http-equiv="X-UA-Compatible" content="IE=edge">
  <meta name="viewport" content="width=device-width, initial-scale=1.0">
  <title>MapsIndoors</title>
  <script src="https://app.mapsindoors.com/mapsindoors/js/sdk/4.24.8/mapsindoors-4.24.8.js.gz?apikey=YOUR_MAPSINDOORS_API_KEY"></script>
  <script src="https://api.mapbox.com/mapbox-gl-js/v2.14.1/mapbox-gl.js"></script>
  <link rel="stylesheet" href="https://api.mapbox.com/mapbox-gl-js/v2.14.1/mapbox-gl.css">
</head>
<body>
  <div id="map" style="width: 600px; height: 600px;"></div>
  <script src="main.js"></script>
  <input type="text" placeholder="Search">
  <button onclick="onSearch()">Search</button>
  <ul id="search-results"></ul>
</body>
</html>
```

* Get a reference to the list element.
* Reset the list on every complete search.

```javascript
// main.js

const mapViewOptions = {
  accessToken: "YOUR_MAPBOX_ACCESS_TOKEN",
  element: document.getElementById('map'),
  center: { lat: 38.8974905, lng: -77.0362723 }, // The White House
  zoom: 17,
  maxZoom: 22,
};
const mapViewInstance = new mapsindoors.mapView.MapboxView(mapViewOptions);
const mapsIndoorsInstance = new mapsindoors.MapsIndoors({ mapView: mapViewInstance });
const mapboxInstance = mapViewInstance.getMap();

// Floor Selector
const floorSelectorElement = document.createElement('div');
new mapsindoors.FloorSelector(floorSelectorElement, mapsIndoorsInstance);
mapboxInstance.addControl({ onAdd: function () { return floorSelectorElement }, onRemove: function () { } });

function onSearch() {
  const searchInputElement = document.querySelector('input');
 // Get list element reference
  const searchResultsElement = document.getElementById('search-results');

  const searchParameters = { q: searchInputElement.value };
  mapsindoors.services.LocationsService.getLocations(searchParameters).then(locations => {
   // Reset search results list
    searchResultsElement.innerHTML = null;
  });
}
```

* Add a *for* loop and append every result to the search results list element.

```javascript
// main.js

const mapViewOptions = {
  accessToken: "YOUR_MAPBOX_ACCESS_TOKEN",
  element: document.getElementById('map'),
  center: { lat: 38.8974905, lng: -77.0362723 }, // The White House
  zoom: 17,
  maxZoom: 22,
};
const mapViewInstance = new mapsindoors.mapView.MapboxView(mapViewOptions);
const mapsIndoorsInstance = new mapsindoors.MapsIndoors({ mapView: mapViewInstance });
const mapboxInstance = mapViewInstance.getMap();

// Floor Selector
const floorSelectorElement = document.createElement('div');
new mapsindoors.FloorSelector(floorSelectorElement, mapsIndoorsInstance);
mapboxInstance.addControl({ onAdd: function () { return floorSelectorElement }, onRemove: function () { } });

function onSearch() {
  const searchInputElement = document.querySelector('input');
  // Get list element reference
  const searchResultsElement = document.getElementById('search-results');

  const searchParameters = { q: searchInputElement.value };
  mapsindoors.services.LocationsService.getLocations(searchParameters).then(locations => {
    // Reset search results list
    searchResultsElement.innerHTML = null;

  // Append new search results
  locations.forEach(location => {
    const listElement = document.createElement('li');
    listElement.innerHTML = location.properties.name;
    searchResultsElement.appendChild(listElement);
  });
  });
}
```

**Filter Locations on Map Based on Search Results**[**​**](https://docs.mapsindoors.com/getting-started/web/search#filter-locations-on-map-based-on-search-results)

To filter the map to only display the search results you can use the `filter` method.

* Call `mapsIndoorsInstance.filter` with an array of Location IDs.

```javascript
// main.js

const mapViewOptions = {
  accessToken: "YOUR_MAPBOX_ACCESS_TOKEN",
  element: document.getElementById('map'),
  center: { lat: 38.8974905, lng: -77.0362723 }, // The White House
  zoom: 17,
  maxZoom: 22,
};
const mapViewInstance = new mapsindoors.mapView.MapboxView(mapViewOptions);
const mapsIndoorsInstance = new mapsindoors.MapsIndoors({ mapView: mapViewInstance });
const mapboxInstance = mapViewInstance.getMap();

// Floor Selector
const floorSelectorElement = document.createElement('div');
new mapsindoors.FloorSelector(floorSelectorElement, mapsIndoorsInstance);
mapboxInstance.addControl({ onAdd: function () { return floorSelectorElement }, onRemove: function () { } });

function onSearch() {
  const searchInputElement = document.querySelector('input');
  // Get list element reference
  const searchResultsElement = document.getElementById('search-results');

  const searchParameters = { q: searchInputElement.value };
  mapsindoors.services.LocationsService.getLocations(searchParameters).then(locations => {
    // Reset search results list
    searchResultsElement.innerHTML = null;

    // Append new search results
    locations.forEach(location => {
      const listElement = document.createElement('li');
      listElement.innerHTML = location.properties.name;
      searchResultsElement.appendChild(listElement);
    });

  // Filter map to only display search results
  mapsIndoorsInstance.filter(locations.map(location => location.id), false);
}
```

To remove the location filter again, call `mapsIndoorsInstance.filter(null)`.

Here's a JSFiddle demonstrating the result you should have by now:

<https://jsfiddle.net/mapspeople/r86903om/3/>

{% embed url="<https://jsfiddle.net/mapspeople/r86903om/>" %}
{% endtab %}

{% tab title="Mapbox - MI Components" %}
**Create a Simple Query Search**

Using the `<mi-search>` component you get an `<input>`element tied tightly together with the [Location Service](https://app.mapsindoors.com/mapsindoors/js/sdk/latest/docs/LocationsService.html).

* Insert the `<mi-search>` custom element into `<body>`.
* Add the `mapsindoors` and `placeholder` attributes.

```html
<!-- index.html -->

<!DOCTYPE html>
<html lang="en">
<head>
  <meta charset="UTF-8">
  <meta http-equiv="X-UA-Compatible" content="IE=edge">
  <meta name="viewport" content="width=device-width, initial-scale=1.0">
  <title>MapsIndoors</title>
  <script type="module" src="https://unpkg.com/@mapsindoors/components@latest/dist/mi-components/mi-components.esm.js"></script>
</head>
<body>
  <mi-map-mapbox style="width: 600px; height: 600px;"
    access-token="YOUR_MAPBOX_ACCESS_TOKEN"
    mi-api-key="YOUR_MAPSINDOORS_API_KEY"
    floor-selector-control-position="TOP_RIGHT">
  </mi-map-mapbox>
<mi-search style="width: 600px;" mapsindoors="true" placeholder="Search">
</mi-search>
  <script src="main.js"></script>
</body>
</html>
```

* Get a reference to the `<mi-search>` element.
* Attach a `results` event listener and log the results in the console.

```javascript
// main.js
const miMapElement = document.querySelector('mi-map-mapbox');
+ const miSearchElement = document.querySelector('mi-search');

miMapElement.addEventListener('mapsIndoorsReady', () => {
    miMapElement.getMapInstance().then((mapInstance) => {
        mapInstance.setCenter([-77.0362723, 38.8974905]); // The White House
    });
});

miSearchElement.addEventListener('results', (event) => {
    console.log(event.detail);
});
```

For more information on available events and how to configure the `<mi-search>` component, see [components.mapsindoors.com/search](https://components.mapsindoors.com/search/).

**Display a List of Search Results**[**​**](https://docs.mapsindoors.com/getting-started/web/search#show-a-list-of-search-results)

To display a list of search results you can append each search result to a list element.

* Insert the `<mi-list>` custom element below the search field in `<body>`.
* Add the `scroll-buttons-enabled` and `scroll-length` attributes.

```html
<!-- index.html -->

<!DOCTYPE html>
<html lang="en">
<head>
  <meta charset="UTF-8">
  <meta http-equiv="X-UA-Compatible" content="IE=edge">
  <meta name="viewport" content="width=device-width, initial-scale=1.0">
  <title>MapsIndoors</title>
  <script type="module" src="https://unpkg.com/@mapsindoors/components@13.7.1/dist/mi-components/mi-components.esm.js"></script>
</head>
<body>
  <mi-map-mapbox style="width: 600px; height: 600px;" access-token="YOUR_MAPBOX_ACCESS_TOKEN" mi-api-key="YOUR_MAPSINDOORS_API_KEY">
  </mi-map-mapbox>
  <mi-search style="width: 600px;" mapsindoors="true" placeholder="Search">
  </mi-search>
  <mi-list style="width: 600px; height: 400px;" scroll-buttons-enabled="true" scroll-length="200">
  </mi-list>
  <script src="main.js"></script>
</body>
</html>
```

For more information on how to configure the `<mi-list>` component, see [components.mapsindoors.com/list](https://components.mapsindoors.com/list/).

* Get a reference to the list element.
* Reset the list on every complete search.

```javascript
// main.js

const miMapElement = document.querySelector("mi-map-mapbox");
const miSearchElement = document.querySelector('mi-search');
const miListElement = document.querySelector('mi-list');

miMapElement.addEventListener('mapsIndoorsReady', () => {
  miMapElement.getMapInstance().then((mapInstance) => {
    mapInstance.setCenter({ lat: 38.8974905, lng: -77.0362723 }); // The White House
  });
})

miSearchElement.addEventListener('results', (event) => {
  // Reset search results list
  miListElement.innerHTML = null;
});
```

* Add a *for* loop and append every result to the search results list element.

```javascript
// main.js

const miMapElement = document.querySelector('mi-map-mapbox');
const miSearchElement = document.querySelector('mi-search');
const miListElement = document.querySelector('mi-list');

miMapElement.addEventListener('mapsIndoorsReady', () => {
  miMapElement.getMapInstance().then((mapInstance) => {
    mapInstance.setCenter({ lat: 38.8974905, lng: -77.0362723 }); // The White House
  });
})

miSearchElement.addEventListener('results', (event) => {
  // Reset search results list
  miListElement.innerHTML = null;

// Append new search results
  event.detail.forEach(location => {
    const miListItemElement = document.createElement('mi-list-item-location');
    miListItemElement.location = location;
    miListElement.appendChild(miListItemElement);
  });
});
```

**Filter Locations on Map Based on Search Results**[**​**](https://docs.mapsindoors.com/getting-started/web/search#filter-locations-on-map-based-on-search-results)

To filter the map to only display the search results you can use the `filter` method.

```javascript
// main.js

const miMapElement = document.querySelector("mi-map-mapbox");
const miSearchElement = document.querySelector('mi-search');
const miListElement = document.querySelector('mi-list');

miMapElement.addEventListener('mapsIndoorsReady', () => {
  miMapElement.getMapInstance().then((mapInstance) => {
    mapInstance.setCenter({ lat: 38.8974905, lng: -77.0362723 }); // The White House
  });
})

miSearchElement.addEventListener('results', (event) => {
  // Reset search results list
  miListElement.innerHTML = null;

  // Append new search results
  event.detail.forEach(location => {
    const miListItemElement = document.createElement('mi-list-item-location');
    miListItemElement.location = location;
    miListElement.appendChild(miListItemElement);
  });

// Get the MapsIndoors instance
miMapElement.getMapsIndoorsInstance().then((mapsIndoorsInstance) => {
  // Filter map to only display search results
  mapsIndoorsInstance.filter(event.detail.map(location => location.id), false);
});
```

To remove the location filter again, call `mapsIndoorsInstance.filter(null)`.

Here's a JSFiddle demonstrating the result you should have by now:

{% embed url="<https://jsfiddle.net/mapspeople/bd4n1qtr/>" %}
{% endtab %}
{% endtabs %}

## Step 4. Getting Directions

In this step you'll create directions between two points and change the transportation mode.

### Step 4a. Get Directions Between Two Locations[​](https://docs.mapsindoors.com/getting-started/web/directions#get-directions-between-two-locations) <a href="#get-directions-between-two-locations" id="get-directions-between-two-locations"></a>

To get directions between two MapsIndoors Locations, or places outside of your MapsIndoors solution, we need two things:

1. The Directions Service instance
2. The Directions Render instance

We need the Directions Service to calculate the fastest route between two points, and use the Directions Render to actually draw the route on the map.

{% tabs %}
{% tab title="Google Maps - Manually" %}
**Get Directions Service and Render instances**

First, initialize the [MapsIndoors Directions Service](https://app.mapsindoors.com/mapsindoors/js/sdk/latest/docs/mapsindoors.services.DirectionsService.html), and add an external Directions Provider (in this case Google Maps).

Then, we need to initialize the [MapsIndoors Directions Render](https://app.mapsindoors.com/mapsindoors/js/sdk/latest/docs/mapsindoors.directions.DirectionsRenderer.html) with the MapsIndoors instance:

```javascript
// main.js

const mapViewOptions = {
  element: document.getElementById('map'),
  center: { lat: 38.8974905, lng: -77.0362723 }, // The White House
  zoom: 17,
  maxZoom: 22,
};
const mapViewInstance = new mapsindoors.mapView.GoogleMapsView(mapViewOptions);
const mapsIndoorsInstance = new mapsindoors.MapsIndoors({ mapView: mapViewInstance });
const googleMapsInstance = mapViewInstance.getMap();

const externalDirectionsProvider = new mapsindoors.directions.GoogleMapsProvider();
const miDirectionsServiceInstance = new mapsindoors.services.DirectionsService(externalDirectionsProvider);
const directionsRendererOptions = { mapsIndoors: mapsIndoorsInstance }
const miDirectionsRendererInstance = new mapsindoors.directions.DirectionsRenderer(directionsRendererOptions);

// Floor Selector
const floorSelectorElement = document.createElement('div');
new mapsindoors.FloorSelector(floorSelectorElement, mapsIndoorsInstance);
googleMapsInstance.controls[google.maps.ControlPosition.RIGHT_TOP].push(floorSelectorElement);

function onSearch() {
  const searchInputElement = document.querySelector('input');
  // Get list element reference
  const searchResultsElement = document.getElementById('search-results');

  const searchParameters = { q: searchInputElement.value };
  mapsindoors.services.LocationsService.getLocations(searchParameters).then(locations => {
    // Reset search results list
    searchResultsElement.innerHTML = null;

    // Append new search results
    locations.forEach(location => {
      const listElement = document.createElement('li');
      listElement.innerHTML = location.properties.name;
      searchResultsElement.appendChild(listElement);
    });

    // Filter map to only display search results
    mapsIndoorsInstance.filter(locations.map(location => location.id), false);
  });
}
```

> See all available directions render options and methods in the [reference documentation](https://app.mapsindoors.com/mapsindoors/js/sdk/latest/docs/mapsindoors.directions.DirectionsRenderer.html).

Now our app is ready to provide directions. Next up is how to give it an Origin and Destination *-* and draw a route between those.

**Draw a Route on the Map**[**​**](https://docs.mapsindoors.com/getting-started/web/directions#draw-a-route-on-the-map)

To display a route on the map, we use the coordinates of an Origin and Destination and draw a line between them. For this, we use MapsIndoors' [DirectionsRenderer](https://app.mapsindoors.com/mapsindoors/js/sdk/latest/docs/mapsindoors.directions.DirectionsRenderer.html).

The Destination coordinate is retrieved dynamically using the coordinate of the selected Location in the search results list. Therefore, you must search for the destination to get directions, and then click the result in the text list. Different solutions can of course be implemented into your own solution later.

In this tutorial, the Origin is, naturally, a hardcoded coordinate in the demo API key supplied with this guide. If you're using you own key, you can hardcode coordinates from a Location in your building instead.

In the following example, this is what happens:

1. Create a new `getRoute` method in `main.js` which accepts a location
2. Create two new constants, one for the Origin's coordinate, and another for the Destination's coordinate
3. Add another constant defining the `routeParameters`
4. Using the [MapsIndoors Directions Service](https://app.mapsindoors.com/mapsindoors/js/sdk/latest/docs/mapsindoors.services.DirectionsService.html#getRoute) call the `getRoute` method to get the fastest route between the two coordinates

   > See all available route parameters in the [reference documentation](https://app.mapsindoors.com/mapsindoors/js/sdk/latest/docs/mapsindoors.services.DirectionsService.html#getRoute).
5. Using the [MapsIndoors Directions Renderer](https://app.mapsindoors.com/mapsindoors/js/sdk/latest/docs/mapsindoors.directions.DirectionsRenderer.html#setRoute) call the `setRoute` method to display the route on the map

```javascript
// main.js

const mapViewOptions = {
  element: document.getElementById('map'),
  center: { lat: 38.8974905, lng: -77.0362723 }, // The White House
  zoom: 17,
  maxZoom: 22,
};
const mapViewInstance = new mapsindoors.mapView.GoogleMapsView(mapViewOptions);
const mapsIndoorsInstance = new mapsindoors.MapsIndoors({ mapView: mapViewInstance });
const googleMapsInstance = mapViewInstance.getMap();

const externalDirectionsProvider = new mapsindoors.directions.GoogleMapsProvider();
const miDirectionsServiceInstance = new mapsindoors.services.DirectionsService(externalDirectionsProvider);
const directionsRendererOptions = { mapsIndoors: mapsIndoorsInstance }
const miDirectionsRendererInstance = new mapsindoors.directions.DirectionsRenderer(directionsRendererOptions);

// Floor Selector
const floorSelectorElement = document.createElement('div');
new mapsindoors.FloorSelector(floorSelectorElement, mapsIndoorsInstance);
googleMapsInstance.controls[google.maps.ControlPosition.RIGHT_TOP].push(floorSelectorElement);

function onSearch() {
  const searchInputElement = document.querySelector('input');
  // Get list element reference
  const searchResultsElement = document.getElementById('search-results');

  const searchParameters = { q: searchInputElement.value };
  mapsindoors.services.LocationsService.getLocations(searchParameters).then(locations => {
    // Reset search results list
    searchResultsElement.innerHTML = null;

    // Append new search results
    locations.forEach(location => {
      const listElement = document.createElement('li');
      listElement.innerHTML = location.properties.name;
      searchResultsElement.appendChild(listElement);
    });

    // Filter map to only display search results
    mapsIndoorsInstance.filter(locations.map(location => location.id), false);
  });
}

function getRoute(location) {
  const originLocationCoordinate = { lat: 38.897389429704695, lng: -77.03740973527613, floor: 0 }; // Oval Office, The White House (Hardcoded coordinate and floor index)
  const destinationCoordinate = { lat: location.properties.anchor.coordinates[1], lng: location.properties.anchor.coordinates[0], floor: location.properties.floor };

  // Route parameters
  const routeParameters = {
    origin: originLocationCoordinate,
    destination: destinationCoordinate,
    travelMode: 'WALKING'
  };

  // Get route from directions service
  miDirectionsServiceInstance.getRoute(routeParameters).then((directionsResult) => {
    // Use directions render to display route
    miDirectionsRendererInstance.setRoute(directionsResult);
  });
}
```

Now, to make it more dynamic, we attach a `click` event listener for each location appended to the search results list element with the `getRoute` method as a callback function.

You will now have something like this:

```javascript
// main.js

const mapViewOptions = {
  element: document.getElementById('map'),
  center: { lat: 38.8974905, lng: -77.0362723 }, // The White House
  zoom: 17,
  maxZoom: 22,
};
const mapViewInstance = new mapsindoors.mapView.GoogleMapsView(mapViewOptions);
const mapsIndoorsInstance = new mapsindoors.MapsIndoors({ mapView: mapViewInstance });
const googleMapsInstance = mapViewInstance.getMap();

const externalDirectionsProvider = new mapsindoors.directions.GoogleMapsProvider();
const miDirectionsServiceInstance = new mapsindoors.services.DirectionsService(externalDirectionsProvider);
const directionsRendererOptions = { mapsIndoors: mapsIndoorsInstance }
const miDirectionsRendererInstance = new mapsindoors.directions.DirectionsRenderer(directionsRendererOptions);

// Floor Selector
const floorSelectorElement = document.createElement('div');
new mapsindoors.FloorSelector(floorSelectorElement, mapsIndoorsInstance);
googleMapsInstance.controls[google.maps.ControlPosition.RIGHT_TOP].push(floorSelectorElement);

function onSearch() {
  const searchInputElement = document.querySelector('input');
  // Get list element reference
  const searchResultsElement = document.getElementById('search-results');

  const searchParameters = { q: searchInputElement.value };
  mapsindoors.services.LocationsService.getLocations(searchParameters).then(locations => {
    // Reset search results list
    searchResultsElement.innerHTML = null;

    // Append new search results
    locations.forEach(location => {
      const listElement = document.createElement('li');
      listElement.innerHTML = location.properties.name;

    // Add click event listener
    listElement.addEventListener("click", () => getRoute(location), false);

      searchResultsElement.appendChild(listElement);
    });

    // Filter map to only display search results
    mapsIndoorsInstance.filter(locations.map(location => location.id), false);
  });
}

function getRoute(location) {
  const originLocationCoordinate = { lat: 38.897389429704695, lng: -77.03740973527613, floor: 0 }; // Oval Office, The White House (Hardcoded coordinate and floor index)
  const destinationCoordinate = { lat: location.properties.anchor.coordinates[1], lng: location.properties.anchor.coordinates[0], floor: location.properties.floor };

  // Route parameters
  const routeParameters = {
    origin: originLocationCoordinate,
    destination: destinationCoordinate,
    travelMode: 'WALKING'
  };

  // Get route from directions service
  miDirectionsServiceInstance.getRoute(routeParameters).then((directionsResult) => {
    // Use directions render to display route
    miDirectionsRendererInstance.setRoute(directionsResult);
  });
}
```

Now you can click on any item in the search results list to get directions from the hardcoded origin to that destination.

**Change Transportation Mode**[**​**](https://docs.mapsindoors.com/getting-started/web/directions#change-transportation-mode)

In MapsIndoors, the transportation mode is referred to as travel mode. There are four travel modes; walking, bicycling, driving and transit (public transportation). The travel modes apply for outdoor navigation. Indoor navigation calculations are based on walking travel mode.

To change between travel modes we first need to add a `<select>` element with all four transportation options above the search field:

<pre class="language-html"><code class="lang-html">&#x3C;!-- index.html -->

&#x3C;!DOCTYPE html>
&#x3C;html lang="en">
&#x3C;head>
  &#x3C;meta charset="UTF-8">
  &#x3C;meta http-equiv="X-UA-Compatible" content="IE=edge">
  &#x3C;meta name="viewport" content="width=device-width, initial-scale=1.0">
  &#x3C;title>MapsIndoors&#x3C;/title>
  &#x3C;script src="https://app.mapsindoors.com/mapsindoors/js/sdk/4.24.8/mapsindoors-4.24.8.js.gz?apikey=YOUR_MAPSINDOORS_API_KEY">&#x3C;/script>
&#x3C;script src="https://maps.googleapis.com/maps/api/js?libraries=geometry&#x26;key=YOUR_GOOGLE_MAPS_API_KEY">&#x3C;/script>
&#x3C;/head>
&#x3C;body>
  &#x3C;div id="map" style="width: 600px; height: 600px;">&#x3C;/div>

&#x3C;!-- Travel mode selector -->
&#x3C;label for="travel-modes">Choose a travel mode:&#x3C;/label>
&#x3C;select name="travelModeSelector" id="travel-modes">
  &#x3C;option value="walking" selected>Walking&#x3C;/option>
  &#x3C;option value="bicycling">Bicycling&#x3C;/option>
  &#x3C;option value="driving">Driving&#x3C;/option>
  &#x3C;option value="transit">Transit&#x3C;/option>
&#x3C;/select>
<strong>  &#x3C;script src="main.js">&#x3C;/script>
</strong>  &#x3C;input type="text" placeholder="Search">
  &#x3C;button onclick="onSearch()">Search&#x3C;/button>
  &#x3C;ul id="search-results">&#x3C;/ul>
&#x3C;/body>
&#x3C;/html>
</code></pre>

To use the chosen travel mode when getting a route, we need to replace the hardcoded value for `travelMode` parameter inside the `getRoute` method with the `<select>` elements value:

```javascript
// main.js

const mapViewOptions = {
  element: document.getElementById('map'),
  center: { lat: 38.8974905, lng: -77.0362723 }, // The White House
  zoom: 17,
  maxZoom: 22,
};
const mapViewInstance = new mapsindoors.mapView.GoogleMapsView(mapViewOptions);
const mapsIndoorsInstance = new mapsindoors.MapsIndoors({ mapView: mapViewInstance });
const googleMapsInstance = mapViewInstance.getMap();

const externalDirectionsProvider = new mapsindoors.directions.GoogleMapsProvider();
const miDirectionsServiceInstance = new mapsindoors.services.DirectionsService(externalDirectionsProvider);
const directionsRendererOptions = { mapsIndoors: mapsIndoorsInstance }
const miDirectionsRendererInstance = new mapsindoors.directions.DirectionsRenderer(directionsRendererOptions);

// Floor Selector
const floorSelectorElement = document.createElement('div');
new mapsindoors.FloorSelector(floorSelectorElement, mapsIndoorsInstance);
googleMapsInstance.controls[google.maps.ControlPosition.RIGHT_TOP].push(floorSelectorElement);

function onSearch() {
  const searchInputElement = document.querySelector('input');
  const searchResultsElement = document.getElementById('search-results');

  const searchParameters = { q: searchInputElement.value };
  mapsindoors.services.LocationsService.getLocations(searchParameters).then(locations => {
    // Reset search results list
    searchResultsElement.innerHTML = null;

    // Append new search results
    locations.forEach(location => {
      const listElement = document.createElement('li');
      listElement.innerHTML = location.properties.name;
      // Add click event listener
      listElement.addEventListener("click", () => getRoute(location), false);
      searchResultsElement.appendChild(listElement);
    });
    // Filter map to only display search results
    mapsIndoorsInstance.filter(locations.map(location => location.id), false);
  });
}

function getRoute(location) {
  const originLocationCoordinate = { lat: 38.897389429704695, lng: -77.03740973527613, floor: 0 }; // Oval Office, The White House (Hardcoded coordinate and floor index)
  const destinationCoordinate = { lat: location.properties.anchor.coordinates[1], lng: location.properties.anchor.coordinates[0], floor: location.properties.floor };

  // Route parameters
  const routeParameters = {
    origin: originLocationCoordinate,
    destination: destinationCoordinate,
  travelMode: document.getElementById('travel-modes').value.toUpperCase()
  };

  // Get route from directions service
  miDirectionsServiceInstance.getRoute(routeParameters).then((directionsResult) => {
    // Use directions render to display route
    miDirectionsRendererInstance.setRoute(directionsResult);
  });
}
```

You now have something like this:

<https://jsfiddle.net/mapspeople/z23vjhf4/4/>
{% endtab %}

{% tab title="Google Maps - MI Components" %}
**Get Directions Service and Render instances**

First, add two new `let` statements all the way at the top, after the `miMapElement` constant for storing our Directions Service and Directions Renderer instances. Then, we populate them with the instances within the `mapsIndoorsReady` event:

```javascript
// main.js

const miMapElement = document.querySelector('mi-map-googlemaps');
const miSearchElement = document.querySelector('mi-search');
const miListElement = document.querySelector('mi-list');

let miDirectionsServiceInstance;
let miDirectionsRendererInstance;

miMapElement.addEventListener('mapsIndoorsReady', () => {
  miMapElement.getMapInstance().then((mapInstance) => {
    mapInstance.setCenter({ lat: 38.8974905, lng: -77.0362723 }); // The White House
  });
miMapElement.getDirectionsServiceInstance()
  .then((directionsServiceInstance) => miDirectionsServiceInstance = directionsServiceInstance);

miMapElement.getDirectionsRendererInstance()
  .then((directionsRendererInstance) => miDirectionsRendererInstance = directionsRendererInstance);
})

miSearchElement.addEventListener('results', (event) => {
  // Reset search results list
  miListElement.innerHTML = null;

  // Append new search results
  event.detail.forEach(location => {
    const miListItemElement = document.createElement('mi-list-item-location');
    miListItemElement.location = location;
    miListElement.appendChild(miListItemElement);
  });

  // Get the MapsIndoors instance
  miMapElement.getMapsIndoorsInstance().then((mapsIndoorsInstance) => {
    // Filter map to only display search results
    mapsIndoorsInstance.filter(event.detail.map(location => location.id), false);
});
```

> See all available directions render options and methods in the [reference documentation](https://app.mapsindoors.com/mapsindoors/js/sdk/latest/docs/mapsindoors.directions.DirectionsRenderer.html).

Now our app is ready to provide directions. Next up is how to give it an Origin and Destination - and draw a route between those.

**Draw a Route on the Map**[**​**](https://docs.mapsindoors.com/getting-started/web/directions#draw-a-route-on-the-map)

Now our app is ready to provide directions. Next up is how to give it an Origin and Destination *-* and draw a route between those.

**Draw a Route on the Map**[**​**](https://docs.mapsindoors.com/getting-started/web/directions#draw-a-route-on-the-map)

To display a route on the map, we use the coordinates of an Origin and Destination and draw a line between them. For this, we use MapsIndoors' [DirectionsRenderer](https://app.mapsindoors.com/mapsindoors/js/sdk/latest/docs/mapsindoors.directions.DirectionsRenderer.html).

The Destination coordinate is retrieved dynamically using the coordinate of the selected Location in the search results list. Therefore, you must search for the destination to get directions, and then click the result in the text list. Different solutions can of course be implemented into your own solution later.

In this tutorial, the Origin is, naturally, a hardcoded coordinate in the demo API key supplied with this guide. If you're using you own key, you can hardcode coordinates from a Location in your building instead.

In the following example, this is what happens:

1. Create a new `getRoute` method in `main.js` which accepts a `location`
2. Create two new constants, one for the Origin's coordinate, and another for the Destination's coordinate
3. Add another constant defining the `routeParameters`
4. Using the [MapsIndoors Directions Service](https://app.mapsindoors.com/mapsindoors/js/sdk/latest/docs/mapsindoors.services.DirectionsService.html#getRoute) call the `getRoute` method to get the fastest route between the two coordinates

   > See all available route parameters in the [reference documentation](https://app.mapsindoors.com/mapsindoors/js/sdk/latest/docs/mapsindoors.services.DirectionsService.html#getRoute).
5. Using the [MapsIndoors Directions Renderer](https://app.mapsindoors.com/mapsindoors/js/sdk/latest/docs/mapsindoors.directions.DirectionsRenderer.html#setRoute) call the `setRoute` method to display the route on the map

```javascript
// main.js

const miMapElement = document.querySelector('mi-map-googlemaps');
const miSearchElement = document.querySelector('mi-search');
const miListElement = document.querySelector('mi-list');

let miDirectionsServiceInstance;
let miDirectionsRendererInstance;

miMapElement.addEventListener('mapsIndoorsReady', () => {
  miMapElement.getMapInstance().then((mapInstance) => {
    mapInstance.setCenter({ lat: 38.8974905, lng: -77.0362723 }); // The White House
  });
  miMapElement.getDirectionsServiceInstance()
    .then((directionsServiceInstance) => miDirectionsServiceInstance = directionsServiceInstance);

  miMapElement.getDirectionsRendererInstance()
    .then((directionsRendererInstance) => miDirectionsRendererInstance = directionsRendererInstance);
})

miSearchElement.addEventListener('results', (event) => {
  // Reset search results list
  miListElement.innerHTML = null;

  // Append new search results
  event.detail.forEach(location => {
    const miListItemElement = document.createElement('mi-list-item-location');
    miListItemElement.location = location;
    miListElement.appendChild(miListItemElement);
  });

  // Get the MapsIndoors instance
  miMapElement.getMapsIndoorsInstance().then((mapsIndoorsInstance) => {
    // Filter map to only display search results
    mapsIndoorsInstance.filter(event.detail.map(location => location.id), false);
});

function getRoute(location) {
  const originLocationCoordinate = { lat: 38.897389429704695, lng: -77.03740973527613, floor: 0 }; // Oval Office, The White House (Hardcoded coordinate and floor index)
  const destinationCoordinate = { lat: location.properties.anchor.coordinates[1], lng: location.properties.anchor.coordinates[0], floor: location.properties.floor };

  // Route parameters
  const routeParameters = {
    origin: originLocationCoordinate,
    destination: destinationCoordinate,
    travelMode: 'WALKING'
  };

  // Get route from directions service
  miDirectionsServiceInstance.getRoute(routeParameters).then((directionsResult) => {
    // Use directions render to display route
    miDirectionsRendererInstance.setRoute(directionsResult);
  });
}
```

Now, to make it more dynamic, we attach a `click` event listener for each location appended to the search results list element with the `getRoute` method as a callback function.

```javascript
// main.js

const miMapElement = document.querySelector('mi-map-googlemaps');
const miSearchElement = document.querySelector('mi-search');
const miListElement = document.querySelector('mi-list');

let miDirectionsServiceInstance;
let miDirectionsRendererInstance;

miMapElement.addEventListener('mapsIndoorsReady', () => {
  miMapElement.getMapInstance().then((mapInstance) => {
    mapInstance.setCenter({ lat: 38.8974905, lng: -77.0362723 }); // The White House
  });
  miMapElement.getDirectionsServiceInstance()
    .then((directionsServiceInstance) => miDirectionsServiceInstance = directionsServiceInstance);

  miMapElement.getDirectionsRendererInstance()
    .then((directionsRendererInstance) => miDirectionsRendererInstance = directionsRendererInstance);
})

miSearchElement.addEventListener('results', (event) => {
  // Reset search results list
  miListElement.innerHTML = null;

  // Append new search results
  event.detail.forEach(location => {
    const miListItemElement = document.createElement('mi-list-item-location');
    miListItemElement.location = location;

  // Add click event listener
  miListItemElement.addEventListener("click", () => getRoute(location), false);

    miListElement.appendChild(miListItemElement);
  });

  // Get the MapsIndoors instance
  miMapElement.getMapsIndoorsInstance().then((mapsIndoorsInstance) => {
    // Filter map to only display search results
    mapsIndoorsInstance.filter(event.detail.map(location => location.id), false);
});

function getRoute(location) {
  const originLocationCoordinate = { lat: 38.897389429704695, lng: -77.03740973527613, floor: 0 }; // Oval Office, The White House (Hardcoded coordinate and floor index)
  const destinationCoordinate = { lat: location.properties.anchor.coordinates[1], lng: location.properties.anchor.coordinates[0], floor: location.properties.floor };

  // Route parameters
  const routeParameters = {
    origin: originLocationCoordinate,
    destination: destinationCoordinate,
    travelMode: 'WALKING'
  };

  // Get route from directions service
  miDirectionsServiceInstance.getRoute(routeParameters).then((directionsResult) => {
    // Use directions render to display route
    miDirectionsRendererInstance.setRoute(directionsResult);
  });
}
```

Now you can click on any item in the search results list to get directions from the hardcoded origin to that destination.

**Change Transportation Mode**[**​**](https://docs.mapsindoors.com/getting-started/web/directions#change-transportation-mode)

In MapsIndoors, the transportation mode is referred to as travel mode. There are four travel modes; walking, bicycling, driving and transit (public transportation). The travel modes apply for outdoor navigation. Indoor navigation calculations are based on walking travel mode.

To change between travel modes we first need to add a `<select>` element with all four transportation options above the search field:

```html
<!-- index.html -->

<!DOCTYPE html>
<html lang="en">
<head>
  <meta charset="UTF-8">
  <meta http-equiv="X-UA-Compatible" content="IE=edge">
  <meta name="viewport" content="width=device-width, initial-scale=1.0">
  <title>MapsIndoors</title>
    <script type="module" src="https://unpkg.com/@mapsindoors/components@13.7.1/dist/mi-components/mi-components.esm.js"></script>
</head>
<body>
  <mi-map-googlemaps
    style="width: 600px; height: 600px;"
    mi-api-key="d876ff0e60bb430b8fabb145"
    floor-selector-control-position="TOP_RIGHT">
  </mi-map-googlemaps>

<!-- Travel mode selector -->
<label for="travel-modes">Choose a travel mode:</label>
<select name="travelModeSelector" id="travel-modes">
  <option value="walking" selected>Walking</option>
  <option value="bicycling">Bicycling</option>
  <option value="driving">Driving</option>
  <option value="transit">Transit</option>
</select>

  <mi-search
    style="width: 600px;"
    mapsindoors="true"
    placeholder="Search">
  </mi-search>

  <mi-list
    style="width: 600px; height: 400px;"
    scroll-buttons-enabled="true"
    scroll-length="200">
  </mi-list>
</body>
</html>
```

To use the chosen travel mode when getting a route, we need to replace the hardcoded value for `travelMode` parameter inside the `getRoute` method with the `<select>` elements value:

```javascript
// main.js

const miMapElement = document.querySelector('mi-map-googlemaps');
const miSearchElement = document.querySelector('mi-search');
const miListElement = document.querySelector('mi-list');

let miDirectionsServiceInstance;
let miDirectionsRendererInstance;

miMapElement.addEventListener('mapsIndoorsReady', () => {
  miMapElement.getMapInstance().then((mapInstance) => {
    mapInstance.setCenter({ lat: 38.8974905, lng: -77.0362723 }); // The White House
  });

  miMapElement.getDirectionsServiceInstance().then((directionsServiceInstance) => miDirectionsServiceInstance = directionsServiceInstance);

  miMapElement.getDirectionsRendererInstance().then((directionsRendererInstance) => miDirectionsRendererInstance = directionsRendererInstance);
})

miSearchElement.addEventListener('results', (event) => {
  // Reset search results list
  miListElement.innerHTML = null;

  // Append new search results
  event.detail.forEach(location => {
    const miListItemElement = document.createElement('mi-list-item-location');
    miListItemElement.location = location;
    // Add click event listener
    miListItemElement.addEventListener("click", () => getRoute(location), false);
    miListElement.appendChild(miListItemElement);
  });
  // Get the MapsIndoors instance
  miMapElement.getMapsIndoorsInstance().then((mapsIndoorsInstance) => {
    // Filter map to only display search results
    mapsIndoorsInstance.filter(event.detail.map(location => location.id), false);
  });
});

function getRoute(location) {
  const originLocationCoordinate = { lat: 38.897389429704695, lng: -77.03740973527613, floor: 0 }; // Oval Office, The White House (Hardcoded coordinate and floor index)
  const destinationCoordinate = { lat: location.properties.anchor.coordinates[1], lng: location.properties.anchor.coordinates[0], floor: location.properties.floor };

  // Route parameters
  const routeParameters = {
    origin: originLocationCoordinate,
    destination: destinationCoordinate,
  travelMode: document.getElementById('travel-modes').value.toUpperCase()
  };

  // Get route from directions service
  miDirectionsServiceInstance.getRoute(routeParameters).then((directionsResult) => {
    // Use directions render to display route
    miDirectionsRendererInstance.setRoute(directionsResult);
  });
}
```

You now have something like this:
{% endtab %}

{% tab title="Mapbox - Manually" %}
**Get Directions Service and Render instances**

First, initialize the [MapsIndoors Directions Service](https://app.mapsindoors.com/mapsindoors/js/sdk/latest/docs/mapsindoors.services.DirectionsService.html), and add an external Directions Provider (in this case Mapbox).

Then, we need to initialize the [MapsIndoors Directions Renderer](https://app.mapsindoors.com/mapsindoors/js/sdk/latest/docs/mapsindoors.directions.DirectionsRenderer.html) with the MapsIndoors instance:

```javascript
// main.js

const mapViewOptions = {
  accessToken: "YOUR_MAPBOX_ACCESS_TOKEN",
  element: document.getElementById("map"),
  center: { lat: 38.8974905, lng: -77.0362723 }, // The White House
  zoom: 17,
  maxZoom: 22,
};
const mapViewInstance = new mapsindoors.mapView.MapboxView(mapViewOptions);
const mapsIndoorsInstance = new mapsindoors.MapsIndoors({ mapView: mapViewInstance });
const mapboxInstance = mapViewInstance.getMap();

const externalDirectionsProvider = new mapsindoors.directions.MapboxProvider('YOUR_MAPBOX_ACCESS_TOKEN');
const miDirectionsServiceInstance = new mapsindoors.services.DirectionsService(externalDirectionsProvider);
const directionsRendererOptions = { mapsIndoors: mapsIndoorsInstance }
const miDirectionsRendererInstance = new mapsindoors.directions.DirectionsRenderer(directionsRendererOptions);

// Floor Selector
const floorSelectorElement = document.createElement('div');
new mapsindoors.FloorSelector(floorSelectorElement, mapsIndoorsInstance);
mapboxInstance.addControl({ onAdd: function () { return floorSelectorElement }, onRemove: function () { } });

function onSearch() {
  const searchInputElement = document.querySelector('input');
  // Get list element reference
  const searchResultsElement = document.getElementById('search-results');

  const searchParameters = { q: searchInputElement.value };
  mapsindoors.services.LocationsService.getLocations(searchParameters).then(locations => {
    // Reset search results list
    searchResultsElement.innerHTML = null;

    // Append new search results
    locations.forEach(location => {
      const listElement = document.createElement('li');
      listElement.innerHTML = location.properties.name;
      searchResultsElement.appendChild(listElement);
    });

    // Filter map to only display search results
    mapsIndoorsInstance.filter(locations.map(location => location.id), false);
  });
}
```

> See all available directions render options and methods in the [reference documentation](https://app.mapsindoors.com/mapsindoors/js/sdk/latest/docs/mapsindoors.directions.DirectionsRenderer.html).

Now our example app is ready to provide Directions. Next up is how to give it an Origin and Destination and draw the route between.

**Draw a Route on the Map**[**​**](https://docs.mapsindoors.com/getting-started/web/directions#draw-a-route-on-the-map)

To display a route on the map, we use the coordinates of an Origin and Destination and draw a line between them. For this, we use MapsIndoors' [Directions Renderer](https://app.mapsindoors.com/mapsindoors/js/sdk/latest/docs/mapsindoors.directions.DirectionsRenderer.html).

The Destination coordinate is retrieved dynamically, using the coordinate of the selected Location in the search results list. Therefore, you must search for the destination to get directions, and then click the result in the text list. Different solutions can of course be implemented into your own solution later.

In this tutorial, the Origin is, naturally, a hardcoded coordinate in the demo API key supplied with this guide. If you're using you own key, you can hardcode coordinates from a Location in your building instead.

In the following example, this is what happens:

1. Create a new `getRoute` method in `main.js` which accepts a `location`
2. Create two new constants, one for the Origin's coordinate, and another for the Destination's coordinate
3. Add another constant defining the `routeParameters`
4. Using the [MapsIndoors Directions Service](https://app.mapsindoors.com/mapsindoors/js/sdk/latest/docs/mapsindoors.services.DirectionsService.html#getRoute) call the `getRoute` method to get the fastest route between the two coordinates

   > See all available route parameters in the [reference documentation](https://app.mapsindoors.com/mapsindoors/js/sdk/latest/docs/mapsindoors.services.DirectionsService.html#getRoute).
5. Using the [MapsIndoors Directions Renderer](https://app.mapsindoors.com/mapsindoors/js/sdk/latest/docs/mapsindoors.directions.DirectionsRenderer.html#setRoute) call the `setRoute` method to display the route on the map

```javascript
// main.js

const mapViewOptions = {
  accessToken: "YOUR_MAPBOX_ACCESS_TOKEN",
  element: document.getElementById('map'),
  center: { lat: 38.8974905, lng: -77.0362723 }, // The White House
  zoom: 17,
  maxZoom: 22,
};
const mapViewInstance = new mapsindoors.mapView.MapboxView(mapViewOptions);
const mapsIndoorsInstance = new mapsindoors.MapsIndoors({ mapView: mapViewInstance });
const mapboxInstance = mapViewInstance.getMap();

const externalDirectionsProvider = new mapsindoors.directions.MapboxProvider();
const miDirectionsServiceInstance = new mapsindoors.services.DirectionsService(externalDirectionsProvider);
const directionsRendererOptions = { mapsIndoors: mapsIndoorsInstance }
const miDirectionsRendererInstance = new mapsindoors.directions.DirectionsRenderer(directionsRendererOptions);

// Floor Selector
const floorSelectorElement = document.createElement('div');
new mapsindoors.FloorSelector(floorSelectorElement, mapsIndoorsInstance);
mapboxInstance.addControl({ onAdd: function () { return floorSelectorElement }, onRemove: function () { } });

function onSearch() {
  const searchInputElement = document.querySelector('input');
  // Get list element reference
  const searchResultsElement = document.getElementById('search-results');

  const searchParameters = { q: searchInputElement.value };
  mapsindoors.services.LocationsService.getLocations(searchParameters).then(locations => {
    // Reset search results list
    searchResultsElement.innerHTML = null;

    // Append new search results
    locations.forEach(location => {
      const listElement = document.createElement('li');
      listElement.innerHTML = location.properties.name;
      searchResultsElement.appendChild(listElement);
    });

    // Filter map to only display search results
    mapsIndoorsInstance.filter(locations.map(location => location.id), false);
  });
}

function getRoute(location) {
  const originLocationCoordinate = { lat: 38.897389429704695, lng: -77.03740973527613, floor: 0 }; // Oval Office, The White House (Hardcoded coordinate and floor index)
  const destinationCoordinate = { lat: location.properties.anchor.coordinates[1], lng: location.properties.anchor.coordinates[0], floor: location.properties.floor };

  // Route parameters
  const routeParameters = {
    origin: originLocationCoordinate,
    destination: destinationCoordinate,
    travelMode: 'WALKING'
  };

  // Get route from directions service
  miDirectionsServiceInstance.getRoute(routeParameters).then((directionsResult) => {
    // Use directions render to display route
    miDirectionsRendererInstance.setRoute(directionsResult);
  });
}
```

Now, to make it more dynamic, we attach a `click` event listener for each location appended to the search results list element with the `getRoute` method as a callback function.

```javascript
// main.js

const mapViewOptions = {
  accessToken: "YOUR_MAPBOX_ACCESS_TOKEN",
  element: document.getElementById('map'),
  center: { lat: 38.8974905, lng: -77.0362723 }, // The White House
  zoom: 17,
  maxZoom: 22,
};
const mapViewInstance = new mapsindoors.mapView.MapboxView(mapViewOptions);
const mapsIndoorsInstance = new mapsindoors.MapsIndoors({ mapView: mapViewInstance });
const mapboxInstance = mapViewInstance.getMap();

const externalDirectionsProvider = new mapsindoors.directions.MapboxProvider();
const miDirectionsServiceInstance = new mapsindoors.services.DirectionsService(externalDirectionsProvider);
const directionsRendererOptions = { mapsIndoors: mapsIndoorsInstance }
const miDirectionsRendererInstance = new mapsindoors.directions.DirectionsRenderer(directionsRendererOptions);

// Floor Selector
const floorSelectorElement = document.createElement('div');
new mapsindoors.FloorSelector(floorSelectorElement, mapsIndoorsInstance);
mapboxInstance.addControl({ onAdd: function () { return floorSelectorElement }, onRemove: function () { } });

function onSearch() {
  const searchInputElement = document.querySelector('input');
  // Get list element reference
  const searchResultsElement = document.getElementById('search-results');

  const searchParameters = { q: searchInputElement.value };
  mapsindoors.services.LocationsService.getLocations(searchParameters).then(locations => {
    // Reset search results list
    searchResultsElement.innerHTML = null;

    // Append new search results
    locations.forEach(location => {
      const listElement = document.createElement('li');
      listElement.innerHTML = location.properties.name;

    // Add click event listener
    listElement.addEventListener("click", () => getRoute(location), false);

      searchResultsElement.appendChild(listElement);
    });

    // Filter map to only display search results
    mapsIndoorsInstance.filter(locations.map(location => location.id), false);
  });
}

function getRoute(location) {
  const originLocationCoordinate = { lat: 38.897389429704695, lng: -77.03740973527613, floor: 0 }; // Oval Office, The White House (Hardcoded coordinate and floor index)
  const destinationCoordinate = { lat: location.properties.anchor.coordinates[1], lng: location.properties.anchor.coordinates[0], floor: location.properties.floor };

  // Route parameters
  const routeParameters = {
    origin: originLocationCoordinate,
    destination: destinationCoordinate,
    travelMode: 'WALKING'
  };

  // Get route from directions service
  miDirectionsServiceInstance.getRoute(routeParameters).then((directionsResult) => {
    // Use directions render to display route
    miDirectionsRendererInstance.setRoute(directionsResult);
  });
}
```

Now you can click on each item in the search results list to get directions.

**Change Transportation Mode**[**​**](https://docs.mapsindoors.com/getting-started/web/directions#change-transportation-mode)

In MapsIndoors, the transportation mode is referred to as travel mode. There are four travel modes; walking, bicycling, driving and transit (public transportation). The travel modes apply for outdoor navigation. Indoor navigation calculations are based on walking travel mode.

To change between travel modes we first need to add a `<select>` element with all four transportation options above the search field:

```html
<!-- index.html -->

<!DOCTYPE html>
<html lang="en">
<head>
  <meta charset="UTF-8">
  <meta http-equiv="X-UA-Compatible" content="IE=edge">
  <meta name="viewport" content="width=device-width, initial-scale=1.0">
  <title>MapsIndoors</title>
  <script src="https://app.mapsindoors.com/mapsindoors/js/sdk/4.24.8/mapsindoors-4.24.8.js.gz?apikey=YOUR_MAPSINDOORS_API_KEY"></script>
  <script src="https://api.mapbox.com/mapbox-gl-js/v2.14.1/mapbox-gl.js"></script>
  <link rel="stylesheet" href="https://api.mapbox.com/mapbox-gl-js/v2.14.1/mapbox-gl.css">
</head>
<body>
  <div id="map" style="width: 600px; height: 600px;"></div>

<!-- Travel mode selector -->
<label for="travel-modes">Choose a travel mode:</label>
<select name="travelModeSelector" id="travel-modes">
  <option value="walking" selected>Walking</option>
  <option value="bicycling">Bicycling</option>
  <option value="driving">Driving</option>
  <option value="transit">Transit</option>
</select>
  <script src="main.js"></script>
  <input type="text" placeholder="Search">
  <button onclick="onSearch()">Search</button>
  <ul id="search-results"></ul>
</body>
</html>
```

To use the chosen transportation when getting a route, we need to replace the hardcoded value for `travelMode` parameter inside the `getRoute` method with the `<select>` elements value:

```javascript
// main.js

const mapViewOptions = {
  accessToken: "YOUR_MAPBOX_ACCESS_TOKEN",
  element: document.getElementById('map'),
  center: { lat: 38.8974905, lng: -77.0362723 }, // The White House
  zoom: 17,
  maxZoom: 22,
};
const mapViewInstance = new mapsindoors.mapView.MapboxView(mapViewOptions);
const mapsIndoorsInstance = new mapsindoors.MapsIndoors({ mapView: mapViewInstance });
const mapboxInstance = mapViewInstance.getMap();

const externalDirectionsProvider = new mapsindoors.directions.MapboxProvider();
const miDirectionsServiceInstance = new mapsindoors.services.DirectionsService(externalDirectionsProvider);
const directionsRendererOptions = { mapsIndoors: mapsIndoorsInstance }
const miDirectionsRendererInstance = new mapsindoors.directions.DirectionsRenderer(directionsRendererOptions);

// Floor Selector
const floorSelectorElement = document.createElement('div');
new mapsindoors.FloorSelector(floorSelectorElement, mapsIndoorsInstance);
mapboxInstance.addControl({ onAdd: function () { return floorSelectorElement }, onRemove: function () { } });

function onSearch() {
  const searchInputElement = document.querySelector('input');
  const searchResultsElement = document.getElementById('search-results');

  const searchParameters = { q: searchInputElement.value };
  mapsindoors.services.LocationsService.getLocations(searchParameters).then(locations => {
    // Reset search results list
    searchResultsElement.innerHTML = null;

    // Append new search results
    locations.forEach(location => {
      const listElement = document.createElement('li');
      listElement.innerHTML = location.properties.name;
      // Add click event listener
      listElement.addEventListener("click", () => getRoute(location), false);
      searchResultsElement.appendChild(listElement);
    });
    // Filter map to only display search results
    mapsIndoorsInstance.filter(locations.map(location => location.id), false);
  });
}

function getRoute(location) {
  const originLocationCoordinate = { lat: 38.897389429704695, lng: -77.03740973527613, floor: 0 }; // Oval Office, The White House (Hardcoded coordinate and floor index)
  const destinationCoordinate = { lat: location.properties.anchor.coordinates[1], lng: location.properties.anchor.coordinates[0], floor: location.properties.floor };

  // Route parameters
  const routeParameters = {
    origin: originLocationCoordinate,
    destination: destinationCoordinate,
  travelMode: document.getElementById('travel-modes').value.toUpperCase()
  };

  // Get route from directions service
  miDirectionsServiceInstance.getRoute(routeParameters).then((directionsResult) => {
    // Use directions render to display route
    miDirectionsRendererInstance.setRoute(directionsResult);
  });
}
```

You now have something like this:<br>
{% endtab %}

{% tab title="Mapbox - MI Components" %}
**Get Directions Service and Render instances**

First, add two new `let` statements all the way at the top, after the `miMapElement` constant for storing our Directions Service and Directions Renderer instances. Then, we populate them with the instances within the `mapsIndoorsReady` event:

```javascript
// main.js

const miMapElement = document.querySelector('mi-map-mapbox');
const miSearchElement = document.querySelector('mi-search');
const miListElement = document.querySelector('mi-list');

let miDirectionsServiceInstance;
let miDirectionsRendererInstance;

miMapElement.addEventListener('mapsIndoorsReady', () => {
  miMapElement.getMapInstance().then((mapInstance) => {
    mapInstance.setCenter({ lat: 38.8974905, lng: -77.0362723 }); // The White House
  });
miMapElement.getDirectionsServiceInstance()
  .then((directionsServiceInstance) => miDirectionsServiceInstance = directionsServiceInstance);

miMapElement.getDirectionsRendererInstance()
  .then((directionsRendererInstance) => miDirectionsRendererInstance = directionsRendererInstance);
})
miSearchElement.addEventListener('results', (event) => {
  // Reset search results list
  miListElement.innerHTML = null;

  // Append new search results
  event.detail.forEach(location => {
    const miListItemElement = document.createElement('mi-list-item-location');
    miListItemElement.location = location;
    miListElement.appendChild(miListItemElement);
  });

  // Get the MapsIndoors instance
  miMapElement.getMapsIndoorsInstance().then((mapsIndoorsInstance) => {
    // Filter map to only display search results
    mapsIndoorsInstance.filter(event.detail.map(location => location.id), false);
});
```

> See all available directions render options and methods in the [reference documentation](https://app.mapsindoors.com/mapsindoors/js/sdk/latest/docs/mapsindoors.directions.DirectionsRenderer.html).

Now our app is ready to provide directions. Next up is how to give it an Origin and Destination - and draw a route between those.

**Draw a Route on the Map**[**​**](https://docs.mapsindoors.com/getting-started/web/directions#draw-a-route-on-the-map)

To display a route on the map, we use the coordinates of an Origin and Destination and draw a line between them. For this, we use MapsIndoors' [Directions Renderer](https://app.mapsindoors.com/mapsindoors/js/sdk/latest/docs/mapsindoors.directions.DirectionsRenderer.html).

The Destination coordinate is retrieved dynamically, using the coordinate of the selected Location in the search results list. Therefore, you must search for the destination to get directions, and then click the result in the text list. Different solutions can of course be implemented into your own solution later.

In this tutorial, the Origin is, naturally, a hardcoded coordinate in the demo API key supplied with this guide. If you're using you own key, you can hardcode coordinates from a Location in your building instead.

In the following example, this is what happens:

1. Create a new `getRoute` method in `main.js` which accepts a `location`
2. Create two new constants, one for the Origin's coordinate, and another for the Destination's coordinate
3. Add another constant defining the `routeParameters`
4. Using the [MapsIndoors Directions Service](https://app.mapsindoors.com/mapsindoors/js/sdk/latest/docs/mapsindoors.services.DirectionsService.html#getRoute) call the `getRoute` method to get the fastest route between the two coordinates

   > See all available route parameters in the [reference documentation](https://app.mapsindoors.com/mapsindoors/js/sdk/latest/docs/mapsindoors.services.DirectionsService.html#getRoute).
5. Using the [MapsIndoors Directions Renderer](https://app.mapsindoors.com/mapsindoors/js/sdk/latest/docs/mapsindoors.directions.DirectionsRenderer.html#setRoute) call the `setRoute` method to display the route on the map

```javascript
// main.js

const miMapElement = document.querySelector("mi-map-mapbox");
const miSearchElement = document.querySelector('mi-search');
const miListElement = document.querySelector('mi-list');

let miDirectionsServiceInstance;
let miDirectionsRendererInstance;

miMapElement.addEventListener('mapsIndoorsReady', () => {
  miMapElement.getMapInstance().then((mapInstance) => {
    mapInstance.setCenter({ lat: 38.8974905, lng: -77.0362723 }); // The White House
  });
  miMapElement.getDirectionsServiceInstance()
    .then((directionsServiceInstance) => miDirectionsServiceInstance = directionsServiceInstance);

  miMapElement.getDirectionsRendererInstance()
    .then((directionsRendererInstance) => miDirectionsRendererInstance = directionsRendererInstance);
})

miSearchElement.addEventListener('results', (event) => {
  // Reset search results list
  miListElement.innerHTML = null;

  // Append new search results
  event.detail.forEach(location => {
    const miListItemElement = document.createElement('mi-list-item-location');
    miListItemElement.location = location;
    miListElement.appendChild(miListItemElement);
  });

  // Get the MapsIndoors instance
  miMapElement.getMapsIndoorsInstance().then((mapsIndoorsInstance) => {
    // Filter map to only display search results
    mapsIndoorsInstance.filter(event.detail.map(location => location.id), false);
});

function getRoute(location) {
  const originLocationCoordinate = { lat: 38.897389429704695, lng: -77.03740973527613, floor: 0 }; // Oval Office, The White House (Hardcoded coordinate and floor index)
  const destinationCoordinate = { lat: location.properties.anchor.coordinates[1], lng: location.properties.anchor.coordinates[0], floor: location.properties.floor };

  // Route parameters
  const routeParameters = {
    origin: originLocationCoordinate,
    destination: destinationCoordinate,
    travelMode: 'WALKING'
  };

  // Get route from directions service
  miDirectionsServiceInstance.getRoute(routeParameters).then((directionsResult) => {
    // Use directions render to display route
    miDirectionsRendererInstance.setRoute(directionsResult);
  });
}
```

Now, to make it more dynamic, we attach a `click` event listener for each location appended to the search results list element with the `getRoute` method as a callback function.

```javascript
// main.js

const miMapElement = document.querySelector("mi-map-mapbox");
const miSearchElement = document.querySelector('mi-search');
const miListElement = document.querySelector('mi-list');

let miDirectionsServiceInstance;
let miDirectionsRendererInstance;

miMapElement.addEventListener('mapsIndoorsReady', () => {
  miMapElement.getMapInstance().then((mapInstance) => {
      mapInstance.setCenter([-77.0362723, 38.8974905]); // The White House
  });
  miMapElement.getDirectionsServiceInstance()
    .then((directionsServiceInstance) => miDirectionsServiceInstance = directionsServiceInstance);

  miMapElement.getDirectionsRendererInstance()
    .then((directionsRendererInstance) => miDirectionsRendererInstance = directionsRendererInstance);
})

miSearchElement.addEventListener('results', (event) => {
  // Reset search results list
  miListElement.innerHTML = null;

  // Append new search results
  event.detail.forEach(location => {
    const miListItemElement = document.createElement('mi-list-item-location');
    miListItemElement.location = location;

  // Add click event listener
  miListItemElement.addEventListener("click", () => getRoute(location), false);

    miListElement.appendChild(miListItemElement);
  });

  // Get the MapsIndoors instance
  miMapElement.getMapsIndoorsInstance().then((mapsIndoorsInstance) => {
    // Filter map to only display search results
    mapsIndoorsInstance.filter(event.detail.map(location => location.id), false);
});

function getRoute(location) {
  const originLocationCoordinate = { lat: 38.897389429704695, lng: -77.03740973527613, floor: 0 }; // Oval Office, The White House (Hardcoded coordinate and floor index)
  const destinationCoordinate = { lat: location.properties.anchor.coordinates[1], lng: location.properties.anchor.coordinates[0], floor: location.properties.floor };

  // Route parameters
  const routeParameters = {
    origin: originLocationCoordinate,
    destination: destinationCoordinate,
    travelMode: 'WALKING'
  };

  // Get route from directions service
  miDirectionsServiceInstance.getRoute(routeParameters).then((directionsResult) => {
    // Use directions render to display route
    miDirectionsRendererInstance.setRoute(directionsResult);
  });
}
```

Now you can click on any item in the search results list to get directions from the hardcoded origin to that destination.

**Change Transportation Mode**[**​**](https://docs.mapsindoors.com/getting-started/web/directions#change-transportation-mode)

In MapsIndoors, the transportation mode is referred to as travel mode. There are four travel modes; walking, bicycling, driving and transit (public transportation). The travel modes apply for outdoor navigation. Indoor navigation calculations are based on walking travel mode.

To change between travel modes we first need to add a `<select>` element with all four transportation options above the search field:

```html
<!-- index.html -->
<!DOCTYPE html>
<html lang="en">
<head>
  <meta charset="UTF-8">
  <meta http-equiv="X-UA-Compatible" content="IE=edge">
  <meta name="viewport" content="width=device-width, initial-scale=1.0">
  <title>MapsIndoors</title>
  <script type="module" src="https://unpkg.com/@mapsindoors/components@13.7.1/dist/mi-components/mi-components.esm.js"></script>
</head>
<body>
  <mi-map-mapbox
    access-token="YOUR_MAPBOX_ACCESS_TOKEN"
    style="width: 600px; height: 600px;"
    mi-api-key="d876ff0e60bb430b8fabb145"
    floor-selector-control-position="TOP_RIGHT">
  </mi-map-mapbox>

<!-- Travel mode selector -->
<label for="travel-modes">Choose a travel mode:</label>
<select name="travelModeSelector" id="travel-modes">
  <option value="walking" selected>Walking</option>
  <option value="bicycling">Bicycling</option>
  <option value="driving">Driving</option>
  <option value="transit">Transit</option>
</select>

  <mi-search
    style="width: 600px;"
    mapsindoors="true"
    placeholder="Search">
  </mi-search>

  <mi-list
    style="width: 600px; height: 400px;"
    scroll-buttons-enabled="true"
    scroll-length="200">
  </mi-list>
</body>
</html>
```

To use the chosen travel mode when getting a route, we need to replace the hardcoded value for `travelMode` parameter inside the `getRoute` method with the `<select>` elements value:

```javascript
// main.js

const miMapElement = document.querySelector('mi-map-mapbox');
const miSearchElement = document.querySelector('mi-search');
const miListElement = document.querySelector('mi-list');

let miDirectionsServiceInstance;
let miDirectionsRendererInstance;

miMapElement.addEventListener('mapsIndoorsReady', () => {
  miMapElement.getMapInstance().then((mapInstance) => {
    mapInstance.setCenter({ lat: 38.8974905, lng: -77.0362723 }); // The White House
  });

  miMapElement.getDirectionsServiceInstance().then((directionsServiceInstance) => miDirectionsServiceInstance = directionsServiceInstance);

  miMapElement.getDirectionsRendererInstance().then((directionsRendererInstance) => miDirectionsRendererInstance = directionsRendererInstance);
})

miSearchElement.addEventListener('results', (event) => {
  // Reset search results list
  miListElement.innerHTML = null;

  // Append new search results
  event.detail.forEach(location => {
    const miListItemElement = document.createElement('mi-list-item-location');
    miListItemElement.location = location;
    // Add click event listener
    miListItemElement.addEventListener("click", () => getRoute(location), false);
    miListElement.appendChild(miListItemElement);
  });
  // Get the MapsIndoors instance
  miMapElement.getMapsIndoorsInstance().then((mapsIndoorsInstance) => {
    // Filter map to only display search results
    mapsIndoorsInstance.filter(event.detail.map(location => location.id), false);
  });
});

function getRoute(location) {
  const originLocationCoordinate = { lat: 38.897389429704695, lng: -77.03740973527613, floor: 0 }; // Oval Office, The White House (Hardcoded coordinate and floor index)
  const destinationCoordinate = { lat: location.properties.anchor.coordinates[1], lng: location.properties.anchor.coordinates[0], floor: location.properties.floor };

  // Route parameters
  const routeParameters = {
    origin: originLocationCoordinate,
    destination: destinationCoordinate,
  travelMode: document.getElementById('travel-modes').value.toUpperCase()
  };

  // Get route from directions service
  miDirectionsServiceInstance.getRoute(routeParameters).then((directionsResult) => {
    // Use directions render to display route
    miDirectionsRendererInstance.setRoute(directionsResult);
  });
}
```

You now have something like this:

{% embed url="<https://jsfiddle.net/mapspeople/g4epm0zj/1/>" %}
{% endtab %}
{% endtabs %}


# Map Visualization

Getting your map visualization right means going beyond simple floorplan representation and elevating the map to a rich and user-friendly indoor mapping experience. \\

The design and customization of your map visualization are crucial for creating a user-friendly, visually engaging, and functionally relevant mapping experience. The map visualization is your foundation for effective navigation, information accessibility, and overall user satisfaction. \\

In MapsIndoors, key aspects of map visualization cover:

**Real-World Geospatial Visualization**

MapsIndoors enables the visualization of venue details, building structures, floor plans, rooms, and related data on georeferenced Google or Mapbox maps. This real-world geospatial context enhances the accuracy and relevance of the indoor map.

**Map Design**

Users can customize the appearance of their maps to align with branding and specific use cases. Whether in 2D or 3D, the ability to design the map's look and feel provides flexibility and coherence with organizational aesthetics.

**Dynamic Maps**

MapsIndoors supports dynamic maps that can display relevant content based on users, use cases, or zoom levels. This adaptability ensures that users receive the most pertinent information based on their context and needs.

**Map Interaction**

The platform includes built-in features for map interaction, such as a floor selector, zoom, pan, tilt, and search functionalities. These features make it easy for users to navigate and interact with maps in ways that are relevant to their specific requirements.\\

Whether you’re building your map solution on Mapbox or Google Maps, we’ve got your back. Follow the guides and you’ll soon be up and running.


# Highlight, Hover and Select

**How to change the appearance of the different states**

The state DisplayRules controls how Locations are displayed on the map in different states For example, you can change the icon scale of a Location when it is hovered over or highlight a search result. The state DisplayRules gives access to the same properties as the regular [DisplayRules](https://app.mapsindoors.com/mapsindoors/js/sdk/latest/docs/DisplayRule.html), which can be used to control the appearance of Locations.

### Available states

<table><thead><tr><th width="164">State</th><th>Description</th></tr></thead><tbody><tr><td>hover</td><td>The state when the user hovers over a Location.</td></tr><tr><td>highlight</td><td>The state when Locations are programmatically highlighted using the <code>mapsIndoors.highlight()</code> method.</td></tr><tr><td>selection</td><td>The state when the user has selected a Location by clicking on it.</td></tr><tr><td>hoverHighlight</td><td>The state when the user hovers over a highlighted Location.</td></tr><tr><td>hoverSelection</td><td>The state when the user hovers over a selected Location.</td></tr></tbody></table>

To change the state DisplayRules, you can access the Solution Config object using the `mapsIndoors.getSolutionConfig()` method. Once you have the Solution Config object, you can access the state DisplayRules using the `solutionConfig.stateDisplayRules` property.

**Example:**

```javascript
// This should happen after the 'ready' event has fired.
mapsIndoors.addListener('ready', () => {

    // Get the Solution Config object.
    const solutionConfig = mapsIndoors.getSolutionConfig();

    // Get the hover state DisplayRule.
    const hoverDisplayRule = solutionConfig.stateDisplayRules.hover;

    // Set the icon scale to 2. This will result in the icon being scaled to double size on hover.
    hoverDisplayRule.iconScale = 2;

    // Update the SolutionCofig to apply the changes.
    mapsIndoors.setSolutionConfig(solutionConfig);

});    
```

<figure><img src="/files/8cQJdmZa5bhfcVnUxUpV" alt=""><figcaption><p>An example of the hover state DisplayRule in action</p></figcaption></figure>

### Hover

The default SDK behavior is to scale the icon and lighten the fill and stroke color of the polygon and extrusion.

**Default values for the hover DisplayRule:**

```json
{
    'iconScale': 1.25,
    'polygonLightnessFactor': -0.1,
    'extrusionLightnessFactor': -0.1,
    'badgeScale': 1.25,
    'badgePosition': 'top_left'
}
```

The lightnessFactor is used to darken the fill and stroke color of both the polygon and the extrusion by 10%.

#### Highlight and Selection

The `hoverHighlight` and `hoverSelection` is two separate state DisplayRules to configure the appearance of highlighted or selected locations when hovered.

**Default values for the hoverHighlight DisplayRule:**

```json
{
    'zoomFrom': 15.0,
    'zoomTo': 999,
    'iconScale': 1.25,
    'polygonZoomFrom': 15.0,
    'polygonZoomTo': 999,
    'polygonLightnessFactor': -0.15,
    'extrusionZoomFrom': 15.0,
    'extrusionZoomTo': 999,
    'extrusionLightnessFactor': -0.15,
    'badgeVisible': true,
    'badgeZoomFrom': 15,
    'badgeZoomTo': 999,
    'badgeRadius': 6,
    'badgeStrokeWidth': 4.0,
    'badgeStrokeColor': '#ffffff',
    'badgeFillColor': '#ec4899',
    'badgePosition': 'top_left'
    'badgeScale': 1.25
};
```

**Default values for the hoverSelection DisplayRule:**

```json
{
    'zoomFrom': 0.0,
    'zoomTo': 999,
    'iconVisible': true,
    'icon': 'https://app.mapsindoors.com/mapsindoors/gfx/select-pin.png',
    'iconScale': 1.25,
    'iconPlacement': 'above',
    'iconSize': {
        'width': 24.0,
        'height': 28.0
    },
    'polygonZoomFrom': 15.0,
    'polygonZoomTo': 999,
    'polygonLightnessFactor': -0.15,
    'extrusionZoomFrom': 15.0,
    'extrusionZoomTo': 999,
    'extrusionLightnessFactor': -0.15
}
```

### Highlight

The default SDK behavior is to add a small badge to the upper left corner of the Location icon and ensure visibility by setting the zoomFrom and zoomTo values, and the fill and stroke color of the polygon and extrusion.

**Default values for the highlight DisplayRule:**

```json
{
    'zoomFrom': 15.0,
    'zoomTo': 999,
    'polygonZoomFrom': 15.0,
    'polygonZoomTo': 999,
    'polygonLightnessFactor': -0.1,
    'extrusionZoomFrom': 15.0,
    'extrusionZoomTo': 999,
    'extrusionLightnessFactor': -0.1,
    'badgeVisible': true,
    'badgeZoomFrom': 15,
    'badgeZoomTo': 999,
    'badgeRadius': 6,
    'badgeStrokeWidth': 4.0,
    'badgeStrokeColor': '#ffffff',
    'badgeFillColor': '#ec4899',
    'badgePosition': 'top_left'
    'badgeScale': 1
};
```

**Highlight all Meeting Rooms:**

```javascript
// Get the LocationsService object.
const locationsService = mapsindoors.services.LocationsService;

// Get all Locations of the type "Meeting Room".
const meetingRoomLocations = await locationsService.getLocations({ types: ['MeetingRoom'] });

// Highlight the Locations.
mapsIndoors.highlight(meetingRoomLocations.map(location => location.id));
```

<figure><img src="/files/pXWdY7NgqTVSM6YOIxyW" alt=""><figcaption><p>An example of the highlight state DisplayRule in action</p></figcaption></figure>

**Clear the highlight:**

```javascript
mapsIndoors.highlight([]);
```

### Selection

The selection state is for changing the appearance of a single Location, for example when the user clicks on it. To select a Location, call the mapsIndoors.selectLocation() method, passing in the Location object as the parameter.

**Default values for the selection DisplayRule:**

```json
{
    'zoomFrom': 0.0,
    'zoomTo': 999,
    'iconVisible': true,
    'icon': 'https://app.mapsindoors.com/mapsindoors/gfx/select-pin.png',
    'iconScale': 1.0,
    'iconPlacement': 'above',
    'iconSize': {
        'width': 24.0,
        'height': 28.0
    },
    'polygonZoomFrom': 15.0,
    'polygonZoomTo': 999,
    'polygonLightnessFactor': -0.1,
    'extrusionZoomFrom': 15.0,
    'extrusionZoomTo': 999,
    'extrusionLightnessFactor': -0.1
}
```

**Select a Location, when the user clicks it:**

```javascript
// (location) is the Location object that is clicked by the user.
mapsIndoors.on('click', (location) => {
    mapsIndoors.selectLocation(location);
});
```

<figure><img src="/files/Um2XBtFdNaXmu1LcDBJD" alt=""><figcaption><p>An example of the selection state DisplayRule in action</p></figcaption></figure>

**Clear current selection:**

```javascript
mapsIndoors.deselectLocation();
```


# Remove Labels from Buildings and Venues

**Are your building and venue labels disrupting your user experience?**

Traditionally, both Buildings and Venues are treated as Locations in the Web SDK, inherently displaying Labels which might not always align with the desired user experience. A conventional method to manage their visibility is illustrated below via a [**`setDisplayRule`**](https://app.mapsindoors.com/mapsindoors/js/sdk/latest/docs/mapsindoors.MapsIndoors.html#setDisplayRule)

It can be a best practice to set this display rule after initializing your MapsIndoors instance.

```javascript
mapsIndoorsInstance.setDisplayRule(['MI_BUILDING', 'MI_VENUE'], { visible: false });
```

Here, `MI_BUILDING` and `MI_VENUE` are specific Location Types dedicated to facilitate display rule settings for Buildings and Venues respectively.

**Enhancing User Interaction with Adaptive Zoom-Level Popups**

<figure><img src="/files/Pkegz1Fz5nHCbhYir0Ov" alt=""><figcaption><p>Dynamically adding a Mapbox Popup based on zoom level</p></figcaption></figure>

Let's say a user zooms out to get a broad overview of a large campus or city area. At a lower zoom level, the display becomes less cluttered, paving the way for a more clear, bird's eye view of the venues available. Here’s where dynamic, zoom-dependent [**popups**](https://docs.mapbox.com/mapbox-gl-js/example/popup/) come into play, serving as intuitive markers and information windows. This example is specific to Mapbox, for Google Maps you will need to use [**info windows**](https://developers.google.com/maps/documentation/javascript/infowindows).

Integrating the following code snippet enables the application to listen for changes in zoom level, and depending on the zoom threshold, dynamically fetch venues and exhibit crisp, stylish popups at each venue’s anchor point:

```javascript
let popups = [];  

mapsIndoorsInstance.addListener('zoom_changed', (zoomLevel) => {
    if (zoomLevel < 19) {
        mapsindoors.services.VenuesService.getVenues().then(venues => {
            venues.forEach(venue => {
                const anchor = venue.anchor.coordinates;
                const popup = new mapboxgl.Popup({ closeOnClick: true, closeButton: false, className: 'custom-popup' })
                    .setLngLat([anchor[0], anchor[1]])
                    .setHTML(`<h2>${venue.name}</h2>`)
                    .addTo(mapsIndoorsInstance.getMap());
                popups.push(popup);
            });
        });
    } else {
        popups.forEach(popup => popup.remove());
        popups = [];
    }
});
```

**What does this achieve?**

When the map zoom level is below 19, unobtrusive popups appear, providing users with a quick overview of each venue’s name. Upon zooming in beyond the level 19, the popups discreetly vanish, preventing any visual obstruction and facilitating an unhindered exploration of the MapsIndoors map.


# Change Building Outline

## Crafting a Dynamic, Color-Transitioning Example

Here's a code snippet that alternates the building outline color every second, cycling through a palette of contrasting colors, it's not the most practical application, but it shows how to achieve it.

You may desire a way to change the stroke color based on user requirements to make the map meet different accessibility requirements.

<figure><img src="/files/68VnwW4cKrqiVfVGwm2Q" alt=""><figcaption><p>Changing border color programmatically</p></figcaption></figure>

```javascript
const colors = ['#E63946', '#F1FA8C', '#A8DADC', '#457B9D'];

// Initialize an index to keep track of the current color
let colorIndex = 0;

// Use setInterval to create a loop that runs every 1000 milliseconds (1 second)
setInterval(() => {
    // Set the building outline color to the current color
    mapsIndoorsInstance.setBuildingOutlineOptions({strokeColor: colors[colorIndex]});

    // Increment the color index, cycling back to 0 if we've reached the end of the colors array
    colorIndex = (colorIndex + 1) % colors.length;
}, 1000);
```

### Additional Details

To change the building outline color use the [`strokeColor`](https://developer.mozilla.org/en-US/docs/Web/CSS/color_value) property of the [`BuildingOutlineOptions` interface](https://app.mapsindoors.com/mapsindoors/js/sdk/latest/docs/BuildingOutlineOptions.html). This property accepts any color as defined by conventional CSS color values.

See <https://developer.mozilla.org/en-US/docs/Web/CSS/color_value> for more information on CSS color values.

To do this in practice, on the MapsIndoors instance, call `setBuildingOutlineOptions` to change the appearance of the building outline.

```javascript
mapsIndoors.setBuildingOutlineOptions({strokeColor: '#3071d9'});
```

## CMS configuration

The building outline design will be taken from the values set through the CMS.

<figure><img src="/files/pWwudCupfijUZGFPwSTU" alt=""><figcaption></figcaption></figure>

### Overriding the CMS configuration via the SDK

To change the building outline you can use the different properties of the `BuildingOutlineOptions` interface. The properties are the following:

1. `visible` - Controls whether the Building Outline is visible on the map.
   * The value should be a Boolean here, so either `true` or `false`.
2. `zoomFrom` - Sets the minimum Zoom Level at which the Building Outline is visible.
   * The value should be a number between 1 and 25, with 1 being very far away, and 25 being very close (25 not available for all Solutions). In a general use case, most users will only need values between 15 and 25.
3. `zoomTo`- Sets the maximum Zoom Level at which the Building Outline is visible.
   * The value should be a number between 1 and 25, with 1 being very far away, and 25 being very close (25 not available for all Solutions). In a general use case, most users will only need values between 15 and 25.
4. `strokeColor` - Controls the stroke color of the Building Outline.
   * This property accepts any color as defined by conventional CSS color values. See <https://developer.mozilla.org/en-US/docs/Web/CSS/color_value> for more information on CSS color values.
5. `strokeWeight` - Controls the stroke width (in pixels) of the Building Outline.
   * The value should be a number between.
6. `strokeOpacity` - Controls the stroke opacity of the Building Outline.
   * The value should be a number between 0 and 1, for example a value of 1 gives 100% opacity, 0.2 gives 20% opacity, etc.

To read more about the `BuildingOutlineOptions` interface see the [reference docs](https://app.mapsindoors.com/mapsindoors/js/sdk/latest/docs/BuildingOutlineOptions.html).

One way to do this in practice, call `setBuildingOutlineOptions` on the MapsIndoors instance, to change the appearance of the building outline.

```javascript
mapsIndoorsInstance.setBuildingOutlineOptions({
    visible: true,
    zoomFrom: 15,
    zoomTo: 20,
    strokeColor: '#fcd305',
    strokeWeight: 5,
    strokeOpacity: 0.8
});
```

Alternatively, you can define the `buildingOutlineOptions` property when creating a new mapsindoors instance.

```javascript
new mapsindoors.MapsIndoors({
    mapView: mapView,
    buildingOutlineOptions: {
        visible: true,
        zoomFrom: 15,
        zoomTo: 20,
        strokeColor: '#fcd305',
        strokeWeight: 5,
        strokeOpacity: 0.8
    }
});
```

[<br>](https://docs.mapsindoors.com/display-language)


# Managing Collisions Based on Zoom Level

**Handling Label Collisions in MapsIndoors SDK with Mapbox**

**Overview**

When utilizing the MapsIndoors SDK, managing label collisions—particularly at high zoom levels—can be crucial to maintain a clean and informative map display. The SDK's collision detection may sometimes hide labels of Points of Interest (POIs) that are situated closely together, to avoid visual clutter and overlap. This guide introduces a method to manually control label visibility at specific zoom levels.

**Why It Matters**

* **Visibility vs Clarity**: Ensuring labels are always visible might be vital for certain use cases or specific POIs. However, enabling labels to overlap can disrupt map clarity and user experience.
* **Zoom Level Sensitivity**: At high zoom levels, the preference might lean towards always displaying labels, despite close proximity to others.

**Limitations**

* **Map Provider Dependency**: This workaround for web is only available on Mapbox. For Mobile, this approach can be done on both Google Maps and Mapbox. Please see relevant mobile documentation for more details on implementation.
* **Global Application**: The approach impacts all labels in MapsIndoors. For granular control over specific labels, consider employing display rules via the MapsIndoors CMS or the SDK as you normally handle most use-cases.

**Cost-Benefit Analysis**

* **Cost**: Enabling overlap can result in labels obscuring each other, potentially hindering readability and aesthetic appeal, especially at low zoom levels like zoom 17, 18, 19.
* **Benefit**: Guarantees label visibility at all times, especially at higher zoom levels, ensuring crucial information is always displayed, which might make sense at zoom levels 21, 22, 23, 24, 25 (we support zoom levels up to 25 with Mapbox).

**Implementation Example**

The following example demonstrates how to manage label collisions by enabling or disabling the `text-allow-overlap` property based on zoom levels.

<figure><img src="/files/3Kdr6epbOBXnmXpdVExM" alt=""><figcaption></figcaption></figure>

```javascript
mapsIndoorsInstance.addListener('zoom_changed', (zoomLevel) => {
    console.log('Zoom level changed: ', zoomLevel);
    if (zoomLevel > 20) {
        mapsIndoorsInstance.getMap().setLayoutProperty('MI_POINT_LAYER', 'text-allow-overlap', true);
        console.log('Collisions turned OFF'); // Labels can overlap
    } else {
        mapsIndoorsInstance.getMap().setLayoutProperty('MI_POINT_LAYER', 'text-allow-overlap', false);
        console.log('Collisions turned ON'); // Labels cannot overlap
    }
});
```

**Explanation**

* `zoom_changed` listener: Detects changes in zoom level, triggering the condition check against the current zoom level.
* `setLayoutProperty`: Adjusts the `text-allow-overlap` property of the 'MI\_POINT\_LAYER' to either allow or prevent label overlap, depending on the zoom condition.

Optional Conditional Check: Compares the current zoom level against the maximum permissible zoom level (retrieved via [mapsIndoorsInstance.getMaxZoom()](https://app.mapsindoors.com/mapsindoors/js/sdk/latest/docs/mapsindoors.MapsIndoors.html#getMaxZoom) ) to determine label rendering behavior.


# 3D Maps

Starting with the V4 versions of our SDKs, MapsIndoors has introduced the functionality to have your map viewed in 3D, with the appropriate navigational features, rather than just a flat 2D image.

### Requirements[​](https://docs.mapsindoors.com/3d-maps#requirements) <a href="#requirements" id="requirements"></a>

Regardless of your app platform, you need to use the **Mapbox** map provider in order to use this functionality. You also need to be using V4 of our MapsIndoors SDK's, the specific minimum version depending on the platform.

* Android SDK v4.0.0
* Web SDK v4.18.0
* iOS SDK v4.2.6

If you have fulfilled the above requirements, you can contact your MapsPeople representative to have the 3D map functionality enabled for your Solution(s).

### Why 3D Maps?​ <a href="#why-3d-maps" id="why-3d-maps"></a>

3D indoor mapping solutions, such as MapsIndoors, can provide companies with a multitude of benefits by creating a detailed and interactive representation of their indoor spaces. One of the primary advantages of using 3D maps is the ability to enhance the overall user experience for employees, visitors, and customers. These interactive maps can help users effortlessly navigate complex facilities such as corporate campuses, shopping malls, airports, or hospitals. By offering a user-friendly interface and intuitive visual aids, 3D maps can facilitate wayfinding, reduce confusion, and improve overall satisfaction for anyone interacting with the indoor environment.

In addition to improving user experience, 3D indoor mapping solutions like MapsIndoors can significantly streamline various operations within a company, leading to increased efficiency and cost savings. With the integration of real-time data, facility managers can optimize space utilization according to the needs of the company. Furthermore, 3D maps can be integrated with other select enterprise systems supported by MapsIndoors, such as asset tracking and user positioning, to create a comprehensive and connected ecosystem that enhances the overall functionality and productivity of the organization. The value of using 3D maps for indoor mapping solutions is multifaceted and can ultimately contribute to a more efficient, user-friendly, and well-managed working environment.

### Best Practices​ <a href="#best-practices" id="best-practices"></a>

While exact best practices will depend on your specific solution and implementation, we can provide some general pointers of things to consider when developing your solution to work with MapsIndoors 3D maps. Most of these will be specifically pertaining to the inclusion of 3D models in your solution, not to utilising 3D walls and 3D room extrusions.

* Use .glb file format
* Ideally 25-100kb size. You can go higher if you want, just be aware that it impacts load time.
* Keep your models as low-poly as possible.
* Consider whether all your locations need a 3D model.
* Where possible, consider reusing the same model, instead of uploading 3 different models with only minor variations.


# Managing your 3D Maps

Your 3D maps are managed and customised through the use of Display Rules. For a more extensive and detailed explanation on Display Rules, [please read this article covering the topic](https://docs.mapsindoors.com/display-rules). The following information can also be found in the articles detailing Display Rules, but 3D-specific information will be covered in this article.

The MapsIndoors CMS gives you the option of displaying your map in 3D. This is achieved by ensuring that any walls present in your solution are displayed as an extrusion, giving the user the appearance of a 3D map. The appearance of the walls can be customized to match your desired visual identity.

1. **Visibility** - Controls whether the 3D walls are visible on the map.
   * The system will accept a Boolean here, so either `true` or `false`.
2. **Zoom from** - Sets the minimum Zoom Level at which the 3D walls are visible.
   * The value should be a number between 1 and 22, with 1 being very far away, and 22 being very close (22 not available for all Solutions). In a general use case, most users will only need values between 15 and 22.
   * If you are developing using the JavaScript SDK for Google Maps, the value must be an integer. If you are developing for Android or iOS, or using a different map provider, the value may be fractional.
3. **Zoom to** - Sets the maximum Zoom Level at which the 3D walls are visible.
   * The value should be a number between 1 and 22, with 1 being very far away, and 22 being very close (22 not available for all Solutions). In a general use case, most users will only need values between 15 and 22.
   * If you are developing using the JavaScript SDK for Google Maps, the value must be an integer. If you are developing for Android or iOS, or using a different map provider, the value may be fractional.
4. **Wall color** - Controls the color of the 3D walls.
   * In the CMS, you can select a color using the color picker displayed when clicking the color input field.
   * If setting the color in-app, the value provided must be in 6-digit HEX code (eg. #3071D9).
5. **Wall height** - Controls the height of the 3D walls, measured in meters.

In addition to the ability to extrude all walls, you can additionally extrude specific rooms or areas, for example, if you wish to highlight a specific meeting room where an important meeting is taking place.

1. **Visibility** - Controls whether the extrusion is visible on the map.
   * The system will accept a Boolean here, so either `true` or `false`.
2. **Zoom from** - Sets the minimum Zoom Level at which the extrusion is visible.
   * The value should be a number between 1 and 22, with 1 being very far away, and 22 being very close (22 not available for all Solutions). In a general use case, most users will only need values between 15 and 22.
   * If you are developing using the JavaScript SDK for Google Maps, the value must be an integer. If you are developing for Android or iOS, or using a different map provider, the value may be fractional.
3. **Zoom to** - Sets the maximum Zoom Level at which the extrusion is visible.
   * The value should be a number between 1 and 22, with 1 being very far away, and 22 being very close (22 not available for all Solutions). In a general use case, most users will only need values between 15 and 22.
   * If you are developing using the JavaScript SDK for Google Maps, the value must be an integer. If you are developing for Android or iOS, or using a different map provider, the value may be fractional.
4. **Extrusion color** - Controls the color of the extrusion.
   * In the CMS, you can select a color using the color picker displayed when clicking the color input field.
   * If setting the color in-app, the value provided must be in 6-digit HEX code (eg. #3071D9).
5. **Extrusion height** - Controls the height of the room extrusion, measured in meters.

3D models are a way of including models on the map, and customising their appearance. They are uploaded using the Media Library.

1. **Visibility** - Controls whether the 3D model is visible on the map.
   * The system will accept a Boolean here, so either `true` or `false`.
2. **Zoom from** - Sets the minimum Zoom Level at which the 3D model is visible.
   * The value should be a number between 1 and 22, with 1 being very far away, and 22 being very close (22 not available for all Solutions). In a general use case, most users will only need values between 15 and 22.
   * If you are developing using the JavaScript SDK for Google Maps, the value must be an integer. If you are developing for Android or iOS, or using a different map provider, the value may be fractional.
3. **Zoom to** - Sets the maximum Zoom Level at which the 3D model is visible.
   * The value should be a number between 1 and 22, with 1 being very far away, and 22 being very close (22 not available for all Solutions). In a general use case, most users will only need values between 15 and 22.
   * If you are developing using the JavaScript SDK for Google Maps, the value must be an integer. If you are developing for Android or iOS, or using a different map provider, the value may be fractional.
4. **3D Model** - Open the Media Library, where you can choose which 3D model to display.
   * The Media Library is a tool to select the displayed model from either a pre-loaded selection of models, or for you to upload your own. Please note that 3D models are only accepted to be uploaded with `.glb` file-type.
   * In-app, you can provide a URL to a desired model.
5. **X-axis rotation** - Controls the rotation of the model on the X-axis.
   * This value is the rotation on a given axis measured in degrees, and can be any value between 0 and 360.
6. **Y-axis rotation** - Controls the rotation of the model on the Y-axis.
   * This value is the rotation on a given axis measured in degrees, and can be any value between 0 and 360.
7. **Z-axis rotation** - Controls the rotation of the model on the Z-axis.
   * This value is the rotation on a given axis measured in degrees, and can be any value between 0 and 360.
8. **Scale** - Control the scale of the model. Can be used to make the model larger or smaller on the map.
   * This value is a multiplier in relation to the original size of the uploaded model. The ability to deisgnate specific measurements will be added in a future update.


# Base Map Styling - Google Maps

External business POIs from the base map can clutter up your map with irrelevant content. This article describes how to hide unwanted features from the base map - and how to change the colours to better match your branding guidelines.

<figure><img src="/files/o3ILwNjEYQSn4bgHwTQG" alt=""><figcaption><p>Use styling to control or hide visual features like the business POIs on the right hand side</p></figcaption></figure>

With Google Maps there are two methods to style the base map. Both style methods can be used across JavaScript, iOS and Android for a consistent look across platforms and apps.

**Google Maps Cloud Styling**

Cloud-based maps styling makes it easy to style, customize, and manage your maps using the Google Cloud Console, letting you create a customized map experience for your users without having to update your apps' code each time you make a style change.

***Warning - paid feature:** Functionality accessed by adding a `map ID` triggers a map load charged against the Dynamic Maps SKU for **Android** and **iOS**. See* [*Google Maps Billing*](https://developers.google.com/maps/billing-and-pricing/pricing#dynamic-maps) *for more information. Use of Cloud Styling with JavaScript does not add any additional cost.*

Follow the guidelines linked below to create a Style and associate it with a `map ID`.

{% embed url="<https://developers.google.com/maps/documentation/cloud-customization/overview>" %}
Feature documentation from Google Maps
{% endembed %}

To use a map ID with MapsIndoors, simply add the `mapId` parameter alongside other options in [GoogleMapsView](https://app.mapsindoors.com/mapsindoors/js/sdk/latest/docs/mapsindoors.mapView.GoogleMapsView.html)

```javascript
// main.js

const mapViewOptions = {
  element: document.getElementById('map'),
  // your other map options here
  mapId: "8e0a97af9386fef",
};
const mapViewInstance = new mapsindoors.mapView.GoogleMapsView(mapViewOptions);
```

\
**Google Maps JSON Style (legacy method)**

Use a JSON style declaration to control both colours and visual display of features like roads, parks and other points of interest. You can also hide features entirely.

The Styling Wizard can be an easy way to generate a JSON style:

{% embed url="<https://mapstyle.withgoogle.com/>" %}
Google Maps Styling Wizard (legacy)
{% endembed %}

To use a JSON style with MapsIndoors, simply add the styles array in [GoogleMapsView](https://app.mapsindoors.com/mapsindoors/js/sdk/latest/docs/mapsindoors.mapView.GoogleMapsView.html). Here is an example hiding all Google-supplied POIs:

```javascript
// main.js

const mapViewOptions = {
  element: document.getElementById('map'),
  // your other map options here
  styles: [
  {
    "featureType": "poi",
    "stylers": [
      {
        "visibility": "off"
      }
    ]
  }
  ],
};
const mapViewInstance = new mapsindoors.mapView.GoogleMapsView(mapViewOptions);
```


# Managing feature visibility for Mapbox

## Overview

From Mapbox v3 (Web) and v11 (Mobile), it's now possible to control what features (layers) should be shown or hidden at runtime. We are introducing three new methods to enhance the control and visibility of features on your Mapbox map. With these methods, you can easily manipulate the visibility of specific features, enhancing the user experience and providing more control over map customization. As an example, you could easily change between a 2D and a 3D map at runtime, without reloading the map data.

## Methods

### `hideFeatures(features: string[]): void`

This method allows you to hide specific Mapbox features by passing an array of feature identifiers. Once hidden, the features will no longer be visible on the map. This can be useful for scenarios where certain map elements need to be temporarily removed from view.

**Parameters**

* `features` (Array): An array of `FeatureType` objects representing the features to be hidden.

**Switching between 2D and 3D features example:**

```javascript
// Creating two arrays: one which hides 3D features,
// and the other one that hides 2D features.
const features3DToHide = [
    FeatureType.WALLS3D, 
    FeatureType.MODEL3D, 
    FeatureType.EXTRUSION3D,
    FeatureType.EXTRUDEDBUILDINGS
];

const features2DToHide = [
    FeatureType.MODEL2D,
    FeatureType.WALLS2D
];

// Then calling each function either on button click or toggle.
function hide3DFeatures() {
    mapView.hideFeatures(features3DToHide);
}

function hide2DFeatures() {
    mapView.hideFeatures(features2DToHide);
}

// Calling hideFeatures with an empty array as a parameter will result in
// showing all the features.
function showFeatures() {
    mapView.hideFeatures([])
}
```

Example when calling `hide3DFeatures()` function:

<figure><img src="/files/QfDl34gYa01yrnNsDpTw" alt=""><figcaption><p>Only 2D features visible</p></figcaption></figure>

Example when calling `hide2DFeatures()` function:

<figure><img src="/files/hOk0yqbKqmYgkRlvJEmF" alt=""><figcaption><p>Only 3D features visible</p></figcaption></figure>

### `getHiddenFeatures(): string[]`

This method retrieves the currently hidden features on the map. It returns an array of feature identifiers representing the features that are currently not visible.

**Returns**

* `string[]`: An array of strings representing the identifiers of the currently hidden features.

**Example**

```javascript
mapView.hideFeatures([FeatureType.MODEL2D, FeatureType.WALLS2D])
const hiddenFeatures = mapView.getHiddenFeatures();
console.log(hiddenFeatures); // [MODEL2D, WALLS2D]
```

### `FeatureType(): string[]`

This method retrieves all the available feature identifiers that can have their visibility set to "none". It returns an array of these feature identifiers, providing developers with an overview of the features that can be hidden.

**Returns**

* `string[]`: An array of strings representing the identifiers of the features that can be hidden.

**Example**

```javascript
const features = mapView.FeatureType();
console.log(features); // [MODEL2D, WALLS2D, MODEL3D, WALLS3D, EXTRUSION3D, EXTRUDEDBUILDINGS]
```

**NOTE**: `MapboxFeatures()` method is deprecated. It still works as expected but will be removed within next major release.

## Conclusion

You now have powerful tools to control the visibility of features on your maps. By utilizing the `hideFeatures`, `FeatureType`, and `getHiddenFeatures` methods, you can enhance user experience and customize map displays according to your needs.

See example of the implementation [here](/products/fast-track-maptemplate/2d-3d-visibility-switch).


# Wayfinding

Wayfinding is a critical component of your indoor map solution enabling efficient route calculations and optimal navigation within indoor spaces.\\

MapsIndoors’ wayfinding functionality is a comprehensive solution that seamlessly integrates local and global maps, considers various travel modes, utilizes entry points for smooth transitions, and breaks down routes into logical legs and steps, ultimately enhancing navigation and user satisfaction.\\

Key elements to dig into when enabling wayfinding in your MapsIndoors solution are:

**Outdoor to indoor navigation**\
Turn-by-turn directions visualized on the map with estimated travel time and detailed descriptions.

**Venue to Venue wayfinding**

When you're getting routes between two of your own MapsIndoors venues and may require using public routes from Google Maps or Mapbox to get there.

**Dynamic routes**\
Automated route updates based on obstacles like furniture and changing floor plan layout.

**Personalized routes**\
User profiles allow for personalized guidance, based on what the user is allowed to see and where they are allowed to navigate. Getting the right people to the right destinations.

**Accessible wayfinding**\
Allow users with disabilities to effortlessly navigate your building by avoiding stairs and using elevators and ramps for navigation.

\\

All the guidance is here for you. Happy wayfinding!


# Directions

## Introduction to Directions

As a key element in the MapsIndoors platform, we offer APIs for efficiently calculating and displaying the most optimal routes from anywhere in the world to any Location in MapsIndoors. In the case of travelling inside a Venue, this calculation can be done on a local map provided by MapsIndoors. In the case of travelling between Venues or from outdoors to indoors, MapsIndoors provides a seamless journey outline from a specified Origin through automatically selected Entry Points at the edge of your Venues to the specified destination. See illustration below:

<figure><img src="/files/sy3zZshWoenLXNNM7AOa" alt=""><figcaption></figcaption></figure>

In order to provide a route between Venues, MapsIndoors integrates with external and global map engines (Mapbox and Google Maps).

The central components that utilize a Directions experience is the [Directions Service](/sdks-and-frameworks/web/directions-and-routing/directions-service) and the [Directions Renderer](/sdks-and-frameworks/web/directions-and-routing/directions-renderer). Let's examine some key concepts first.

### Entry Points​ <a href="#entry-points" id="entry-points"></a>

Entry Points are specified points in a MapsIndoors Venue that enable a transition between a global or regional map and the local map in MapsIndoors. The Entry Point often specifies which travel modes are suitable for entering/exiting the Venue. There are four travel modes: Walking, Bicycling, Driving and Transit (Public Transportation). As such, the Entry Point may be a bike shed for the Bicycling travel mode, a carpark for Driving and a bus stop for Transit. As a consequence, it is often at the Entry Point that the Travel Mode changes from Bicycling, Driving or Transit to Walking. The selection of an Entry Point for transitioning between route networks is based on a combination of automatic calculation, estimation and optimization.

### The Route Model​ <a href="#the-route-model" id="the-route-model"></a>

When requesting a route with MapsIndoors Directions Service, the Route model in MapsIndoors is separated into Legs, and these Legs are again separated into Steps.

#### The Route Leg Model​ <a href="#the-route-leg-model" id="the-route-leg-model"></a>

A leg represents a logical subset of the journey from Origin to Destination. A Route will break into legs when:

* Travelling from one floor level to another.
* Changing context, such as entering or exiting a building.
* Changing travel mode, for example parking your car and continuing by foot.

If you examine the illustration above, you will see that the purple line representing the Route has been marked with purple circles where the Route would be separated into legs.

#### The Route Step Model​ <a href="#the-route-step-model" id="the-route-step-model"></a>

A Route Step can have different representations depending on where on a Route it is placed. A Step may represent yet another subset of the journey within a leg. Furthermore, it may represent a required action and/or manoeuvre, such as traversing floors, changing directions (left, right, etc.). A step will also contain textual instructions. Examples include “Make a right turn”, “Continue straight ahead”, “Take the elevator to Floor 4” and the like.


# Directions Service

Ready to add indoor navigation to your app with MapsIndoors SDK?

This guide will show you how to implement directions, render routes, and interact with them in your application.

**Design**

* Would you like to show textual directions in a UI?
  * What will your user interface look like?
  * What will the user experience be like
* Would you like to show directions on the map?
  * How will the end user let the map know it's time to update with the next part of their journey?

<figure><img src="/files/9XL7JzJETGjoGqHcVaRC" alt=""><figcaption><p>Creating and combining the interfaces and the map view.</p></figcaption></figure>

<figure><img src="/files/2bcWHfMnMAhh4fh3ARaT" alt=""><figcaption><p>Determining the scope and simplicity of your end user experience should be a big focus when implementing the MapsIndoors SDK</p></figcaption></figure>

From an implementation standpoint, there are two functional things that need to be taken care of.

1. Setting up and requesting directions

<figure><img src="/files/mCelLliqdyCNhJEbtwiy" alt=""><figcaption></figcaption></figure>

1. [Handling and rendering directions responses](/sdks-and-frameworks/web/directions-and-routing/directions-renderer)

<figure><img src="/files/RdUWXwM3B1CidNPVWvvm" alt=""><figcaption></figcaption></figure>

The first step in getting directions is initializing the directions service instance. By passing the externalDirectionsProvider, the MapsIndoors SDK will handle merging responses from the base map, e.g. outdoor directions that will charge billable requests if you request from somewhere else other than MapsIndoors data (e.g. an end users house, to somewhere indoors.)

## **Implementation**

The class `DirectionsService` is used to request routes from one point to another. The minimal required input is an `origin` and a `destination`.

**Mapbox** (required parameter of the DirectionsService instance)

```javascript
const externalDirectionsProvider = new mapsindoors.directions.MapboxProvider("YOUR_MAPBOX_TOKEN");
const miDirectionsServiceInstance = new mapsindoors.services.DirectionsService(externalDirectionsProvider);
```

MapboxProvider reference documentation: [**https://app.mapsindoors.com/mapsindoors/js/sdk/latest/docs/mapsindoors.directions.MapboxProvider.html**](https://app.mapsindoors.com/mapsindoors/js/sdk/latest/docs/mapsindoors.directions.MapboxProvider.html)

**Google** (not required for legacy reasons, but recommended to pass an externalDirectionsProvider as a parameter)

```javascript
const externalDirectionsProvider = new mapsindoors.directions.GoogleMapsProvider();
const miDirectionsServiceInstance = new mapsindoors.services.DirectionsService(externalDirectionsProvider);
```

GoogleMapsProvider reference documentation: <https://app.mapsindoors.com/mapsindoors/js/sdk/latest/docs/mapsindoors.directions.GoogleMapsProvider.html>

In the below example, the coordinates are hard coded, but you'll likely want to retrieve them from location objects. It's recommended to get those from the anchor points, e.g.

```javascript
lat: originLocation.properties.anchor.coordinates[1], lng: originLocation.properties.anchor.coordinates[0], floor: originLocation.properties.floor
```

```javascript
const routeParameters = {
  origin: { lat: 38.897389429704695, lng: -77.03740973527613, floor: 0 }, // Oval Office, The White House
  destination: { lat: 38.897579747054046, lng: -77.03658652944773, floor: 1 } // Blue Room, The White House
};

miDirectionsServiceInstance.getRoute(routeParameters).then(directionsResult => {
  console.log(directionsResult);
});
```

### Change Transportation Mode​ <a href="#change-transportation-mode-3" id="change-transportation-mode-3"></a>

In MapsIndoors, the transportation mode is referred to as travel mode. There are four travel modes, walking, bicycling, driving and transit (public transportation). The travel modes generally apply to outdoor navigation. Indoor navigation calculations are based on walking travel mode.

Set travel mode on your request using the `travelMode` property on `routeParameters`:

```javascript
const routeParameters = {
  origin: { lat: 38.897389429704695, lng: -77.03740973527613, floor: 0 }, // Oval Office, The White House
  destination: { lat: 38.897579747054046, lng: -77.03658652944773, floor: 1 }, // Blue Room, The White House
  travelMode: 'WALKING'
};
```

Relevant for outdoor directions only

* DRIVING
* BYCYCLING
* WALKING
* TRANSIT (Only supported with Google Maps as the external provider)

### Route Restrictions​ <a href="#route-restrictions-3" id="route-restrictions-3"></a>

#### Avoiding Stairs and Steps​ <a href="#avoiding-stairs-and-steps-3" id="avoiding-stairs-and-steps-3"></a>

For a wheelchair user or a user with physical disabilities, it could be relevant to request a Route that avoids stairs, escalators, and steps.

Set avoid stairs on your request using the `avoidStairs` property on `routeParameters`:

```javascript
const routeParameters = {
  origin: { lat: 38.897389429704695, lng: -77.03740973527613, floor: 0 }, // Oval Office, The White House
  destination: { lat: 38.897579747054046, lng: -77.03658652944773, floor: 1 }, // Blue Room, The White House
  avoidStairs: 'true'
};
```

#### App User Role Restrictions​ <a href="#app-user-role-restrictions-3" id="app-user-role-restrictions-3"></a>

Application User Roles is a feature that lets you define various roles that you can assign to your users. In the context of route calculation, the feature is used to differentiate routing from one user type to the another. In the MapsIndoors CMS it is possible to restrict paths and doors in the route network for certain [User Roles](/sdks-and-frameworks/web/other-guides/application-user-roles).

You can get available Roles for your MapsIndoors Solution with the help of the `SolutionsService:`

```javascript
mapsindoors.services.SolutionsService.getUserRoles().then(userRoles => {
  console.log(userRoles);
});
```

> For more information, see the [getUserRoles documentation](https://app.mapsindoors.com/mapsindoors/js/sdk/latest/docs/mapsindoors.services.SolutionsService.html#getUserRoles) which returns [User Role objects](https://app.mapsindoors.com/mapsindoors/js/sdk/latest/docs/mapsindoors.UserRole.html).

User Roles can be set on a global level using `mapsindoors.MapsIndoors.setUserRoles()`.

```javascript
mapsindoors.MapsIndoors.setUserRoles(['myUserRoleId']);
```

> For more information, see the [setUserRoles method in our documentation.](https://app.mapsindoors.com/mapsindoors/js/sdk/latest/docs/mapsindoors.MapsIndoors.html#.setUserRoles)

This will affect all following Directions requests, visibility of Locations as well as search queries with `LocationsService`. Be mindful of what restrictions are set on locations if your solution is to utilize user roles within MapsIndoors.

### Transit Departure and Arrival Time​ <a href="#transit-departure-and-arrival-time-3" id="transit-departure-and-arrival-time-3"></a>

Set a departure date or an arrival date on the route using the `transitOptions` property. It will only make sense to set one of these properties at a time.

This parameter is only implemented on our side with Google Maps, not Mapbox.

```javascript
const departureDate = new Date(new Date().getTime() + 30*60000); // 30 minutes from now

const routeParameters = {
  origin: { lat: 38.897389429704695, lng: -77.03740973527613, floor: 0 }, // Oval Office, The White House
  destination: { lat: 38.897579747054046, lng: -77.03658652944773, floor: 1 }, // Blue Room, The White House
  travelMode: 'TRANSIT',
  transitOptions: {
    departureTime: departureDate
  }
};
```

> For more information about available options on the `transitOption` object, see [google.com/maps/documentation](https://developers.google.com/maps/documentation/javascript/reference/directions#TransitOptions.departureTime).

**Additional reading**

For more information on the options you can provide, check the [documentation on getting routes](https://app.mapsindoors.com/mapsindoors/js/sdk/latest/docs/mapsindoors.services.DirectionsService.html).


# Tailoring the directions to your specific needs

by leveraging the avoidHighwayTypes and excludeHighwayTypes parameters.

### This is a continuation of the [Directions Service](/sdks-and-frameworks/web/directions-and-routing/directions-service) article

Navigating within buildings and complexes can be a challenge, especially when considering various obstacles and preferences. The new `avoidHighwayTypes` and `excludeHighwayTypes` parameters empower you to customize your indoor routes to suit your specific needs, ensuring a seamless and accessible journey.

**Supported Highway Types:**

The `avoidHighwayTypes` and `excludeHighwayTypes` parameters support a range of path types commonly found within venues, allowing you to fine-tune your route to your preferences: `'ramp'`, `'stairs'`, `'ladder'`, `'escalator'`, `'travelator'`, `'elevator'`, `'unclassified'`, `'residential'`, `'footway'`, `'wheelchairramp'`, and `'wheelchairlift'`.

**Avoiding Specific Path Types:**

The `avoidHighwayTypes` parameter allows you to specify path types that you prefer to avoid within a venue. For instance, if you're pushing a stroller or carrying heavy luggage, you might want to avoid stairs and escalators. To do so, simply add the path types you wish to avoid to the `avoidHighwayTypes` parameter when calling the `getRoute` method.

Example:

```javascript
miDirectionsServiceInstance.getRoute({
  origin: { lat: 38.897389429704695, lng: -77.03740973527613, floor: 0 },
  destination: { lat: 38.897579747054046, lng: -77.03658652944773, floor: 1 },
  avoidHighwayTypes: ['stairs', 'escalator']
});
```

**Excluding Path Types Entirely:**

The `excludeHighwayTypes` parameter takes customization a step further, allowing you to completely exclude certain path types from your route. This means that the DirectionsService will never consider these path types as part of your journey, ensuring that your route aligns with your preferences.

Example:

<pre class="language-javascript"><code class="lang-javascript"><strong>miDirectionsServiceInstance.getRoute({
</strong>  origin: { lat: 38.897389429704695, lng: -77.03740973527613, floor: 0 },
  destination: { lat: 38.897579747054046, lng: -77.03658652944773, floor: 1 },
  excludeHighwayTypes: ['stairs', 'escalator']
});
</code></pre>

**Accessibility Considerations:**

The `avoidHighwayTypes` and `excludeHighwayTypes` parameters are particularly useful for individuals with accessibility needs. For example, if you are unable to use stairs or escalators, you can add `excludeHighwayTypes: ['stairs', 'escalator']` to your `getRoute` call. This will ensure that the DirectionsService provides you with a route that doesn't include these obstacles.

#### The `avoidHighwayTypes` and `excludeHighwayTypes` parameters take priority over `avoidStairs`

The `avoidStairs` parameter will be disregarded if either `avoidHighwayTypes` or `excludeHighwayTypes` is specified. This approach stems from the fact that `avoidHighwayTypes` and `excludeHighwayTypes` provide a more granular level of control over which path types to exclude.

Example:

<pre class="language-javascript"><code class="lang-javascript"><strong>miDirectionsServiceInstance.getRoute({
</strong>  origin: { lat: 38.897389429704695, lng: -77.03740973527613, floor: 0 },
  destination: { lat: 38.897579747054046, lng: -77.03658652944773, floor: 1 },
  avoidStairs: true,
  excludeHighwayTypes: ['wheelchairramp']
});
</code></pre>

#### Unrestricted routes

To get a route that isn't restricted in any way, assign an empty array to either `avoidHighwayTypes` or `excludeHighwayTypes`

Example:

<pre class="language-javascript"><code class="lang-javascript"><strong>miDirectionsServiceInstance.getRoute({
</strong>  origin: { lat: 38.897389429704695, lng: -77.03740973527613, floor: 0 },
  destination: { lat: 38.897579747054046, lng: -77.03658652944773, floor: 1 },
  excludeHighwayTypes: []
});
</code></pre>

With these new parameters, you have the power to tailor your indoor routes to your specific needs and preferences, whether it's avoiding stairs for easier access, prioritizing accessibility, or simply navigating through a venue with ease.


# Directions Renderer

When getting the result route from a [Directions Service](https://docs.mapsindoors.com/directions-service/), we can use the `DirectionsRenderer` to display this Route on a map.

Once the `miDirectionsServiceInstance` and `miDirectionsRendererInstance` are initialized, the methods used from them should be agnostic to the map provider (whether it's Mapbox, Google Maps, etc.) with the exception of getting routes via TRANSIT, which requires Google as the external provider.

This example shows how to set up a query for a route and display the result on a Google Map using the DirectionsRenderer:

for Google Maps

```javascript
const externalDirectionsProvider = new mapsindoors.directions.GoogleMapsProvider();
```

for Mapbox

```javascript
const externalDirectionsProvider = new mapsindoors.directions.MapboxProvider();
```

```javascript

const miDirectionsServiceInstance = new mapsindoors.services.DirectionsService(externalDirectionsProvider);
const directionsRendererOptions = { mapsIndoors: mapsIndoorsInstance }
const miDirectionsRendererInstance = new mapsindoors.directions.DirectionsRenderer(directionsRendererOptions);

//recall that your coordinates can be found on the location objects here:
// longitude = location.properties.anchor.coordinates[0]
// latitude = location.properties.anchor.coordinates[1]
// floorIndex = location.properties.floor

const routeParameters = {
  origin: { lat: 38.897389429704695, lng: -77.03740973527613, floor: 0 }, // Oval Office, The White House
  destination: { lat: 38.897579747054046, lng: -77.03658652944773, floor: 1 } // Blue Room, The White House
};

miDirectionsServiceInstance.getRoute(routeParameters).then(directionsResult => {
  miDirectionsRendererInstance.setRoute(directionsResult);
});
```

> See all available directions render options in the [reference documentation](https://app.mapsindoors.com/mapsindoors/js/sdk/latest/docs/mapsindoors.directions.DirectionsRenderer.html).

As previously mentioned, the route object is separated into objects of [Leg](https://app.mapsindoors.com/mapsindoors/js/sdk/latest/docs/Leg.html) and these legs are again separated into objects of [Step](https://app.mapsindoors.com/mapsindoors/js/sdk/latest/docs/Step.html). Unless the Route only contains one leg, the Directions Renderer does not allow the full Route to be rendered all at once. A specific part of the route can be rendered by setting the step index and/or leg index using the `DirectionsRenderer`.

```javascript
miDirectionsRendererInstance.setStepIndex(stepIndex, legIndex)
```

> See all available methods in the [reference documentation](https://app.mapsindoors.com/mapsindoors/js/sdk/latest/docs/mapsindoors.directions.DirectionsRenderer.html)

The length of the legs and steps arrays determines the possible values of `legIndex` and `stepIndex`.

**Implementing the route rendering along with a UI**

The route renderer has the ability to update the polyline via its methods.

If a route is broken down into multiple legs, steps, and sub-steps (referred to as steps within the step objects), it will be very helpful if a user can iterate through those steps prior to and even during their journey.

If using a positioning service to get the current position of the end user, you may wish to even update this programmatically. In any case, it will be more helpful to understand the data structure of the route response.

{% embed url="<https://app.mapsindoors.com/mapsindoors/js/sdk/latest/docs/DirectionsResult.html>" %}
Directions response object
{% endembed %}

<figure><img src="/files/uYOPGnJRNgoKHULyf1py" alt=""><figcaption></figcaption></figure>

{% embed url="<https://app.mapsindoors.com/mapsindoors/js/sdk/latest/docs/Route.html>" %}
Route object
{% endembed %}

{% embed url="<https://app.mapsindoors.com/mapsindoors/js/sdk/latest/docs/Leg.html>" %}
Leg object
{% endembed %}

{% embed url="<https://app.mapsindoors.com/mapsindoors/js/sdk/latest/docs/Step.html>" %}
Step object
{% endembed %}

We recommend after getting the route, to set the route, get the current leg index as and also the current step index. This will be helpful in maintaining where in the directions response you are.

```javascript
let currentLegIndex = null;
let currentStepIndex = null;

miDirectionsRendererInstance.setRoute(directionsResult);
currentLegIndex = miDirectionsRendererInstance.getLegIndex();
currentStepIndex = miDirectionsRendererInstance.getStepIndex();
```

If the user wishes to iterate to the next step or even next leg, the directions renderer will handle that for you if you choose to use nextStep or nextLeg, respectively. It will even handle things like floor changes, reanimating the polyline, and changing zooming in or out based on the distance length.


# Customizing the Route Animation

The `DirectionsRenderer` includes functionality to display an animated line that traces the route's path when displayed. You have control over the visual style and timing of this animation.

#### Accessing the Route Animation Controller

To customize the animation, you first need to access the dedicated animation controller object from your `DirectionsRenderer` instance. Use the `getAnimation()` method for this:

JavaScript

```javascript
// Assuming 'directionsRenderer' is your initialized DirectionsRenderer instance
// (See the main Directions Renderer page for setup)

const routeAnimation = directionsRenderer.getAnimation();
```

#### Setting Animation Options

The `routeAnimation` object has a `setOptions()` method that allows you to configure the animation's properties. Pass an object to this method where the keys match the options you want to modify.

These options are defined by the `mapsindoors.directions.RouteAnimationOptions` interface:

**Interface:** `mapsindoors.directions.RouteAnimationOptions`

| Property           | Type     | Default Value          | Description                                                                                                                                                                                                         |
| ------------------ | -------- | ---------------------- | ------------------------------------------------------------------------------------------------------------------------------------------------------------------------------------------------------------------- |
| `speed`            | `number` | `300`                  | The speed of the animation in meters per second (m/s).                                                                                                                                                              |
| `minAnimationTime` | `number` | `1.2`                  | The minimum duration in seconds for the animation. Ensures very short routes still have a perceivable animation effect.                                                                                             |
| `strokeColor`      | `string` | `'hsl(215, 67%, 96%)'` | The color of the animated line. Accepts any valid CSS color value (e.g., `'#ff0000'`, `'rgba(0, 255, 0, 0.8)'`, `'navy'`). See [MDN CSS color value](https://developer.mozilla.org/en-US/docs/Web/CSS/color_value). |
| `strokeOpacity`    | `number` | `1`                    | The opacity of the animated line, from `0.0` (fully transparent) to `1.0` (fully opaque). See [MDN CSS opacity](https://developer.mozilla.org/en-US/docs/Web/CSS/opacity).                                          |
| `strokeWeight`     | `number` | `2`                    | The thickness (weight) of the animated line in pixels.                                                                                                                                                              |

Example

This example shows how to create a `DirectionsRenderer` and immediately configure its animation to be a thicker, red line with a slightly faster speed.

JavaScript

```javascript
// Assuming 'mapsIndoors' and 'stopIconProvider' are defined as needed

// 1. Initialize the DirectionsRenderer (as described on the main page)
const directionsRenderer = new mapsindoors.directions.DirectionsRenderer({
    mapsIndoors: mapsindoors,
    fitBoundsPadding: 200,
    defaultRouteStopIconProvider: stopIconProvider,
});

// 2. Get the route animation controller
const routeAnimation = directionsRenderer.getAnimation();

// 3. Set desired animation options
routeAnimation.setOptions({
    strokeColor: '#E41E26', // A distinct red color
    strokeWeight: 6,        // Make the line noticeably thicker
    speed: 450              // Increase the animation speed
});

// 4. Later, when you render a route...
// directionsRenderer.setRoute(myRoute);
// ...the animation will use the custom settings defined above.
```

By calling `setOptions()` on the object returned by `getAnimation()` (here stored in `routeAnimation`), you can tailor the route reveal animation to better match your application's design or desired user experience. These settings will be applied the next time a route is rendered using `setRoute()`.


# Multi-stop navigation

This article builds on existing knowledge and assumes familiarity with the [Directions Service](/sdks-and-frameworks/web/directions-and-routing/directions-service) and the [Directions Renderer](/sdks-and-frameworks/web/directions-and-routing/directions-renderer).

The MapsIndoors Javascript SDK empowers you to streamline navigation within venues using the multi-stop feature. This functionality allows you to obtain directions to multiple destinations within a venue effortlessly. Provide a sequence of stops, and MapsIndoors will generate the most efficient route, considering two options:

* **Navigation with multiple stops:** Navigate through the stops in the exact order you specify. This is ideal when the order of visits is crucial.
* **Optimized multi-stop navigation (traveling salesman algorithm):** Let MapsIndoors intelligently reorder your stops to create the fastest possible route, saving you valuable time.

<figure><img src="/files/mpSj6vBgi5lTnfjfWKyj" alt=""><figcaption><p>Navigation with multiple stops</p></figcaption></figure>

### Leverage Multi-Stop Navigation in Your App

To get a route with multiple stops along the path, use the [`DirectionsService's`](https://app.mapsindoors.com/mapsindoors/js/sdk/latest/docs/mapsindoors.services.DirectionsService.html) [`getRoute`](https://app.mapsindoors.com/mapsindoors/js/sdk/latest/docs/mapsindoors.services.DirectionsService.html#getRoute) in combination with the stops parameter. The stops parameter takes an array of [`LatLngLiterals`](https://app.mapsindoors.com/mapsindoors/js/sdk/latest/docs/LatLngLiteral.html)

```javascript
const origin = { lat: 30.362364120965957, lng: -97.74102144956545 };
const destination = { lat: 30.3603809, lng: -97.7421568, floor: 0 };

const stops = [
    { lat: 30.3603751, lng: -97.7420869, floor: 0 },
    { lat: 30.3604412, lng: -97.7421172, floor: 0 },
    { lat: 30.3604593, lng: -97.7422238, floor: 0 },
];

const routeResult = await miDirectionsServiceInstance.getRoute({
    origin, 
    destination, 
    stops
});

miDirectionsRendererInstance.setRoute(routeResult);
```

<figure><img src="/files/5yLuFSZC3uIuznrI1rDD" alt=""><figcaption><p>Route with multiple stops, in the given input order.</p></figcaption></figure>

### **Optimized multi-stop navigation**

To optimize the route for the most direct path, you can use the `optimize` parameter. When set to `true`, this parameter ensures that the stops are ordered to optimize the travel time.

```javascript
const origin = { lat: 30.362364120965957, lng: -97.74102144956545 };
const destination = { lat: 30.3603809, lng: -97.7421568, floor: 0 };
const stops = [
    { lat: 30.3603751, lng: -97.7420869, floor: 0 },
    { lat: 30.3604412, lng: -97.7421172, floor: 0 },
    { lat: 30.3604593, lng: -97.7422238, floor: 0 },
];

const routeResult = await miDirectionsServiceInstance.getRoute({
    origin, 
    destination, 
    stops,
    // Optimize the route for the fastest travel time
    optimize: true
});

miDirectionsRendererInstance.setRoute(routeResult);
```

<figure><img src="/files/otw0JMVkIuey8yyT9QvB" alt=""><figcaption><p>Route with multiple stops, optimized for shortest travel time.</p></figcaption></figure>

### Customizing all Route Stop Icons

The MapsIndoors Javascript SDK offers customization options to tailor the appearance of your multi-stop route. By default, MapsIndoors provides a standard icon to visually represent each stop on your route. However, you can override the [`DefaultRouteStopIconProvider`](https://app.mapsindoors.com/mapsindoors/js/sdk/latest/docs/mapsindoors.directions.DefaultRouteStopIconProvider.html) on the [`DirectionsRenderer`](https://app.mapsindoors.com/mapsindoors/js/sdk/latest/docs/mapsindoors.directions.DirectionsRenderer.html) to create a more customized experience.

To customize the icons used for route stops, you can provide a [`DefaultRouteStopIconProvider`](https://app.mapsindoors.com/mapsindoors/js/sdk/latest/docs/mapsindoors.directions.DefaultRouteStopIconProvider.html). For example, to set the fill color to blue (`#00f`):

```javascript
const routeStopIconProvider = new mapsindoors.directions.DefaultRouteStopIconProvider({
    fillColor: '#00f' 
}); 

const directionsRendererOptions = { 
    mapsIndoors: mapsIndoorsInstance,
    defaultRouteStopIconProvider: routeStopIconProvider
};
const miDirectionsRendererInstance = new mapsindoors.directions.DirectionsRenderer(directionsRendererOptions);
```

<figure><img src="/files/bKpsSgJvwEgX4ie4tyk2" alt=""><figcaption><p>Stop icons with a different background color.</p></figcaption></figure>

To omit the numbering of the icons, set the `numbered` boolean parameter to `false`:

```javascript
const routeStopIconProvider = new mapsindoors.directions.DefaultRouteStopIconProvider({
    fillColor: '#00f',
    numbered: false
}); 

const directionsRendererOptions = { 
    mapsIndoors: mapsIndoorsInstance,
    defaultRouteStopIconProvider: routeStopIconProvider
};

const miDirectionsRendererInstance = new mapsindoors.directions.DirectionsRenderer(directionsRendererOptions);
```

<figure><img src="/files/SW28yjMZC5hH2FDX7vle" alt=""><figcaption><p>Stop icons without numbers.</p></figcaption></figure>

### Adding Labels to Route Stops

The MapsIndoors Javascript SDK allows you to enhance the visual representation of your multi-stop routes by incorporating labels beneath each stop icon. This can provide additional context or information about the stop for users.

To add labels to your stops, create a Map of [`RouteStopConfig`](https://app.mapsindoors.com/mapsindoors/js/sdk/latest/docs/RouteStopConfig.html) objects, using the stop index as the key, and the RouteStopConfig as the value. The [`RouteStopConfig`](https://app.mapsindoors.com/mapsindoors/js/sdk/latest/docs/RouteStopConfig.html) offers a `label` property that you can set to the desired text for the stop label.

```javascript
const routeStopConfigs = new Map([
    [0, { label: 'John\'s desk' }], 
    [1, { label: 'Meeting room 4' }], 
    [2, { label: 'Jane\'s desk' }]
]);

miDirectionsRendererInstance.setRoute(routeResult, routeStopConfigs);
```

<figure><img src="/files/qO9NCGmqTr51Gu9IayHp" alt=""><figcaption><p>Numbered stop icons with labels displayed underneath.</p></figcaption></figure>

### Customizing Individual Stop Icons

The [`RouteStopConfig`](https://app.mapsindoors.com/mapsindoors/js/sdk/latest/docs/RouteStopConfig.html) object also lets you configure a different [`RouteStopIconProvider`](https://app.mapsindoors.com/mapsindoors/js/sdk/latest/docs/RouteStopIconProvider.html) for the individual stops. The [`DefaultRouteStopIconProvider`](https://app.mapsindoors.com/mapsindoors/js/sdk/latest/docs/mapsindoors.directions.DefaultRouteStopIconProvider.html) class allows customizing the fill color of the default icon as shown previously. The [`RouteStopConfig`](https://app.mapsindoors.com/mapsindoors/js/sdk/latest/docs/RouteStopConfig.html) has the `iconProvider` property, which can be used to override the [`DirectionsRenderer`](https://app.mapsindoors.com/mapsindoors/js/sdk/latest/docs/mapsindoors.directions.DirectionsRenderer.html)'s [`DefaultRouteStopIconProvider`](https://app.mapsindoors.com/mapsindoors/js/sdk/latest/docs/mapsindoors.directions.DefaultRouteStopIconProvider.html) for the individual stops.

Here is an example of how to use the [`DefaultRouteStopIconProvider`](https://app.mapsindoors.com/mapsindoors/js/sdk/latest/docs/mapsindoors.directions.DefaultRouteStopIconProvider.html) to customize the background color of specific stop icons:

```javascript
const redStopIconProvider = new mapsindoors.directions.DefaultRouteStopIconProvider({
    fillColor: '#f00' // Red background color
});

const greenStopIconProvider = new mapsindoors.directions.DefaultRouteStopIconProvider({
    fillColor: '#0f0', // Green background color
    numbered: false,
});

const routeStopConfigs = new Map([
    [0, { label: 'John\'s desk',  iconProvider: redStopIconProvider}], 
    [1, { label: 'Meeting room 4', iconProvider: greenStopIconProvider }],
    [2, { label: 'Jane\'s desk' }]
]);

miDirectionsRendererInstance.setRoute(routeResult, routeStopConfigs);
```

<figure><img src="/files/NJmU3OAlQLUNhgsZipUn" alt=""><figcaption><p>Stop icons with different background colors.</p></figcaption></figure>


# Custom Icons

### **Creating Custom Stop Icons**

Ready to add a touch of personality to your multi-stop routes? Let's dive into the world of custom stop icons! This article dives into the world of custom stop icon design for multi-stop routes within the MapsIndoors Javascript SDK. It explains how to leverage the [`RouteStopIconProvider`](https://app.mapsindoors.com/mapsindoors/js/sdk/latest/docs/RouteStopIconProvider.html) interface to craft unique icons that perfectly match your application's style and branding.

### **The RouteStopIconProvider Interface**

The [`RouteStopIconProvider`](https://app.mapsindoors.com/mapsindoors/js/sdk/latest/docs/RouteStopIconProvider.html) interface acts as a blueprint for creating custom stop icons. While the MapsIndoors SDK provides a default implementation (DefaultRouteStopIconProvider), this interface empowers you to take control and design stop icons beyond the built-in options.

The core functionality of [`RouteStopIconProvider`](https://app.mapsindoors.com/mapsindoors/js/sdk/latest/docs/RouteStopIconProvider.html) revolves around a single asynchronous function called [`getImage`](https://app.mapsindoors.com/mapsindoors/js/sdk/latest/docs/RouteStopIconProvider.html#getImage). It accepts an optional parameter named `stopNumber`. This parameter provides the actual stop number (not the index) within the route and is intended to display the stop number directly on the custom stop icon. This allows you to create numbered icons that visually communicate the stop sequence within the route.

The [`getImage`](https://app.mapsindoors.com/mapsindoors/js/sdk/latest/docs/RouteStopIconProvider.html#getImage) function returns a Promise that resolves to an [`HTMLImageElement`](https://developer.mozilla.org/en-US/docs/Web/API/HTMLImageElement/Image) representing the custom stop icon that will be displayed on the map. It likely utilizes libraries like Canvas or SVG to generate the icon image.

### **Implementing a Custom RouteStopIconProvider**

Now that we understand the core concept, let's see how to implement a custom [`RouteStopIconProvider`](https://app.mapsindoors.com/mapsindoors/js/sdk/latest/docs/RouteStopIconProvider.html) class. Here's a basic example:

```javascript
/**
 * Custom route stop icon provider.
 */
class CustomRouteStopIconProvider {
    /**
     * Gets the icon for the specified stop number.
     *
     * @param {number} [stopNumber] - The stop number.
     * @returns {Promise<HTMLImageElement>} - The icon image.
     */
    async getImage(stopNumber) {
        return new Promise((resolve) => {
            // This example creates a simple circle icon with a number
            const width = 64;
            const height = width;
            const canvas = document.createElement('canvas');
            canvas.width = width;
            canvas.height = height;
            const context = canvas.getContext('2d');

            context.beginPath();
            context.arc(width / 2, height / 2, width / 2 - 2, 0, 2 * Math.PI);
            context.strokeStyle = '#fff'; // Set your desired stroke color here
            context.lineWidth = 4;
            context.fillStyle = '#00f'; // Set your desired fill color here
            context.fill();
            context.stroke();
            
            if (Number.isInteger(stopNumber)) {
                context.fillStyle = '#fff';
                context.font = 'bold 28px sans-serif';
                context.textAlign = 'center';
                context.textBaseline = 'middle';
                context.fillText(stopNumber, width / 2, height / 2);
            }

            const img = new Image(canvas.width, canvas.height);
            img.onload = () => resolve(img);
            img.src = canvas.toDataURL();
        });
    }
}
```

This example creates a simple blue circle with a white number overlay representing the stop number. You can customize this logic to generate any desired icon based on your application's needs. The code utilizes the Canvas API to create a circular icon and conditionally adds the stop number in the center.

By following this approach and leveraging the [`RouteStopIconProvider`](https://app.mapsindoors.com/mapsindoors/js/sdk/latest/docs/RouteStopIconProvider.html) interface, you can create unique and informative stop icons that enhance the visual experience of your MapsIndoors multi-stop routes.

### Using the CustomRouteStopIconProvider

```javascript
const redStopIconProvider = new mapsindoors.directions.DefaultRouteStopIconProvider({
    fillColor: '#f00' // Red background color
});

const greenStopIconProvider = new mapsindoors.directions.DefaultRouteStopIconProvider({
    fillColor: '#0f0', // Green background color
    numbered: false,
});

const customRouteStopIconProvider = new CustomRouteStopIconProvider();

const routeStopConfigs = new Map([
    [0, { label: 'John\'s desk',  iconProvider: redStopIconProvider}], 
    [1, { label: 'Meeting room 4', iconProvider: greenStopIconProvider }],
    [2, { label: 'Jane\'s desk', iconProvider: customStopIconProvider }]
]);

miDirectionsRendererInstance.setRoute(routeResult, routeStopConfigs);
```

<figure><img src="/files/mU4R9chqqtDMh82g6XxI" alt=""><figcaption><p>Multi-stop route with a custom icon.</p></figcaption></figure>


# User's Location as Point of Origin

Often you may want to get directions starting from a user's actual current position instead of from another fixed Location. The following code snippet gives an example on how to implement this.

```javascript
// Setting styling options to the route path.
miDirectionsRendererInstance.setOptions({
    strokeColor: '#bada55',
    strokeWeight: 10,
});
// Latitude and longitude position of the route destination.
// again, you'll likely want to retrieve this from a location
// location.properties.anchor.coordinates, and then access the array directly.
const routeDestination = {
    lat: 57.058230237700194,
    lng: 9.951134229974498
};
// enableHighAccuracy is a boolean value that indicates that the application would like to receive the best possible results.
// timeout represents the maximum length of time (milliseconds) the device is allowed to take in order to return a position.
const options = {
    enableHighAccuracy: true,
    timeout: 5000
}
// Creates origin with the users latitude and longitude. Then sets the route from this position to the route destination.
function getRoute(pos) {
    const coords = pos.coords;
    const origin = {
        lat: coords.latitude,
        lng: coords.longitude
    }
    directionsServiceInstance.getRoute({ origin: origin, destination: routeDestination }).then(function (res) {
        if (res === undefined) {
            console.log('Error: Route is undefined.')
        } else {
            console.log('Route', res);
            miDirectionsRendererInstance.setRoute(res);
        }
    });
}
// Error handling function.
function errorHandler(err) {
    console.log('Error: ', err)
}
// Gets users device current position and sets route with additional options. If any errors, errorHandler will trigger.
navigator.geolocation.getCurrentPosition(getRoute, errorHandler, options);
```

Further details on how user positioning works, and how to display it, can be found [here](https://docs.mapsindoors.com/blue-dot/).

This results in directions queries originating from the user's current location.


# Search

Searching the map and making sure you are able to find what you need is crucial for users navigating complex indoor spaces. Search functionality on an indoor map is a critical component for improving navigation, efficiency, and overall user satisfaction.\\

Depending on your solution and use case, search can come into play in different ways. It could be specific locations, points of interest, or services within the indoor space, like enabling users to search for a meeting room, a desk, a booth, a coffee, an elevator, anything.

In MapsIndoors, searching is a crucial element of user interaction, allowing users to discover locations and filter map displays for a tailored experience. The search functionality covers all MapsIndoors geodata, and customization options are available to create a search experience that aligns with your specific use case.\\

Key features of the searching functionality include:

* Filters for Precision
* Search Result Ranking
* Displaying Search Results
* Clearing Filters
* List Presentation

Overall, the search mechanism in MapsIndoors prioritizes proximity, text matching, and geodata type to provide users with relevant and ranked results. The flexibility to customize the search experience and the ability to present results in both map and list formats are built to contribute to a user-friendly and adaptable indoor mapping solution.

We’ve lined up all the guidance you need for getting the best out of MapsIndoors’ search functionality. Enjoy.


# Search Operations

### Search Operations with MapsIndoors

Enhance your application's search capabilities with MapsIndoors data. The following topics offer a brief introduction to various functionalities you can implement. For in-depth guidance, click on the specific topics.

#### [Basic Searching](/sdks-and-frameworks/web/search/searching)

* **Retrieve Specific Location**: Use [`getLocation(id)`](https://app.mapsindoors.com/mapsindoors/js/sdk/latest/docs/mapsindoors.services.LocationsService.html#.getLocation) to obtain individual location objects.
* **Querying Locations**: Perform broader searches with [`getLocations(args)`](https://app.mapsindoors.com/mapsindoors/js/sdk/latest/docs/mapsindoors.services.LocationsService.html#.getLocations).
  * **Filter Customization**: Fine-tune your searches with specialized query parameters.

#### [Extending Your Search](/sdks-and-frameworks/web/search/external-ids) <a href="#ffaf" id="ffaf"></a>

* **Using External IDs**: Translate your unique IDs to MapsIndoors IDs using [`getLocationsByExternalId`](https://app.mapsindoors.com/mapsindoors/js/sdk/latest/docs/mapsindoors.services.LocationsService.html#.getLocationsByExternalId).
* **Advanced Search Integration**: Integrate MapsIndoors data into your existing search functionalities.
* **Distance Matrix**: Create a distance matrix when dealing with multiple locations. [Ref docs here](https://app.mapsindoors.com/mapsindoors/js/sdk/latest/docs/DistanceMatrixService.html)

#### [Utilizing MapsIndoors Web Components and Other Searches](/sdks-and-frameworks/web/search/utilizing-mapsindoors-web-components-and-other-searches)

* **Utilizing MapsIndoors web components**
  * **Components:** MapsIndoors search component, list component, etc.
  * **Click Event Handling**: Interactive retrieval of location details.
* **Venue and Building Info**: Access information about venues and buildings stored in MapsIndoors.


# Searching

Searching through your MapsIndoors data is an key part of a great user experience with your maps. Users can look for places to go, or filter what is shown on the map.

Searches work on all MapsIndoors geodata. It is up to you to create a search experience that fits your use case.

## Retrieve Specific Location: `getLocation(id)`

### **Use-Case 1: Center the Map to the Location**

#### Example 1: Using MapsIndoors Location ID on the Card

This example assumes that you've stored the MapsIndoors Location ID directly on the card, accessible via a custom attribute or some other mechanism. When the card is clicked, `getLocation(id)` retrieves the corresponding location, centers the map on it, and sets the zoom level.

```javascript
card.addEventListener('click', () => {
  const locationId = card.getAttribute('data-location-id'); // Assume the MapsIndoors ID is stored in a data attribute
  mapsindoors.services.LocationsService.getLocation(locationId).then(location => {
    mapsIndoorsInstance.setFloor(location.properties.floor);
    mapInstance.setCenter({
      lat: location.properties.anchor.coordinates[1],
      lng: location.properties.anchor.coordinates[0]
    });
    mapInstance.setZoom(18);
  });
});
```

#### Example 2: Using an External Custom ID on the Card

In this example, an external (custom) ID is stored on the card. The `getLocationsByExternalId` method is used to fetch locations, taking into account that multiple locations could be returned.

```javascript
card.addEventListener('click', () => {
  const externalId = card.getAttribute('data-external-id'); // Assume the external ID is stored in a data attribute
  
  // Use getLocationsByExternalId to fetch locations by their external IDs
  mapsindoors.services.LocationsService.getLocationsByExternalId(externalId).then(locations => {
    if (locations.length > 0) {
      const location = locations[0]; // Take the first location if multiple are returned
      
      // Set the floor and center the map
      mapsIndoorsInstance.setFloor(location.properties.floor);
      mapInstance.setCenter({
        lat: location.properties.anchor.coordinates[1],
        lng: location.properties.anchor.coordinates[0]
      });
      
      mapInstance.setZoom(18);
    } else {
      // Handle the case where no locations are returned for the given external ID
      console.warn(`No locations found for external ID ${externalId}`);
    }
  });
});
```

Both examples work off a click event attached to a card element. The key difference lies in the method used to query MapsIndoors for the location information. Example 1 uses the native MapsIndoors ID, while Example 2 uses an external ID. Both methods then focus the map on the retrieved location.

### **Use-Case 2: Utilizing MapsIndoors SDK Highlighting and Filtering**

Take advantage of using MapsIndoors native filtering and highlighting functionality via the SDK without needing to implement your own custom display logic.

### **Use-Case 3: Modify Display Rule**

#### Example 1: Customizing Display Rule on Click Event with MapsIndoors Location ID

```javascript
// Define the rule outside the listener for better readability and reusability
const rule = { 
  visible: true,
  polygonVisible: true,
  polygonFillColor: "#FF0000",
  polygonFillOpacity: 1,
  iconSize: { width: 30, height: 30 },
  labelVisible: true,
};

let previousLocationId = null;  // Keep track of previously filtered location

card.addEventListener('click', () => {
  const locationId = card.getAttribute('data-location-id');
  mapsindoors.services.LocationsService.getLocation(locationId).then(location => {
    // Optionally set the floor and center the map
    mapsIndoorsInstance.setFloor(location.properties.floor);
    mapInstance.setCenter({
      lat: location.properties.anchor.coordinates[1],
      lng: location.properties.anchor.coordinates[0]
    });

    // Reset display rule for previously filtered location, if any
    if (previousLocationId) {
      mapsIndoorsInstance.setDisplayRule(previousLocationId, null);
    }

    // Apply the new display rule to the clicked location
    mapsIndoorsInstance.setDisplayRule(location.id, rule);

    // Update the previous location ID
    previousLocationId = location.id;
  });
});
```

#### Example 2: Using an External Custom ID

```javascript
// Define the display rule
const rule = { 
  visible: true,
  polygonVisible: true,
  polygonFillColor: "#FF0000",
  polygonFillOpacity: 1,
  iconSize: { width: 30, height: 30 },
  labelVisible: true,
};

let previousLocationId = null;  // Keep track of the previously filtered location

card.addEventListener('click', () => {
  const externalId = card.getAttribute('data-external-id');
  
  // Use getLocationsByExternalId() to fetch locations by their external IDs
  mapsindoors.services.LocationsService.getLocationsByExternalId(externalId).then(locations => {
    if (locations.length > 0) {
      const location = locations[0];  // Assume the first location is the one to display

      // Optionally set the floor and center the map
      mapsIndoorsInstance.setFloor(location.properties.floor);
      mapInstance.setCenter({
        lat: location.properties.anchor.coordinates[1],
        lng: location.properties.anchor.coordinates[0]
      });

      // Reset display rule for the previously filtered location, if any
      if (previousLocationId) {
        mapsIndoorsInstance.setDisplayRule(previousLocationId, null);
      }

      // Apply the new display rule to the location
      mapsIndoorsInstance.setDisplayRule(location.id, rule);

      // Update the ID of the previously filtered location
      previousLocationId = location.id;

    } else {
      console.warn(`No locations found for external ID ${externalId}`);
    }
  });
});
```

This code assumes that if multiple locations are returned from `getLocationByExternalId()`, the first one is the relevant location for display. The remainder of the code remains largely similar to the previous example, but we're fetching the locations based on an external ID instead of a MapsIndoors Location ID.

### Use-Case 4: Add a Popup / Info Window

For this use-case, we're focusing on how to display an information popup or info window when a MapsIndoors location is clicked. Both Mapbox and Google Maps implementations are provided. These popups will show a custom image and a link, allowing developers the flexibility to populate it with any content. Let's assume you're getting back your location object from one of the approaches in [Use-Case 1](#use-case-1-center-the-map-to-the-location).

**Mapbox Implementation**

In the Mapbox example, we add an event listener to the MapsIndoors instance that listens for 'click' events. When a location is clicked, we display a Mapbox popup at the location's coordinates. Any previously displayed popup will be removed to avoid clutter.

```javascript
let currentPopup = null;

export const handleLocationClickForMapbox = (location, mapsIndoorsInstance, mapInstance) => {
  if (currentPopup) {
    currentPopup.remove();
  }

  const coords = location.properties.anchor.coordinates;
  const popupContent = `
    <img src="${'Your_custom_image_url_here'}" alt="${location.properties.description}" width="100" height="100" />
    <h2><a href="${'Your_custom_link_here'}" target="_blank">${location.properties.name}</a></h2>
  `;

  currentPopup = new mapboxgl.Popup({ closeOnClick: true, closeButton: true })
    .setLngLat(coords)
    .setHTML(popupContent)
    .addTo(mapInstance);
};

mapsIndoorsInstance.addListener('click', location => {
  handleLocationClickForMapbox(location, mapsIndoorsInstance, mapInstance);
});
```

**Google Maps Implementation**

In the Google Maps example, we add an event listener to the MapsIndoors instance to listen for location clicks. When a location is clicked, an info window appears at the coordinates of that location. Similar to the Mapbox example, any previously displayed info window will be closed.

```javascript
let previousInfoWindow = null;

mapsIndoorsInstance.addListener('click', location => {
  if (previousInfoWindow) {
    previousInfoWindow.close();
  }

  const coords = location.properties.anchor.coordinates;
  const infoWindowContent = `
    <img src="${'Your_custom_image_url_here'}" alt="${location.properties.description}" width="100" height="100" />
    <h2><a href="${'Your_custom_link_here'}" target="_blank">${location.properties.name}</a></h2>
  `;

  const infoWindowOptions = {
    content: infoWindowContent,
    position: {
      lat: coords[1],
      lng: coords[0]
    }
  };

  const infoWindow = new google.maps.InfoWindow(infoWindowOptions);
  infoWindow.open(googleMapsInstance);
  previousInfoWindow = infoWindow;
});
```

Both implementations ensure that only one popup or info window is open at a given time, closing any previous ones when a new location is clicked. This keeps the map clean and focuses the user's attention on the most recently clicked location.

## Retrieve Queried Locations: `getLocations(`args opt`)`

To help you in this, there is a range of filters you can apply to the search queries to get the best results. E.g. you can filter by Categories, search only a specific part of the map or search near a Location.

All three return a list of Locations from your solution matching the parameters they are given. The results are ranked upon the three following factors:

* If a "near" parameter is set, how close is the origin point to the result?
* How well does the search input text match the text of the result?
  * (Our base algorithm for searching is using the "[Levenshtein distance](https://en.wikipedia.org/wiki/Levenshtein_distance)" algorithm)
* Which kind of geodata is the result (e.g. Buildings are ranked over POIs)?

This means that the first item in the search result list will be the one best matching the three factors. **You always have the ability to reorder your array of locations based on your preference before rendering them in your user interface, if you choose to handle that via some client-side code.**

Feel free to refer to this table for a comprehensive understanding of each parameter's type, optional/required status, and functionality.

| Parameter    | Type                    | Optional/Required  | Description                                                                                                     | Default / Example | Code Example                                                                                                                |
| ------------ | ----------------------- | ------------------ | --------------------------------------------------------------------------------------------------------------- | ----------------- | --------------------------------------------------------------------------------------------------------------------------- |
| `q`          | string                  | Optional           | Use a text query to search for one or more locations.                                                           |                   |                                                                                                                             |
| `fields`     | string                  | Optional           | Fields to search in when using the search string parameter 'q'. Options: "name,description,aliases,categories"  |                   |                                                                                                                             |
| `types`      | Array.                  | Optional           | Filter by types in a comma-separated list. A location only has one type.                                        |                   | `mapsindoors.services.LocationsService.getLocations({ lr: 'en', types: ['meetingroom'] }).then(locations => { ... });`      |
| `categories` | Array.                  | Optional           | Filter by categories in a comma-separated list. A location can be in multiple categories.                       |                   | `mapsindoors.services.LocationsService.getLocations({ categories: categoryKey, lr: 'en' }).then(locations => { ... });`     |
| `bbox`       | Object                  | Optional           | Limits the result to inside the bounding box. Must include `bbox.east`, `bbox.north`, `bbox.south`, `bbox.west` |                   |                                                                                                                             |
| `bbox.east`  | number                  | Required if `bbox` | Max longitude of the bounds in degrees.                                                                         |                   |                                                                                                                             |
| `bbox.north` | number                  | Required if `bbox` | Max latitude of the bounds in degrees.                                                                          |                   |                                                                                                                             |
| `bbox.south` | number                  | Required if `bbox` | Min latitude of the bounds in degrees.                                                                          |                   |                                                                                                                             |
| `bbox.west`  | number                  | Required if `bbox` | Min longitude of the bounds in degrees.                                                                         |                   |                                                                                                                             |
| `take`       | number                  | Optional           | Max number of locations to get.                                                                                 |                   | `await mapsindoors.services.LocationsService.getLocations({ near: 'location:9897fd93fcb14bd39ec8110d', take: 5, ... });`    |
| `skip`       | number                  | Optional           | Skip the first number of entries.                                                                               |                   |                                                                                                                             |
| `near`       | LatLngLiteral \| string | Optional           | Can either be a coordinate `{lat: number, lng: number}` or a string in the format "type:id".                    |                   | `await mapsindoors.services.LocationsService.getLocations({ near: 'location:9897fd93fcb14bd39ec8110d', radius: 50, ... });` |
| `radius`     | number                  | Optional           | A radius in meters. Must be supplied when using `near` with a point.                                            |                   | `await mapsindoors.services.LocationsService.getLocations({ near: 'location:9897fd93fcb14bd39ec8110d', radius: 50, ... });` |
| `floor`      | integer                 | Optional           | Filter locations to a specific floor.                                                                           |                   | `await mapsindoors.services.LocationsService.getLocations({ near: 'location:9897fd93fcb14bd39ec8110d', floor: 50, ... });`  |
| `orderBy`    | string                  | Optional           | Which property the result should be sorted by.                                                                  |                   |                                                                                                                             |
| `sortOrder`  | string                  | Optional           | Specifies in which order the results are sorted, either "ASC" or "DESC"                                         | "ASC"             |                                                                                                                             |
| `building`   | string                  | Optional           | Limit the search for locations to a building.                                                                   |                   |                                                                                                                             |
| `venue`      | string                  | Optional           | Limit the search for locations to a venue (id or name).                                                         |                   |                                                                                                                             |

### Example of Creating a Search Query​ <a href="#example-of-creating-a-search-query" id="example-of-creating-a-search-query"></a>

See the full list of parameters in the [reference guide](https://app.mapsindoors.com/mapsindoors/js/sdk/latest/docs/mapsindoors.services.LocationsService.html#.getLocations):

```javascript
const searchParameters = {
  q: 'Office',
  near: { lat: 38.897579747054046, lng: -77.03658652944773 }, // // Blue Room, The White House
  take: 1
}

mapsindoors.services.LocationsService.getLocations(searchParameters).then(locations => {
  console.log(locations);
});
```

## Display Search Results on the Map​

When displaying the search results, it is helpful to filter the map to only show matching Locations. Matching Buildings and Venues will still be shown on the map, as they give context to the user, even if they aren't selectable on the map.

#### Example of Filtering the Map to Display Searched Locations on the Map <a href="#example-of-filtering-the-map-to-display-searched-locations-on-the-map" id="example-of-filtering-the-map-to-display-searched-locations-on-the-map"></a>

```javascript
const searchParameters = {
  q: 'Office',
  near: { lat: 38.897579747054046, lng: -77.03658652944773 }, // // Blue Room, The White House
  take: 1
}

mapsindoors.services.LocationsService.getLocations(searchParameters).then(locations => {
  mapsIndoorsInstance.filter(locations.map(location => location.id), false);
});
```

### Clearing the Map of Your Filter​ <a href="#clearing-the-map-of-your-filter" id="clearing-the-map-of-your-filter"></a>

After displaying the search results on your map you can then clear the filter so that all Locations show up on the map again.

#### Example of Clearing Your Map Filter to Show All Locations Again <a href="#example-of-clearing-your-map-filter-to-show-all-locations-again" id="example-of-clearing-your-map-filter-to-show-all-locations-again"></a>

```javascript
mapsIndoorsInstance.filter(null);
```

### Display Locations as List​ <a href="#display-locations-as-list" id="display-locations-as-list"></a>

You can also search for Locations, and have them presented to you as a list, instead of just displaying them on the map.

The full code example is shown in the JSFiddle below which will be examined below.

#### Search example​ <a href="#search" id="search"></a>

The `mapsindoors.services.LocationsService` class exposes the `getLocations` function that enables you to search for Locations.

It will return a promise that gets resolved when the query has executed.

See [mapsindoors.services.LocationsService](https://app.mapsindoors.com/mapsindoors/js/sdk/latest/docs/mapsindoors.services.LocationsService.html) for more information.

```javascript
searchElement.addEventListener('input', debounce((e) => {
    const value = e.target.value;
    if (value > '') {
        mapsindoors.services.LocationsService.getLocations({ q: value, includeOutsidePOI: true })
            .then(displayResults)
            .then(filterMap);
    } else {
        clearResults();
        clearFilter();
    }
}, 500));
```

The `debounce` method is there to ensure that the service is not being called in rapid succession. This method delays the execution of the function by 500ms, unless `debounce` is called again within 500ms, in which case the timer is reset.

See this article ["What is debouncing" by Jamis Charles](https://medium.com/@jamischarles/what-is-debouncing-2505c0648ff1) for a more detailed description of the `debounce` concept.

When the function executes, we check whether the input is empty or not. A request object is created if the input is not empty.

The `getLocations` function expects either no input, in which case it returns all Locations, or an Object (please refer to the official documentation for an exhaustive list of properties). In this case, the constant `value` is passed to the `q` property and the `includeOutsidePOI` property is set to `true`. When the Promise resolves, the response is passed to the `displayResults` helper function.

If the input is empty, we clear the result list and reset the map filter by calling the helper functions `clearResults` and `clearFilter`.

#### Checking for Results​ <a href="#checking-for-results" id="checking-for-results"></a>

We need to clear the previous results, and check if any Locations were returned. If so, we loop through them and add them to the result list.

```javascript
function displayResults(locations) {
    clearResults();

    if (locations.length > 0) {
        for (const location of locations) {
            searchResults.innerHTML += `<li>${location.properties.name}</li>`;
        }
    } else {
        searchResults.innerHTML = '<li class="no-results">No results matched the query.</li>';
    }

    return locations;
}
```

If no Locations are returned, a message is shown to the user stating "No results matched the query.". Otherwise, we pass the Locations on to the next helper function called `filterMap`.

```javascript
function filterMap(locations) {
    mapsIndoors.filter(locations.map(location => location.id), false);
    return locations;
}
```

The purpose of the `filterMap` function is to create a list of `location id`s used to filter the Locations on the map.

The second parameter tells MapsIndoors not to change the viewport of the map.

For more information, see `MapsIndoors.filter` in the [reference documentation](https://app.mapsindoors.com/mapsindoors/js/sdk/latest/docs/MapsIndoors.html#filter).


# Using External ID, Geospatial Joins

## Background on External ID

The External ID is a reference from your real-life data to a piece of MapsIndoors geodata.

In a large venue like a conference hall, headquarter, or university, every room will have a unique ID like `1.234AB` or `HALL_A` in a naming scheme that makes sense to that organization.

All MapsIndoors geospatial objects contain an internal ID. While this can be used for performing lookups, it means that in general as a developer you'll need to either query for them, or create your own mapping tables against your own resources.

Our recommendation is to use the `externalId` as the identifier for an your system's ID or another external system of your choosing.

If you have a queue monitoring system and want to display some regularly updated statuses on a piece of geodata in MapsIndoors like a room, poi, or area, you can use the External ID as the common denominator between the systems.

There are many ways you can utilize the power of external ID as a reference point for one of your systems, and we recommend looking at the [Integration API documentation](https://docs.mapsindoors.com/api/) and [getting in touch](https://resources.mapspeople.com/contact-us) to hear more about your options with this feature.

Alternatively, you might need to change the ID for a particular room in your physical building. It might be a large meeting room that is now split in two smaller rooms and one of them keeps that original ID. The external ID should then reflect your naming scheme, and not concern itself with the internal random identifier our database handed out to any of your rooms, as they can potentially be two new ones.

Historically, we referred to this as room ID, so if you see a property on an object when working with the SDK and see a `roomId`, it should be consistent with the external ID property.

## Getting Locations by External ID

A method on MapsIndoors is available to retrieve locations by their external ID. This method generally assumes that your first party system will do querying of different data, and only need to use the externalId to find the equivalent MapsIndoors location.

The function on all 3 platforms functions similarly, returning an Array or List of Locations that match the supplied External ID strings.

The below example shows how to retrieve some MapsIndoors locations based on your own IDs from your system, e.g. 'extId1', 'extId2' and updates the corresponding MapsIndoors locations with display rules.

<figure><img src="/files/JeMgjwPmEa0urcueUcWO" alt=""><figcaption><p>Update the map with display rules based on your own data</p></figcaption></figure>

### Implementation example

```javascript

// Define arrays of external IDs for available and unavailable resources
const availableExternalIds = ['extId1', 'extId2']; // Replace with your actual IDs
const unavailableExternalIds = ['extId3', 'extId4']; // Replace with your actual IDs

// Fetch locations based on external IDs
async function fetchLocationsByExternalIds(externalIds) {
  const promises = externalIds.map(id => mapsindoors.services.LocationsService.getLocationsByExternalId(id));
  return await Promise.all(promises);
}

// Fetch locations for available and unavailable resources
const availableLocations = await fetchLocationsByExternalIds(availableExternalIds);
const unavailableLocations = await fetchLocationsByExternalIds(unavailableExternalIds);

// Segment locations into Meeting Rooms and Workstations
const availableMeetingRooms = availableLocations.filter(location => location.properties.type === 'MeetingRoom');
const availableWorkstations = availableLocations.filter(location => location.properties.type === 'Workstation');

const unavailableMeetingRooms = unavailableLocations.filter(location => location.properties.type === 'MeetingRoom');
const unavailableWorkstations = unavailableLocations.filter(location => location.properties.type === 'Workstation');

// Extract MapsIndoors location Ids
const availableMeetingRoomIds = availableMeetingRooms.map(location => location.id);
const unavailableMeetingRoomIds = unavailableMeetingRooms.map(location => location.id);

const availableWorkstationIds = availableWorkstations.map(location => location.id);
const unavailableWorkstationIds = unavailableWorkstations.map(location => location.id);

// Set display rules for Meeting Rooms
mapsIndoorsInstance.setDisplayRule(availableMeetingRoomIds, {
  polygonVisible: true,
  polygonFillColor: "#90ee90",
  polygonFillOpacity: 1,
  polygonZoomFrom: 16,
  polygonZoomTo: 22,
  visible: true,
});

mapsIndoorsInstance.setDisplayRule(unavailableMeetingRoomIds, {
  polygonVisible: true,
  polygonFillColor: "#ff4d4d",
  polygonFillOpacity: 1,
  polygonZoomFrom: 16,
  polygonZoomTo: 22,
  visible: true,
});

// Set display rules for Workstations
mapsIndoorsInstance.setDisplayRule(availableWorkstationIds, {
  model3DVisible: true,
  model3DModel: 'your_3D_model_URL_for_available_workstations',
  model3DZoomFrom: 16,
  model3DZoomTo: 22,
  visible: true,
});

mapsIndoorsInstance.setDisplayRule(unavailableWorkstationIds, {
  model3DVisible: true,
  model3DModel: 'your_3D_model_URL_for_unavailable_workstations',
  model3DZoomFrom: 16,
  model3DZoomTo: 22,
  visible: true,
});

```

## Adding Geospatial Criteria to Your Own Search

You may wish to have some kind of recommendation system, so returning a list of your objects from your system might get a benefit to adding geospatial information.

* Find all the nearby rooms that require cleaning
* Find the closest nearby available meeting room
* Get me all of the service orders tickets on this floor

Let's dig into how to implement this

### First and foremost, the Map is not required

1. Load the MapsIndoors SDK

Use the relevant script tag for the MapsIndoors SDK. There is no API directly accessible as a developer, so the script tag must be run and therefore you need to have a javascript environment.

As of the date of writing this Dec, 2023 the most recent version is

```html
<script src="https://app.mapsindoors.com/mapsindoors/js/sdk/4.26.3/mapsindoors-4.26.3.js.gz"></script>
```

However, you can find the latest version of our SDK [here](https://app.mapsindoors.com/mapsindoors/js/sdk/latest/docs/).

2. Use the getLocationsByExternalId method with whatever list of IDs are returned from your own search handled outside of MapsIndoors.

```
// Define arrays of external IDs for available and unavailable resources
const availableExternalIds = ['extId1', 'extId2']; // Replace with your actual IDs

// Fetch locations based on external IDs
async function fetchLocationsByExternalIds(externalIds) {
  const promises = externalIds.map(id => mapsindoors.services.LocationsService.getLocationsByExternalId(id));
  return await Promise.all(promises);
}

// Fetch locations for available and unavailable resources
const availableLocations = await fetchLocationsByExternalIds(availableExternalIds);
```

For a more full implementation to demonstrate this

{% embed url="<https://storage.googleapis.com/meeting-room-recommender-demo/index.html>" %}

<figure><img src="/files/4FK97bU8cYnC9XGEF1UI" alt=""><figcaption><p>Narrow recommendations based on walking distance proximity</p></figcaption></figure>

{% hint style="info" %}
Make sure to use the latest version of the SDK when implementing.

Depending on your ambition, you could do things like automatically book the closest nearby for the user if they wish.

This particular feature shows value with MapsIndoors even for employees who are quite familiar with their surroundings.
{% endhint %}

```
<!DOCTYPE html>
<html lang="en">
   <head>
      <meta charset="UTF-8">
      <title>Meeting Room Finder</title>
      <script src="https://app.mapsindoors.com/mapsindoors/js/sdk/4.24.8/mapsindoors-4.24.8.js.gz?apikey=3ddemo"></script>
      <style>
         body {
         font-family: Arial, sans-serif;
         }
         table {
             width: 100%;
             border-collapse: collapse;
             table-layout: fixed; 
         }
         th, td {
             border: 1px solid #dddddd;
             text-align: left;
             padding: 8px;
             word-wrap: break-word; 
         }
         th {
             background-color: #f2f2f2;
             cursor: pointer;
             }
             /* Specify the width of each column */
             th:nth-child(1), td:nth-child(1) { width: 20%; }
             th:nth-child(2), td:nth-child(2) { width: 15%; }
             th:nth-child(3), td:nth-child(3) { width: 10%; }
             th:nth-child(4), td:nth-child(4) { width: 20%; }
             th:nth-child(5), td:nth-child(5) { width: 15%; }
             th:nth-child(6), td:nth-child(6) { width: 20%; }
        .table-container {
            display: none;
         }
         /* Style for buttons */
         #buttons-container button {
             border: none;
             border-radius: 12px;
             padding: 10px 20px;
             margin: 5px;
             cursor: pointer;
             background-color: #ffffff;
             color: #000000;
             transition: all 0.3s ease;
         }
         /* Hover effect */
         #buttons-container button:hover {
             background-color: #ffedd5;
             color: #0f5655;
             box-shadow: 0px 0px 10px 2px #ffedd5;
         }
         /* Selected state */
             #buttons-container button.selected {
             background-color: #7d49f3;
             color: white;
         }
      </style>
   </head>
   <body>
     <section>
    <h2>Make better recommendations by incorporating MapsIndoors data</h2>
    <p id="dynamic-text">All meeting rooms on the same floor as the employee. Most of this would be in a resource calendar system.</p>
</section>

      <div id="buttons-container">
         <button onclick="toggleTable('all-rooms')" class="selected">All Rooms</button>
         <button onclick="toggleTable('available-rooms')">Available Meeting Rooms</button>
         <button onclick="toggleTable('top-rooms')">Top 10 Nearby Meeting Rooms</button>
         <button onclick="toggleTable('top-3-rooms')">Top 3 Meeting Rooms</button>
      </div>
      <div id="all-rooms" class="table-container"></div>
      <div id="available-rooms" class="table-container"></div>
      <div id="top-rooms" class="table-container"></div>
      <div id="top-3-rooms" class="table-container"></div>
      <script>
function toggleTable(id) {
    const tables = ['all-rooms', 'available-rooms', 'top-rooms', 'top-3-rooms'];
    const textElement = document.getElementById('dynamic-text');

    let description = '';
    switch(id) {
        case 'all-rooms':
            description = "All meeting rooms on the same floor as the employee. Most of this would be in a resource calendar system.";
            break;
        case 'available-rooms':
            description = "Dynamic meeting room availability on the employee's floor based on your own data or a calendar system like Outlook or Google Calendar.";
            break;
        case 'top-rooms':
            description = "Starting to optimize the recommended rooms based on their position in the office based on walking distance.";
            break;
        case 'top-3-rooms':
            description = "Optimized greatly the recommendation on where they should go for a meeting based on walking distance.";
            break;
    }

    textElement.innerText = description;

    tables.forEach((tableId) => {
        const el = document.getElementById(tableId);
        const btn = document.querySelector(`button[onclick="toggleTable('${tableId}')"]`);
        if (tableId === id) {
            el.style.display = 'block';
            btn.classList.add('selected');
        } else {
            el.style.display = 'none';
            btn.classList.remove('selected');
        }
    });
}

         
                 function createDirectionsLink(originId, destinationId) {
                     return `<a href="https://map.mapsindoors.com/?apiKey=3ddemo&directionsFrom=${originId}&directionsTo=${destinationId}&pitch=10" target="_blank">Take me there</a>`;
                 }
         
         
                 // Function to create table with distance and directions
         function createTableWithDistance(rows, originId) {
             const headers = ['Name', 'Distance (m)', 'Floor', 'External ID', 'Type', 'Directions'];
             const headerHTML = headers.map(header => `<th>${header}</th>`).join('');
         
             const rowHTML = rows.map(row => {
                 const { name, distance, floor, externalId, type, mapsindoorsId } = row;
                 const directionsLink = createDirectionsLink(originId, mapsindoorsId);
                 return `<tr><td>${name || ''}</td><td>${distance || ''}</td><td>${floor/10 || ''}</td><td>${externalId || ''}</td><td>${type || ''}</td><td>${directionsLink}</td></tr>`;
             }).join('');
         
             return `
                 <table>
                     <thead><tr>${headerHTML}</tr></thead>
                     <tbody>${rowHTML}</tbody>
                 </table>
             `;
         }
         
         // Function to create table without distance and directions
         function createTableWithoutDistance(rows) {
             const headers = ['Name', 'Floor', 'External ID', 'Type'];
             const headerHTML = headers.map(header => `<th>${header}</th>`).join('');
         
             const rowHTML = rows.map(row => {
                 const { name, floor, externalId, type } = row.properties;  // Assuming row.properties contains the required data
                 return `<tr><td>${name || ''}</td><td>${floor/10 || ''}</td><td>${externalId || ''}</td><td>${type || ''}</td></tr>`;
             }).join('');
         
             return `
                 <table>
                     <thead><tr>${headerHTML}</tr></thead>
                     <tbody>${rowHTML}</tbody>
                 </table>
             `;
         }
         
                 (async () => {
                     const allRoomsElement = document.getElementById('all-rooms');
                     const availableRoomsElement = document.getElementById('available-rooms');
                     const topRoomsElement = document.getElementById('top-rooms');
                     const top3RoomsElement = document.getElementById('top-3-rooms');
         
                     const allRooms = await mapsindoors.services.LocationsService.getLocations({
                         floor: 50,
                         types: ['Meetingroom', 'b29e5d4d-f302-4ec2-b8f6-ec251ab879ff', 'Meetingroom small', '615d1438-f6f0-434c-99c0-a0de0c781f42'],
                         take: 50
                     });
         
                     const availableRooms = ['05-D73', '05-D42', '05-D10', '05-D47', '05-D30', '05-D14', '05-D49', '05-D7', '05-D69'];
                     const filteredMeetingRooms = allRooms.filter(room => availableRooms.includes(room.properties.externalId));
         
                     const originsArray = await mapsindoors.services.LocationsService.getLocationsByExternalId('05-Desk393');
                     const origin = originsArray[0];
         
                     const matrix = await mapsindoors.services.DistanceMatrixService.getDistanceMatrix({
                         graphId: 'WEWORK_Graph',
                         origins: [`${origin.properties.anchor.coordinates[1]},${origin.properties.anchor.coordinates[0]},${origin.properties.floor}`],
                         destinations: filteredMeetingRooms.map(room => `${room.properties.anchor.coordinates[1]},${room.properties.anchor.coordinates[0]},${room.properties.floor}`)
                     });
         
                     const sortedRooms = filteredMeetingRooms.map((room, index) => ({
                         name: room.properties.name,
                         distance: matrix.rows[0].elements[index].distance.value,
                         floor: room.properties.floor,
                         externalId: room.properties.externalId,
                         type: room.properties.type,
                         mapsindoorsId: room.id
                     })).sort((a, b) => a.distance - b.distance);
         
                     allRoomsElement.innerHTML = `<h3>All Meeting Rooms</h3>` + createTableWithoutDistance(allRooms);
             availableRoomsElement.innerHTML = `<h3>Available Meeting Rooms</h3>` + createTableWithoutDistance(filteredMeetingRooms);
             topRoomsElement.innerHTML = `<h3>Top 10 Nearby Meeting Rooms</h3>` + createTableWithDistance(sortedRooms.slice(0, 10), origin.id);
             top3RoomsElement.innerHTML = `<h3>Top 3 Meeting Rooms</h3>` + createTableWithDistance(sortedRooms.slice(0, 3), origin.id);
         
                     document.getElementById('all-rooms').style.display = 'block';
         
                 })();
             
      </script>
   </body>
</html>
```


# Utilizing MapsIndoors Web Components and Other Searches

MapsIndoors web components are intended to take advantage of pre-designed and already integrated HTML elements which will greatly reduce the complexity of your user-interface design and help minimize the amount of MapsIndoors specific SDK implementation code you'll need to write.

{% embed url="<https://www.npmjs.com/package/@mapsindoors/components>" %}

<figure><img src="/files/qn7jQQqiQ7ncnG0wUg0F" alt=""><figcaption><p><a href="https://components.mapsindoors.com/">https://components.mapsindoors.com/</a></p></figcaption></figure>

<div><figure><img src="/files/h0sYpZHIHmaFqkfWawQG" alt=""><figcaption><p><a href="https://components.mapsindoors.com/search/">https://components.mapsindoors.com/search/</a></p></figcaption></figure> <figure><img src="/files/f79KYOnmjTpyxfJvxyQe" alt=""><figcaption><p><a href="https://components.mapsindoors.com/map-mapbox/">https://components.mapsindoors.com/map-mapbox/</a></p></figcaption></figure></div>

While the MapsIndoors components will not cover every full user experience, it will allow you to implement MapsIndoors more efficiently.

To learn more about each component, please see the component specific documentation at

<https://components.mapsindoors.com>


# Map Management

Being able to manage your own maps however and whenever you want makes you agile, independent of support and able to immediately act on your customer requests.

Customization and updating of your map is fast and easily done through the MapsIndoors CMS.\\

Key features of the MapsIndoors CMS include:

* Add POIs and areas, like objects, work zones, or any relevant points of interest.
* Make floorplan changes
* Control visibility and user roles
* Update locations data\\

Check out the details and explore many more CMS features in the [MapsIndoors CMS section](/products/cms).


# Data Visualization

Data visualization in the form of displaying external dynamic data within your indoor map is crucial for enhancing the map's utility, relevance, real-time applicability and not least for customizing it to fit your specific use cases. \\

MapsIndoor’s data visualization functionality is built to ensure a unified, up-to-date, and contextually relevant mapping experience for users. \\

By altering your map data visualization dynamically, you will create a use-case-specific digital twin that only shows information that is relevant for solving your users’ needs.\\

Integrate everything from live data sensors, calendar booking systems, ERP systems, and more to MapsIndoors.\\

Follow our guides to customise your maps with the data integrations you need.


# Display Heatmap Overlay

If you use Mapbox as your map engine, it provides the option of creating a heatmap as an alternative way to display datapoints on your map. The MapsIndoors SDK also provides support for integrating this heatmap into the MapsIndoors layers.

### Creating a heatmap[​](https://docs.mapsindoors.com/display-heatmap#creating-a-heatmap) <a href="#creating-a-heatmap" id="creating-a-heatmap"></a>

This guide will focus on how to display the heatmap layer in a visually pleasing way in your MapsIndoors solution. In order to actually create your heatmap, please refer to the documentation from Mapbox.

* Creating a heatmap with Mapbox: <https://docs.mapbox.com/help/tutorials/make-a-heatmap-with-mapbox-gl-js/>
* Creating a heatmap layer with Mapbox: <https://docs.mapbox.com/mapbox-gl-js/example/heatmap-layer/>

### Inserting the heatmap layer between MapsIndoors layers[​](https://docs.mapsindoors.com/display-heatmap#inserting-the-heatmap-layer-between-mapsindoors-layers) <a href="#inserting-the-heatmap-layer-between-mapsindoors-layers" id="inserting-the-heatmap-layer-between-mapsindoors-layers"></a>

Once you have created your heatmaps with Mapbox, you will need a way to get it to work with the layers that MapsIndoors already applies to your Mapbox map. By following the guides above, you should be able to simply overlay it on top of everything. But in order for it to be integrated more seamlessly in the MapsIndoors layers, you could also choose to insert it between the tile layer and the layer containing the area polygons.

In order to insert a heatmap between layers on the web SDK, refer to the [Mapbox GL JS API Reference](https://docs.mapbox.com/mapbox-gl-js/api/map/#map#addlayer). Then use the following code snippet but replace `map` with your Mapbox instance, and insert the relevant parameters from the API Reference:

```javascript
map.addLayer({....}, 'MI_POLYGON_LAYER');
```


# Other guides


# Authentication

Web v4

MapsIndoors Auth is handled in two ways:

* API keys - This is how apps built on top of the SDKs are authorized by default,
* MapsIndoors Auth server - This is how the MapsIndoors CMS authorizes, as well as apps to access secured solutions.

The MapsIndoors Auth server is located at [https://auth.mapsindoors.com](https://auth.mapsindoors.com/) - including [SSO page](https://auth.mapsindoors.com/login) and [OIDC metadata](https://auth.mapsindoors.com/.well-known/openid-configuration). The server is an [IdentityServer4](https://identityserver4.readthedocs.io/en/3.1.0/) implementation - with support for OAauth 2 and OIDC protocols.

It stores all users that are managed through the MapsIndoors CMS, as well as configurations for authentication providers. Based on these users and authentication providers, it can authenticate and authorize users in order to access the MapsIndoors CMS and secured MapsIndoors solutions.

This guide covers the different aspects of user authentication and authorization in the MapsIndoors JavaScript SDK.

Usually, access to the services behind the MapsIndoors SDK is restricted with API keys. However, as an additional layer of security and control, access can be restricted to users of a specific tenant. A MapsIndoors dataset can only be subject to user authentication and authorization if integration with an identity provider exists. Current examples of such identity providers are *Google* and *Microsoft*. These providers and more can be added and integrated to your MapsIndoors project by request.

We recommend using a library such as AppAuth to handle verification and response to get a token to use in the MapsIndoors SDK.

***

To utilize an OAuth2 login flow for your MapsIndoors project, you will need to provide some details to the OAuth2 client, like the *issuer url*, *client id*, *scopes* and possibly a *preferred identity provider* if there is more than one option. These details are available as arguments in the `MapsIndoors.onAuthRequired` callback.

```javascript
mapsindoors.MapsIndoors.onAuthRequired = async ({ authClients = [], authIssuer = '' }) => {
...
})
```

You are required to provide a *redirect\_url*. The authorization server will redirect the user back to the application using this URL after successful authorization.

> Note that the redirect link must be known to MapsIndoors and white-listed for your identity provider integration. You must inform us about all the links that you need for your application, both for development and production use so they can be white-listed. How to apply the authentication details is varying from each OAuth2 client, but you can see below how they are applied in a login flow using the [OAuth2 client library from Open Id](https://github.com/openid/AppAuth-JS)

```javascript
import { AuthorizationRequest, AuthorizationNotifier, BaseTokenRequestHandler, RedirectRequestHandler, AuthorizationServiceConfiguration, FetchRequestor, TokenRequest, GRANT_TYPE_AUTHORIZATION_CODE } from "@openid/appauth";
const requestor = new FetchRequestor();
const authorizationNotifier = new AuthorizationNotifier();
const authorizationHandler = new RedirectRequestHandler();
mapsindoors.MapsIndoors.onAuthRequired = async ({ authClients = [], authIssuer = '' }) => {
    //Fetch the service configuration.
    const config = await AuthorizationServiceConfiguration.fetchFromIssuer(authIssuer, requestor);
    //Check if the URL contains code and state in the hash. They will only be present after the authorization is done.
    if (window.location.hash.includes('code') && window.location.hash.includes('state')) {
        //Next we need to exchange the code to an access token.
        authorizationHandler.setAuthorizationNotifier(authorizationNotifier);
        authorizationNotifier.setAuthorizationListener(async (request, response, error) => {
            if (response) {
                const tokenHandler = new BaseTokenRequestHandler(requestor);
                //Build the token request.
                const tokenRequest = new TokenRequest({
                    client_id: request.clientId,
                    redirect_uri: `${window.location.origin}${window.location.pathname}`,
                    grant_type: GRANT_TYPE_AUTHORIZATION_CODE,
                    code: response.code,
                    state: '',
                    extras: { code_verifier: request?.internal?.code_verifier }
                });
                //Send the token request.
                tokenHandler.performTokenRequest(config, tokenRequest).then(response => {
                    //Assign the access to ken to MapsIndoors.
                    mapsindoors.MapsIndoors.setAuthToken(response.accessToken);
                });
            }
        });
        await authorizationHandler.completeAuthorizationRequestIfPossible();
    } else {
        const authClient = authClients[0];
        const preferredIDP = authClient.preferredIDPs && authClient.preferredIDPs.length > 0 ? authClient.preferredIDPs[0] : '';
        //Build to authorization request.
        const request = new AuthorizationRequest({
            client_id: authClient.clientId,
            redirect_uri: `${window.location.origin}${window.location.pathname}`,
            scope: 'openid profile account client-apis',
            response_type: AuthorizationRequest.RESPONSE_TYPE_CODE,
            extras: { 'acr_values': `idp:${preferredIDP}`, 'response_mode': 'fragment' }
        });
        //Send the authorization request.
        authorizationHandler.performAuthorizationRequest(config, request);
    }
    //Clean up the url when the authentication is done.
    history.replaceState(null, '', `${window.location.origin}${window.location.pathname}${window.location.search}`);
})
```

The above login flow is executed by the SDK if authentication is needed.

The SDK will then make sure that all requests for data are performed using this access token.

For a full example, please [see here](https://github.com/MapsPeople/JS-SDK-Examples/tree/main/single-sign-on).

> Note that the access token obtained from a MapsIndoors Single Sign-on flow cannot be used as access token for the Booking Service. Single Sign-on access tokens are issued by MapsIndoors and not the underlying tenant. You need to login directly on your Booking tenant to get an access token that can be used for working with the Booking Service as an authenticated user.


# Single Sign-On

In order to access certain MapsIndoors apps, and certain custom apps, SSO (Single Sign-On) login can be used. This includes the MapsIndoors Auth SSO, as well as organization-specific authentication providers - see [Configuration](https://docs.mapsindoors.com/sso-configuration/).

The MapsIndoors Auth SSO page is located at <https://auth.mapsindoors.com/login>.

MapsIndoors has the following apps where SSO can be used to sign in:

* MapsIndoors CMS
* MapsIndoors Standard Web App
* MapsIndoors Standard Web Kiosk

Unless an organization-specific provider is used, it is only possible to sign in for users invited orcreated via MapsIndoors CMS. Once a user exists in MapsIndoors, it is possible to sign in via username/password, or public authentication providers such as:

* Google
* Azure Active Directory (pending)

This is only authentication - authorization is still based on the user configuration in MapsIndoors. This also means that the security is extremely tight. MapsIndoors does not gain any access to the authentication provider, as it only expects an id\_token (as opposed to an access token) in order to authenticate. Based on this external authentication, and then internal authorization, an internal access token is granted to the app - which is completely unrelated to the authentication provider and therefore only can be used to access MapsIndoors services. If an organization-specific authentication provider is used, then there are more options in regards to authorization - see [Authorization](https://docs.mapsindoors.com/sso-authorisation/).


# SSO Configuration

Configuring the SSO is currently handled by MapsPeople. Therefore there needs to be an exchange of information - metadata and credentials related to the authentication server, and a unique redirect URL to MapsIndoors. In case of issues, these details must also be documented.

The list of supported providers currently includes Okta, Active Directory Federation Services, Azure Active Directory, Google and Amazon Cognito. However, any provider that can meet the OIDC requirements described below can be supported.

### OIDC​ <a href="#oidc" id="oidc"></a>

OIDC ([Open ID Connect](https://openid.net/connect/)) is the best option for enabling login to MapsIndoors via an authentication server, available from most authentication providers. OIDC is an open standard for authentication, built upon [OAuth 2](https://oauth.net/2/) - an open standard for authorization.

The bare minimum needed by MapsIndoors Auth - given that the authentication server follows the standard as closely as possible - is the following:

* **Authority URL** - The base URL of the authentication server, where the OIDC/OAuth URLs are relative to.
* **Client ID** - The ID of the MapsIndoors-specific client configured at the authentication server.
* **Client Secret**, unless [**client assertion**](https://datatracker.ietf.org/doc/html/rfc7523) is applicable - The secret that was generated for the client, unless client assertion is to be used.

A valid **e-mail** must provided through the `id_token`, or `userinfo endpoint`, as one of the following claim types:

* `email`
* `http://schemas.xmlsoap.org/ws/2005/05/identity/claims/emailaddress`
* `preferred_username`
* `name`

This information is all MapsIndoors Auth needs. For the authentication server, it will also need **whitelisting of the sign-in URL** for the configured client:

`https://auth.mapsindoors.com/signin-NAME`

The `NAME` is usually a short handle based on the organisation name and possibly the type of authentication server - e.g. `mapspeople_okta`.

If client assertion is to be used, the public certificate of MapsIndoors Auth can be retreived at the MapsIndoors Auth [jwks endpoint](https://auth.mapsindoors.com/.well-known/openid-configuration/jwks).

#### Additional configuration​ <a href="#additional-configuration" id="additional-configuration"></a>

Using a configuration like described above, the following will be assumed - with further possibility for configuration.

MapsIndoors Auth will start an OAuth 2 authorization code flow, using the defaults:

* The authentication server OIDC metadata is found at `.well-known/openid-configuration`, a relative URL to the Authority URL given earlier. If the metadata is found elsewhere, the absolute URL must be provided.
* Two scopes are requested: `openid profile`. If other, or no, scopes should be provided, this must be specified.
* MapsIndoors Auth will use the `access_token` to retrieve additional claims from the `userinfo endpoint`. This can be disabled if needed.

For client assertions, these are the defaults:

* The signing algorithm to be used is RS256. Others are available upon request.
* The audience parameter is set to the same as the Authority URL. If this differs it must be specified.

### Organization-specific CMS URL​ <a href="#organization-specific-cms-url" id="organization-specific-cms-url"></a>

If an authentication server has been configured, there will now be an IDP (IDentity Provider) with the `NAME` as defined above. For apps, this can be set via the `acr_values` parameter of the authorize request - e.g. `[...]&acr_values=idp:mapspeople_okta` - in order to have MapsIndoors Auth SSO directly redirect to the authentication server SSO. However, specifically for MapsIndoors CMS, a name can also be set which allows for organization-specific login - i. e. using the authentication server. Note that it does not have to be the same name used for the sign-in redirect URL.

For example, with an organization name of `mapspeople`, a URL will be available at `https://cms.mapsindoors.com?organizationName=mapspeople`. If a login is required, it will redirect to the authentication server SSO, as opposed to MapsIndoors Auth SSO. Alternatively, the organization name can be entered at `https://auth.mapsindoors.com/login/organization`, if a login flow was initiated at the CMS without the `organizationName` parameter, or possibly initiated by a third-party app.[<br>](https://docs.mapsindoors.com/sso)


# SSO Authorisation

What a user can see and do is by default controlled in the MapsIndoors CMS. When signing in with a username and password, or via one of the public authentication providers, authorization will be determined by the user configuration.

If an organization-specific authentication server is configured and used for signing in, there are more possibilities. Similar to the login methods mentioned above, authorization will by default be determined based on the MapsIndoors user configuration. However, if a user that can sign in via the authentication server, but does not exist in MapsIndoors, it will have its authorization determined via the authentication server. This will be done via OAuth claims that can be found on the id\_token (or via the userinfo endpoint upon authentication). If no claims are provided, the user will still get read access to the solutions associated with the authentication provider. If claims are provided, they will be mapped to MapsIndoors access definitions, so that authorization can occur based on what claims are associated with the user in the authentication server.

There is a default mapping that will occur if claims are provided in the following format:

```json
"custom:maps_access": [
  {
    "objectId": "012345678901234567891234",
    "objectType": "dataset",
    "role": "editor"
  },
  ...
]
```

There are three types of roles: admin, editor, and viewer. Authorization can be given on two levels: organization and dataset. A valid MapsIndoors ID must be provided as ObjectId. The claim allows for more than one access definition.

If a different mapping is needed - possibly due to reuse of existing claims, or limitations in the authentication server, this will also be possible. It will, however, require some additional configuration done by MapsPeople.


# 2-Factor Authentication

### Enabling 2-Factor Authentication​ <a href="#enabling-2-factor-authentication" id="enabling-2-factor-authentication"></a>

You can enable 2-Factor Authentication (2FA) in the MapsIndoors CMS. Click the avatar in the top-right corner, and click on "Settings". Follow the instructions to enable 2FA.

<figure><img src="https://docs.mapsindoors.com/img/various/2fa.png" alt=""><figcaption></figcaption></figure>

### Disabling 2FA​ <a href="#disabling-2fa" id="disabling-2fa"></a>

After you've enabled 2FA, the page will show instructions on how to disable 2FA again.

<figure><img src="https://docs.mapsindoors.com/img/various/2fa-disable.png" alt=""><figcaption></figcaption></figure>

If you lose access to your account and are unable to use 2FA for any reason, please [get in touch](https://resources.mapspeople.com/contact-us), and we'll do our best to find a solution.


# Password Reset

### Password Validation​ <a href="#password-validation" id="password-validation"></a>

A password must be 16 characters or longer in order to be valid.

### Password Reset​ <a href="#password-reset" id="password-reset"></a>

You can reset your password via <https://auth.mapsindoors.com/login/forgotpassword>. Submit your e-mail address, and we'll send you a link to reset your password.

Enter your password twice on the Password Reset page to change it.<br>


# Application User Roles

*Application User Roles* are a feature that lets you define various roles you can assign to your users, or they can choose between themselves.

You might have parts of your map that can only be accessed by employees, so you define "Employee" and "Visitor" roles. When using the application to search for directions, users assigned to the "Visitor" role may be shown a different route from "Employee" users based on what they have access to.

### How to Configure App User Roles​ <a href="#how-to-configure-app-user-roles" id="how-to-configure-app-user-roles"></a>

App User Roles are configured via the MapsIndoors CMS. Go to `Solution Details > App Settings > App Configuration`, and find `App User Roles` on the page. Here, you can configure existing roles, and add new ones.

Click `Add App User Role` and enter the name of the newly created Role in all defined languages for your Solution.

### How to Assign/Change a Role to a User​ <a href="#how-to-assignchange-a-role-to-a-user" id="how-to-assignchange-a-role-to-a-user"></a>

Assigning or changing App User Roles to users is done in the app itself. The method depends on which platform you're developing for. Here are some examples:

To get the available Roles in the Web SDK, you use `SolutionsService`:

```javascript
mapsindoors.services.SolutionsService.getUserRoles().then(userRoles => {
  console.log(userRoles);
});
```

User Roles can be set on a global level using `mapsindoors.MapsIndoors.setUserRoles()`.

```javascript
mapsindoors.MapsIndoors.setUserRoles(['myUserRoleId']);
```

> For more information, see the [reference documentation](https://app.mapsindoors.com/mapsindoors/js/sdk/latest/docs/mapsindoors.MapsIndoors.html#.setUserRoles).

### Features Affected by App User Roles​ <a href="#features-affected-by-app-user-roles" id="features-affected-by-app-user-roles"></a>

The App User Roles are useful for setting limits on who can find certain Locations. App User Rules influence the map in three ways; which Locations are displayed on the map, whether they show up in search results, and the directions you can get.

For any Location defined on the map, there is a menu named `Restrictions`, where you are presented with options for limiting functionality certain App User Roles.

<figure><img src="/files/jPITIiTbuJo1KMu4N380" alt=""><figcaption></figcaption></figure>

* **Open for all** - All users can view, search for, and get directions to this Location.
* **Open for specific App User Roles** - Select which App User Roles have access to viewing, searching and getting directions to this specific Location.
* **Closed for All** - No users will see this Location on the map.

#### The Map​ <a href="#the-map" id="the-map"></a>

If a Location has been restricted to certain App User Roles, it will not be displayed on the map for those who do not have permission.

#### Search​ <a href="#search" id="search"></a>

Similarly to the effect on the map, if a Location has restrictions, it will not show up in the search results for users without sufficient permissions.

#### Directions​ <a href="#directions" id="directions"></a>

App User Roles can be used to determine the directions users get. For instance, you can restrict Doors between two Locations to only be passable by a certain App User Role.

Note: If you restrict a Room to only be accessible to certain App User Roles, you restrict both directions *to* and *through* that Room. It effectively sets restrictions on all Doors leading to that Room as well.


# Custom Properties

Web v4

Custom Properties are key/value data that can be associated with different geodata (Venue/Building/Location) within MapsIndoors. MapsIndoors supports two different types of Custom Properties:

* Language-specific Custom Properties
* Generic Custom Properties

**Language-specific Custom Properties** are meant for values that is displayed to the enduser in their preferred language. Using language-specific Custom Properties, it is possible to store a key/value combination in multiple different languages. The MapsIndoors SDKs allows for retrieval of the correct values based on the user's preferred language. If your Solution has multiple languages, you must provide the necessary translations for each Custom Property in each of these languages.

**Generic Custom Properties** are meant for tagging data with key/value data that is relevant for the apps using the map data. These values will be available to the app regardless of the language of the end user, and are often not directly displayed. Examples of values that might be added as Generic Custom Properties could be:

* Whether or not a room is bookable
* The calendar id of a room used for booking
* Ids of a location in other systems

If a Key exists as both a Generic Custom Property and Language-specific Custom Property, the most specific element decides the value. This means that the language-specific Custom Property value will be supplied to the SDKs, as it is considered to be the most specific. This table shows the possible interactions between Generic Custom Property and a Language-specific Custom Property. Scenario 1 shows what happens if a Key is defined as a Generic Custom Property and given the value A, while a Language-specific Custom Property with the same Key is either not defined, or given an empty value:

| Scenario | Generic | Language Specific | SDK Value |
| -------- | :-----: | :---------------: | :-------: |
| 1        |    A    |                   |     A     |
| 2        |         |         B         |     B     |
| 3        |    A    |         B         |     B     |
| 4        |         |                   |           |

If a Solution uses more than one language, it is possible to give a value for a particular Key in only a subset of the languages. If for example a Solution uses both English and German, a Language-specific Custom Property could be given a value for only the German language. In this scenario if the app requests the German language, it would be given the German-specific value, while if the app requests the English language, it would be given either an empty value, or the value of the Generic Custom Property with the same Key if such a property is defined.

#### Custom Property Templates​ <a href="#custom-property-templates" id="custom-property-templates"></a>

On Types it is possible to define Custom Property templates, which can ease getting consistent Custom Property Keys across multiple Locations. Keys added as Custom Property templates on a Type will be shown in the CMS on all Locations of that Type. This ensure that the key naming is consistent across all locations of that type. Adding values to the keys results in key/value pairs being available trough the SDK.

### Creating Custom Properties​ <a href="#creating-custom-properties" id="creating-custom-properties"></a>

Custom Properties are created for each Location, defined using a `key` and a `value`. This is found in a section in the menu for each Location. When adding a Generic Custom Property through the CMS, a value input field will be provided for each language in your Solution allowing you to input the translated values directly in the CMS.

<figure><img src="/files/0oCSu0GMMw43HkZOMpB2" alt=""><figcaption></figcaption></figure>

You can add Custom Properties through the Integration API with the exact same requirements and options as when adding them via the MapsIndoors CMS.

### Reading Custom Properties​ <a href="#reading-custom-properties" id="reading-custom-properties"></a>

The method for reading and using these custom properties depends on which platform you're developing for. Here are some examples:

<figure><img src="/files/4628BtXdgnpq0awxrDQ0" alt=""><figcaption></figcaption></figure>

Using the above screenshot as an example basis you fetch the entire custom property using the following code:

```javascript
let data = location.getFieldForKey('email')
```

To retrieve individual segments of the property, you can use:

```javascript
let text = data.text
let value = data.value
let type = data.type
```

* `data.text` retrieves the content of the `key` field, and in the given example, would return `email`.
* `data.value` retrieves the content of the `value` field, and in the given example, would return `123@email.com`.
* `data.type` retrieves the type of the Custom Property, and will in most known cases return `text`.

#### Example 1​ <a href="#example-1" id="example-1"></a>

You are a conference organizer that needs to associate some pieces of data with each exhibitor, like the contact info / email address, and if there's any kinds of refreshments at the stand.

Should this be the same value for all end users, or just for a subset of those users based on their language?

`contactInfo=(123) 555-5555`

{% hint style="info" %}
It could make sense to make this a **generic custom property** if your app does not render anything language specific in the application based on this value's string.

All custom property values are strings. You'll need to potentially convert the data type on the front end of your application.
{% endhint %}

`refreshments@gen=True`

{% hint style="info" %}
It could make sense to make this a **generic custom property** if your app does not render anything language specific in the application based on this value's string.

All custom property values are strings. You'll need to convert it to a Boolean value on the front end of your application.
{% endhint %}

<figure><img src="/files/l1Tf01h3vXY3pRdvTMNw" alt=""><figcaption></figcaption></figure>

#### Example 2​ <a href="#example-2" id="example-2"></a>

You are a museum operator providing a digital map of your venue.

Your digital map presents points of interest for the various exhibits and you would like to associate both a text description of the item exhibited as well as a link to a video of an expert giving additional insight about the item.

To accomplish this you create a **language specific custom property** called `itemDescription` and provide a description for each language your Solution supports. You choose a Language specific Custom Property for this purpose as the values is to be displayed to the end user and you need the user to be given description in their preferred language.

In addition to this you create a **language-specific custom property** called `videoLink` to store the link to the explanation video. This can make sense as a language specific custom property as the video's audio would be in the language of the user.

If for example you wish to show the same video to each user regardless of their language, it would make sense to have a **generic custom property.**

<div><figure><img src="/files/qYtQgSGSTST2RH3m50JS" alt=""><figcaption><p>generic property for video without audio</p></figcaption></figure> <figure><img src="/files/iQ3JYNRqmmHnAtCxCpEW" alt=""><figcaption><p>description and videoLink with language specific properties</p></figcaption></figure></div>


# Display Language

The language of MapsIndoors is independent of the chosen language on the device on which the app is used. This means that you need to explicitly tell MapsIndoors which language to use.

If you do not specify a language, MapsIndoors will show information in the default language defined in the MapsIndoors CMS. Likewise, if you specify a language that is not supported, MapsIndoors will also show information in the default language.

Additionally, aside from methods mentioned here, you can provide translations via the standard method for your device, such as using individual localized strings.

### Configuring POI translations in CMS​ <a href="#configuring-poi-translations-in-cms" id="configuring-poi-translations-in-cms"></a>

To provide multiple languages for items in the MapsIndoors CMS, such as "Meeting Room" or "Restroom", the translation must be provided by the user in the CMS. A translation can be provided in any language. In order to add support for additional languages that we currently do not support, please contact your MapsIndoors representative, and we will enable you to add translations in your desired language.

Once your language of choice has been created, you can add the translation by clicking on any POI, which will open a menu on the left side of the screen. Here, you will see the following menu point, where you can enter translations for the languages you wish. If a field is left empty, the fallback language is English. In the example below, English (en) and Danish (da) are the enabled languages.

<figure><img src="/files/IRT1DWSYRwfhOwuqY2Gk" alt=""><figcaption></figcaption></figure>

### Use Device Language​ <a href="#use-device-language" id="use-device-language"></a>

The web-app will automatically adjust the language to the language set in the user's browser settings, otherwise default to English. When using Safari, the device's language setting will be used. This is limited to the following languages, and will default to English if the selected language is not supported:

* English
* Danish
* Spanish
* Portuguese
* Italian
* French


# Language

MapsIndoors languages are independent of the chosen languages on the device on which the app is used. This means that you need to explicitly tell MapsIndoors which language to use. The example below shows the **'Languages'** section and drop-down from which you can select languages:

![](/files/m6o1XjczU0QXoZ4FN6DN)

When a solution has only one language, that language will be the default one. You are able to add as many languages as you want to and choose which one should be the default one. Adding German and Danish languages:

![](/files/cOJLPF5PvmWp7vT4WNaZ)

Setting German as default language:

![](/files/IHwdIhtmOZdx1yh5n2PI)

If you do not specify a language, MapsIndoors will show information in the default language defined in the MapsIndoors CMS. Likewise, if you specify a language that is not supported, MapsIndoors will also show information in the default language.

Additionally, aside from methods mentioned here, you can provide translations via the standard method for your device, such as using individual localised strings.

### Configuring POI translations in CMS​ <a href="#configuring-poi-translations-in-cms" id="configuring-poi-translations-in-cms"></a>

To provide multiple languages for items in the MapsIndoors CMS, such as "Meeting Room" or "Restroom", the translation must be provided by the user in the CMS. A translation can be provided in any language that is defined for this specific solution. In order to add support for additional languages that we currently do not support, please contact your MapsIndoors representative, and we will enable you to add translations in your desired language.

Once your language of choice has been added as a supported language, you can add the translation by clicking on any POI, which will open a menu on the left side of the screen. Here, you will see the following menu point, where you can enter translations for the languages you wish. If a field is left empty, the fallback language is the default one. In the example below, English (en) and Danish (da) are the enabled languages:

![](/files/tcblMsLCrBkJHFS1UpbC)

### Use Device Language​ <a href="#use-device-language" id="use-device-language"></a>

The MapsIndoors language can be aligned with the device language by supplying the current language code of the device.

The web-app will automatically adjust the language to the language set in the user's browser settings, otherwise default to English. When using Safari, the device's language setting will be used. This is limited to the following languages, and will default to English if the selected language is not supported:

* English
* Danish
* Spanish
* Portuguese
* Italian
* French


# User Positioning

#### How User Positioning Works in MapsIndoors​ <a href="#how-user-positioning-works-in-mapsindoors" id="how-user-positioning-works-in-mapsindoors"></a>

In order to show a user's position ("Blue Dot") on an indoor map with MapsIndoors, a Position Provider must be implemented. You can integrate a 3rd party positioning provider (IPS) to create this experience. For you the developer, this means that the MapsIndoors SDK offers an interface for such a Position Provider, but no building blocks for acquiring positioning.

This guide will show you how to use a third party positioning provider and implement it into your MapsIndoors application. Here we will start from the finished Getting Started app. This code can be found here: [MapsIndoors Getting Started app](https://github.com/MapsPeople/MapsIndoors-Getting-Started-Android).

A full implementation of three different third party positioning providers can be found here [PositionProviders](https://github.com/MapsPeople/MapsIndoors-Getting-Started-Android/tree/feature/third_pary_position_providers/app/src/main/java/com/example/mapsindoorsgettingstarted/PositionProviders)

We recommend reading [Show the Blue Dot with MapsIndoors](https://docs.mapsindoors.com/blue-dot/) guides to get a basic understanding of the MapsIndoors positioning provider interface.


# Show User's Location aka. Blue Dot

## Overview​ <a href="#overview" id="overview"></a>

In this guide, you will learn how to show a dot on the map, representing the user's current location.

The JSFiddle example below draws a MapsIndoors map, and adds a position control. Whenever a position is received or updated, if the user has not moved the map themselves, the map will pan to the new location. If the user has moved the map, it will not center on the new location until position control is clicked.

### How the position is determined​ <a href="#how-the-position-is-determined" id="how-the-position-is-determined"></a>

The position is determined by utilizing the [Geolocation API](https://developer.mozilla.org/en-US/docs/Web/API/Geolocation_API), which all modern browsers expose.

Behind the scenes, the browser determines your position based on a number of factors, including IP address, cell towers, GPS, Wifi access points etc. The implementation varies from browser to browser, and from device to device. There is currently no way to tweak the Geolocation API to use different positioning providers.

All browsers will ask the user for permission to share the location by displaying a prompt. This prompt is a part of the browser, thus not customizable.

Also note that the Geolocation API will only work on `https` websites (and `localhost` for development).

### The MapsIndoors `PositionControl` class​ <a href="#the-mapsindoors-positioncontrol-class" id="the-mapsindoors-positioncontrol-class"></a>

The MapsIndoors JavaScript SDK exposes a `PositionControl` class.

An instantiation of this class will generate a button that, when clicked:

* will start tracking the user's device location
* show a dot on the map representing location (if accuracy is good enough - more on that later)
* show a circle representing the position accuracy

Clicking on the button will pan the map, so the current position is in the center of the map.

The button will be blue whenever the position is in center of the map.

If the user has granted permission indefinitely, the map will pan to the current position when reloading the app *(this may not work in certain browsers, such as Internet Explorer 11, due to missing support of the* [*Permissions API*](https://developer.mozilla.org/en-US/docs/Web/API/Permissions_API)*)*.

You will have to add the generated button to the map yourself.

#### Basic Example​ <a href="#basic-example" id="basic-example"></a>

MapsIndoors supports both Google Maps and MapBox, and the methods for each vary slightly. Both still revolve around `PositionControl`.

**Google Maps​**

```javascript
// MapsIndoors MapView instantiation, which you should already have
const mapViewInstance = new mapsindoors.mapView.GoogleMapsView(/*...*/);
// MapsIndoors instantiation, which you should already have
const mapsIndoorsInstance = new mapsindoors.MapsIndoors(/*...*/);
// Obtain a reference to the Google map.
const googleMapsInstance = mapViewInstance.getMap();
// Create element to hold the position control
const positionControlElement = document.createElement("div");
// Create position control and attach it to element
const positionControl = new mapsindoors.PositionControl(positionControlElement, {
    mapsIndoors: mapsIndoorsInstance,
});
// Add the element now holding position control to your map
googleMapsInstance.controls[google.maps.ControlPosition.RIGHT_BOTTOM].push(positionControlElement);
```

**Mapbox​**

```javascript
// MapsIndoors MapView instantiation, which you should already have
const mapViewInstance = new mapsindoors.mapView.GoogleMapsView(/*...*/);
// MapsIndoors instantiation, which you should already have
const mapsIndoorsInstance = new mapsindoors.MapsIndoors(/*...*/);
// Obtain a reference to the Mapbox map.
const mapboxInstance = mapViewInstance.getMap();

// Create element to hold the position control
const positionControlElement = document.createElement("div");
// Create position control and attach it to element
const positionControl = new mapsindoors.PositionControl(positionControlElement, {
    mapsIndoors: mapsIndoorsInstance,
});
// Add the element now holding position control to your map
mapboxInstance.addControl({ onAdd: function () { return positionControlElement }, onRemove: function () { } });
```

#### maxAccuracy​ <a href="#maxaccuracy" id="maxaccuracy"></a>

Since browsers sometimes give inaccurate positions, you can use the `maxAccuracy` option when instantiating the `PositionControl`. Then the dot is only shown on the map if the given accuracy is below the given value:

```javascript
// Generate PositionControl and only show the dot on the map if accuracy is better than 80 meters
new mapsindoors.PositionControl(myPositionControlElm, { mapsIndoors: myMapsIndoors, maxAccuracy: 80 });
```


# Using Cisco DNA Spaces

### MapsIndoors & CiscoDNA for Web​ <a href="#mapsindoors--ciscodna-for-web" id="mapsindoors--ciscodna-for-web"></a>

MapsIndoors is a dynamic mapping platform from MapsPeople that can provide maps of your indoor and outdoor localities and helps you create search and navigation experiences for your local users. CiscoDNA is Cisco’s newest digital and cloud-based IT infrastructure management platform. Among many other things, CiscoDNA can pinpoint the physical and geographic position of devices connected wirelessly to the local IT network.

### User Positioning in MapsIndoors for Web​ <a href="#user-positioning-in-mapsindoors-for-web" id="user-positioning-in-mapsindoors-for-web"></a>

In order to show a user's position on an indoor map with MapsIndoors, a Position Provider must be implemented. The MapsIndoors JavaScript SDK does not provide a default Position Provider but relies on 3rd party positioning software to create this experience. In an outdoor environment, this Position Provider can be a wrapper of the browser's native Geolocation API.

### Code Sample​ <a href="#code-sample" id="code-sample"></a>

> Please note that the following code sample assumes that you have already succesfully implemented MapsIndoors into your application.

The JavaScript SDK doesn't have a built-in interface like the Android and iOS SDKs. However, by following these steps, you should be able to achieve the same functionality.

The first step is to create the class `CiscoPositioningService`, and the constructor for it.

```javascript
class CiscoPositioningService {
    /**
     * @param {string} args.clientIp - The local IP address of the device
     * @param {string} args.tenantId - The Cisco tenant id.
     * @param {number} [args.pollingInterval=1000] - The interval that the position will be polled from the backend.
     * @param {string} [args.region="eu"] - The Cisco app region.
     */
    constructor(args = {}) {
        if (!args.clientIp)
            throw new TypeError('Invalid argument: "clientIp"');

        if (!args.tenantId)
            throw new TypeError('Invalid argument: "tenantId"');

        this._pollingInterval = 1000;
        this._tenantId = args.tenantId;
        this._successCallbacks = new Map();
        this._errorCallbacks = new Map();
        this._deviceId = '';

        args.region = args.region || 'eu';

        this.pollingInterval = args.pollInterval;

        fetch(`https://ciscodna.mapsindoors.com/${this._tenantId}/api/ciscodna/devicelookup?clientIp=${args.clientIp}&region=${args.region}`)
            .then(this._errorHandler)
            .then(res => res.json())
            .then(({ deviceId }) => {
                this._deviceId = deviceId;
                this._startPolling();
            }).catch(err => {
                console.error(err.message);
            });
    }
```

Next step is to create `watchPosition` and `clearWatch`, to watch for the positioning updates the system recieves.

```javascript
    watchPosition(successCallback, errorCallback) {
        const watchId = Symbol();
        if (!(successCallback instanceof Function))
            throw new TypeError('Invalid argument: "successCallback"');

        if (errorCallback instanceof Function) {
            this._errorCallbacks.set(watchId, errorCallback);
        }

        this._successCallbacks.set(watchId, successCallback);

        if (!this._interval) {
            this._startPolling();
        }

        return watchId;
    }

    clearWatch(watchId) {
        this._successCallbacks.delete(watchId);
        this._errorCallbacks.delete(watchId);

        if (this._successCallbacks.size === 0) {
            this._stopPolling();
        }
    }

    getCurrentPosition(successCallback, errorCallback) {
        fetch(`https://ciscodna.mapsindoors.com/${this._tenantId}/api/ciscodna/${this._deviceId}`)
            .then(this._errorHandler)
            .then(res => res.json())
            .then(data => {
                this._successCallbacks.forEach(cb => cb.call(null, data));
            }).catch(err => {
                this._errorCallbacks.forEach(cb => cb.call(null, err));
            });
    }
```

The next step is to create some functions that manage how often the system retrieves an update, or polls, from the Cisco DNA setup.

```javascript
    set pollingInterval(value) {
        if (!isNaN(value) && this._pollingInterval !== value) {
            this._pollingInterval = value;
            this._stopPolling();
            this._startPolling();
        }
    }

    get pollingInterval() {
        return this._pollingInterval;
    }


    /**
     * @private
     */
    _startPolling() {
        if (!this._interval && this._deviceId > '' && this._successCallbacks.size > 0) {
            this._interval = window.setInterval(() => {
                this.getCurrentPosition(response => {
                    this._successCallbacks.forEach(callback => callback(response));
                },
                    error => {
                        this._errorCallbacks.forEach(callback => callback(err));
                    });

            }, this._pollingInterval);
        }
    }

    /**
     * @private
     */
    _stopPolling() {
        if (this._interval) {
            window.clearInterval(this._interval);
            this._interval = null;
        }
    }
```

Lastly, an error handler is implemented.

```javascript
    /**
     * @private
     */

    _errorHandler(response) {
        if (!response.ok) {
            const contentType = response.headers.get('content-type');
            if (contentType && contentType.indexOf('application/json') !== -1) {
                return response.json().then(({ message }) => {
                    throw new Error(message);
                });
            } else {
                let statusText;
                switch (response.status) {
                    case 400:
                        statusText = 'The client IP is invalid.';
                        break;
                    case 404:
                        statusText = 'Device not found.';
                        break;
                    case 403:
                        statusText = 'The TenantId supplied is not authorized to access the device at the location.'
                        break;
                    default:
                        statusText = 'Unknown error.';
                }

                throw new Error(statusText);
            }
        }

        return response;
    }
} // end class
```

Once the class is created, it can then be used, for example, in the following way - Keep in mind that you cannot fetch the client/device IP address from the browser, an option to get around this could be a seperate service that returns the IP address:

```javascript
const map = mapView.getMap();
let watchId;

mapsindoors.services.SolutionsService.getSolution('57e4e4992e74800ef8b69718').then(solution => {
    if (solution.positionProviderConfigs && solution.positionProviderConfigs.ciscodna) {
        const tenantId = solution.positionProviderConfigs.ciscodna.ciscoDnaSpaceTenantId;
        const region = solution.positionProviderConfigs.ciscodna.ciscoDnaSpaceTenantRegion || 'usa';
        const clientIp = '10.0.0.134';
        const cps = new CiscoPositioningService({ clientIp, tenantId, region });

        watchId = cps.watchPosition(function (data) {
            console.log(data);
            map.setCenter({ lat: data.latitude, lng: data.longitude });
        }, function (err) {
            console.log(err);
        })
    }
});

const floorSelector = document.createElement('div');
new mapsindoors.FloorSelector(floorSelector, mi);
map.controls[google.maps.ControlPosition.RIGHT_TOP].push(floorSelector);
```


# Working with Events

### Overview​ <a href="#overview" id="overview"></a>

Let's take a look at the events that MapsIndoors offers and how to utilize them.

> Events are actions or occurrences that happen in the system you are programming, which the system tells you about so you can respond to them in some way if desired. -- [*MDN web docs*](https://developer.mozilla.org/en-US/docs/Learn/JavaScript/Building_blocks/Events)

For example, if the user clicks on a Location on the map, then you can react to that action by presenting the user with additional info about the Location.

A code example is shown in the JSFiddle below, but will be run through bit by bit in this guide.

#### Ready Event​ <a href="#ready-event" id="ready-event"></a>

The `ready` event will be fired when MapsIndoors is done initializing and is ready to interact.

```javascript
mapsIndoors.addListener('ready', (e) => {
 log(`MapsIndoors: Ready`);
});
```

#### Building Changed Event​ <a href="#building-changed-event-1" id="building-changed-event-1"></a>

The `building_changed` event will be fired when the map is moved around and a new Building comes in focus.

This is also related to the Floor Selector which will update its view to show the Floors of the current Building.

The event handler is called with a [building](https://app.mapsindoors.com/mapsindoors/js/sdk/latest/docs/global.html#Building) object representing the building in focus.

```javascript
mapsIndoors.addListener('building_changed', (e) => {
 log(`Building changed: ${e.buildingInfo.name}`);
});
```

#### Floor Changed Event​ <a href="#floor-changed-event-1" id="floor-changed-event-1"></a>

The `floor_changed` event will be fired when the Floor is changed; either by clicking the Floor Selector or by calling `setFloor()` on the MapsIndoors instance.

The event handler is called with the Floor Index of the current Floor.

```javascript
mapsIndoors.addListener('floor_changed', (e) => {
 log(`Floor changed: ${e}`);
});
```

#### Click Event​ <a href="#click-event" id="click-event"></a>

The `click` event will fire when the user clicks on a Location on the map.

The event handler is called with a [location](https://app.mapsindoors.com/mapsindoors/js/sdk/latest/docs/global.html#Location) object representing the Location clicked.

```javascript
mapsIndoors.addListener('click', (location) => {
 log(`Clicked: ${location.properties.name}`);
});
```


# Turn Off Collisions Based on Zoom Level

When using the MapsIndoors SDK, the system for detecting collisions will sometimes, at high zoom levels, result in the Labels of POI's that are close together being hidden, no matter what you do. Here we present a small workaround, so you can disable collisions for specific zoom levels.

> Please note that on Web it is only possible to do this when using **Mapbox** as a map provider.

This is accomplished by checking if there is a `zoom_changed` event, and if there is, enabling or disabling the `text-allow-overlap` depending on the zoom levels.

```javascript
mapView.on('zoom_changed', () => {
    if (mi.getZoom() < mi.getMaxZoom() - 1) {
        mi.getMap().setLayoutProperty('MI_POINT_LAYER', 'text-allow-overlap', true);
    } else {
        mi.getMap().setLayoutProperty('MI_POINT_LAYER', 'text-allow-overlap', false);
    }
});
```

<br>


# Remove Labels from Buildings and Venues for Web

Due to some slight differences in how the Web SDK handles Buildings and Venues compared to the Mobile SDKs, Buildings and Venues are treated as Locations, and as such, will be displayed with Labels. This is not always desirable behavior, and thus we also provide this small code snippet to remove them again.

```
mapsIndoorsInstance.setDisplayRule(['MI_BUILDING', 'MI_VENUE'], { visible: false });
```

`MI_BUILDING` and `MI_VENUE` are special Location Types used specifically for this purpose, to set Display Rules for Buildings and Venues.


# Synchronizing data for a subset of venues

**This article assumes that you have already read the** [**Getting Started guide.**](/sdks-and-frameworks/web/tutorial/getting-started)

In this article, we will discuss how to synchronize data for a subset of venues in MapsIndoors. There are multiple benefits to doing this, including performance and control over which data the user can search for.

Synchronizing data for a subset of venues reduces the time it takes to load the map, compared to synchronizing data for all venues. It also enables you to control which data the user can search for. For example, you may only want to synchronize data for venues located in a specific region.

To do this, you must not provide the MapsIndoors API key in the URL when loading the SDK. Instead, you set the MapsIndoors API key by calling the `mapsindoors.MapsIndoors.setMapsIndoorsApiKey('MAPSINDOORS_API_KEY');` method before creating the MapsIndoors instance.

Here is an example of how to set which venues to synchronize data for, and then setting the MapsIndoors API key, to start the synchronization:

```javascript
// Add one or more venues to the list of venues to be synchronized.
mapsindoors.MapsIndoors.addVenuesToSync('FirstVenueId');
// Or
mapsindoors.MapsIndoors.addVenuesToSync(['FirstVenueId', 'SecondVenueId']);

// Set the MapsIndoors API key.
mapsindoors.MapsIndoors.setMapsIndoorsApiKey('MAPSINDOORS_API_KEY');
```

This will now synchronize data exclusively for these two venues, and only those venues.

You can also add one or more venues after the initial data synchronization:

```javascript
// Add one or more venues to the list of venues to be synchronized.
mapsindoors.MapsIndoors.addVenuesToSync('ThirdVenueId');
// Or
mapsindoors.MapsIndoors.addVenuesToSync(['ThirdVenueId', 'FourthVenueId']);
```

To remove the synchronized data for one or more venues:

```javascript
// Remove one or more venues from the list of venues to be synchronized.
mapsindoors.MapsIndoors.removeVenuesToSync('FirstVenueId');
// Or
mapsindoors.MapsIndoors.removeVenuesToSync(['FirstVenueId', 'ThridVenueId']);
```


# Custom Floor Selector

To implement a custom floor selector, we expect you to already have completed the [Getting Started Tutorial](https://docs.mapsindoors.com/sdks-and-frameworks/web/getting-started/tutorial).

This guide will walk you through the process of implementing a custom floor selector using the MapsIndoors JavaScript SDK. The custom floor selector provides a more flexible and visually appealing way to switch between floors in your MapsIndoors-enabled application.

### Prerequisites

Before you begin, make sure you have completed the [getting started tutorial](https://docs.mapsindoors.com/sdks-and-frameworks/web/getting-started/tutorial) for the MapsIndoors JavaScript SDK. You should have a basic MapsIndoors map set up in your project.

### Implementation

#### Step 1: Create the CustomFloorSelector Class

First, we'll create a `CustomFloorSelector` class that will handle the creation and management of our custom floor selector.

```javascript
class CustomFloorSelector {
    constructor(mapsIndoorsInstance) {
        this.mapsIndoors = mapsIndoorsInstance;
        this.element = this.createSelectorElement();
        this.floors = {};
    }

    createSelectorElement() {
        const container = document.createElement('div');
        container.style.cssText = `
            position: absolute;
            top: 20px;
            right: 20px;
            background: rgba(30, 30, 30, 0.8);
            padding: 10px;
            border-radius: 15px;
            box-shadow: 0 4px 20px rgba(0, 0, 0, 0.3);
            display: flex;
            flex-direction: column;
            backdrop-filter: blur(10px);
            border: 1px solid rgba(255, 255, 255, 0.1);
            transition: all 0.3s ease;
        `;
        return container;
    }

    // ... (other methods will be added here)
}
```

#### Step 2: Implement Floor Management Methods

Add methods to handle showing, hiding, and updating the floor selector:

```javascript
class CustomFloorSelector {
    // ... (previous code)

    onShow() {
        this.element.style.display = 'flex';
        this.updateFloorButtons();
    }

    onHide() {
        this.element.style.display = 'none';
    }

    updateFloors(floors) {
        if (floors) {
            this.floors = Object.entries(floors).reduce((acc, [index, floorInfo]) => {
                acc[index] = floorInfo.name || `Floor ${index}`;
                return acc;
            }, {});
        } else {
            this.floors = {};
        }
        this.updateFloorButtons();
    }

    updateWithCurrentBuilding() {
        const currentBuilding = this.mapsIndoors.getBuilding();
        if (currentBuilding) {
            this.updateFloors(currentBuilding.floors);
        } else {
            this.updateFloors(null);
        }
    }
}
```

#### Step 3: Implement Floor Button Creation and Updating

Add methods to create and update the floor buttons:

```javascript
class CustomFloorSelector {
    // ... (previous code)

    updateFloorButtons() {
        this.element.innerHTML = ''; // Clear existing buttons
        const currentFloor = this.mapsIndoors.getFloor();

        if (Object.keys(this.floors).length === 0) {
            const noFloorsMessage = document.createElement('div');
            noFloorsMessage.textContent = 'No floors available';
            noFloorsMessage.style.cssText = `
                color: #DDD;
                font-family: 'Arial', sans-serif;
                font-size: 14px;
                padding: 10px;
            `;
            this.element.appendChild(noFloorsMessage);
            return;
        }

        // Sort floor indices in descending order
        const sortedFloors = Object.entries(this.floors)
            .sort(([a], [b]) => Number(b) - Number(a));

        sortedFloors.forEach(([floorIndex, floorName]) => {
            const button = document.createElement('button');
            button.textContent = floorName;
            button.style.cssText = `
                margin: 5px 0;
                padding: 10px 20px;
                border: none;
                background-color: ${floorIndex === currentFloor ? 'rgba(200, 160, 40, 0.8)' : 'rgba(60, 60, 60, 0.6)'};
                color: ${floorIndex === currentFloor ? '#FFF' : '#CCC'};
                cursor: pointer;
                font-family: 'Arial', sans-serif;
                font-size: 16px;
                font-weight: bold;
                border-radius: 10px;
                transition: all 0.2s ease;
                text-shadow: 0 1px 2px rgba(0, 0, 0, 0.2);
                outline: none;
            `;
            button.onmouseover = () => {
                if (floorIndex !== currentFloor) {
                    button.style.backgroundColor = 'rgba(80, 80, 80, 0.8)';
                    button.style.color = '#FFF';
                }
            };
            button.onmouseout = () => {
                if (floorIndex !== currentFloor) {
                    button.style.backgroundColor = 'rgba(60, 60, 60, 0.6)';
                    button.style.color = '#CCC';
                }
            };
            button.onclick = () => this.changeFloor(floorIndex);
            this.element.appendChild(button);
        });
    }

    changeFloor(floorIndex) {
        this.mapsIndoors.setFloor(floorIndex);
        this.updateFloorButtons();
    }
}
```

#### Step 4: Initialize MapsIndoors and CustomFloorSelector

Now, let's initialize MapsIndoors and our custom floor selector:

```javascript
//Previous code from Getting Started Guide

// Initialize CustomFloorSelector
const customFloorSelector = new CustomFloorSelector(mapsIndoorsInstance);
document.body.appendChild(customFloorSelector.element);
```

#### Step 5: Set Up Event Listeners

Finally, set up event listeners to update the floor selector when necessary:

```javascript
// Set up event listeners for MapsIndoors
mapsIndoorsInstance.addListener('ready', () => {
    customFloorSelector.onShow();
    customFloorSelector.updateWithCurrentBuilding();
});

mapsIndoorsInstance.addListener('floor_changed', () => {
    customFloorSelector.updateFloorButtons();
});

mapsIndoorsInstance.addListener('building_changed', () => {
    customFloorSelector.updateWithCurrentBuilding();
});

// Log any MapsIndoors errors
mapsIndoorsInstance.addListener('error', (error) => {
    console.error("MapsIndoors error:", error);
});
```

### Customization

You can customize the appearance of the floor selector by modifying the CSS styles in the `createSelectorElement` and `updateFloorButtons` methods. Adjust colors, fonts, sizes, and positioning to match your application's design.


# Display Rules in Practice

Display Rules for the Web SDK v4

There are two ways to change the appearance of the map content in MapsIndoors:

* Using Display Rules.
* Using Google Maps or Mapbox styling.

Each has its own purpose which will be explained below.

To get an overview of what Display Rules are and can be used for, read the [Display Rules](/products/cms/display-rules) page first.

### Changing the Appearance when the User clicks on a Location

```javascript
let selectedPOI;
mapsIndoors.addListener("click", function (poi) {
    if (selectedPOI) {
        mapsIndoors.setDisplayRule(selectedPOI.id, null);
    }

    mapsIndoors.setDisplayRule(poi.id, {
        iconSize: { width: 30, height: 30 },
    });

    selectedPOI = poi;
});
```

### Change the Label for All Locations for the Type `PRINTER`

```javascript
mapsIndoors.setDisplayRule('PRINTER',  {
    label: "{{ "Printer: {{ name " }}}}"
});
```

### Change the Label for a single, specific Location

```javascript
mapsIndoors.setDisplayRule('c66dccd480624c428ea5b78d',  {
    label: "{{ "Printer: {{ name " }}}}"
});
```

### Apply the Same Display Rule to Multiple Locations

```javascript
mapsIndoors.setDisplayRule(['c66dccd480624c428ea5b780', 'c66dccd480624c428ea5b79c','c66dccd480624c428ea5b76a', ...], {
    icon: "https://app.mapsindoors.com/mapsindoors/cms/assets/icons/building-icons/printer.png"
});
```

### Reset the Display Rule Back to Default

```javascript
mapsIndoors.setDisplayRule('PRINTER', null);
```

```javascript
mapsIndoors.setDisplayRule('c66dccd480624c428ea5b78d', null);
```

```javascript
mapsIndoors.setDisplayRule(['c66dccd480624c428ea5b780', 'c66dccd480624c428ea5b79c','c66dccd480624c428ea5b76a', ...], null);
```


# Offline Data

### Offline Data

Currently, the Web SDK does not support offline mode.


# Managing map visibility

With MapsIndoors, you have a range of options for controlling how content is styled on the map, and how your users can interact with it. This guide takes you through some of these options, to help you find the best approach.

### Visibility and rendering

The options you have for controlling visibility and rendering on the map are the following:

* Setting "Active From" and "Active To" dates
* Setting Restrictions to "Closed for all"
* Display Rules: Set Visibility and Opacity values

They generally fall into two categories:

1. The data is sent to the SDK, but not rendered on the map
2. The data is not sent to the SDK

In the first case, you can change the data to become **not** visible. It works like this:

* In the Display Rule, you can set the "General Visibility" to `false`, and nothing of the Location will render; neither the icon, nor the label, polygon, 2D Model, 3D Walls, 3D Extrusions or 3D Models (all of these parts of the Location's Display Rule can of course also be controlled individually)
* At runtime, either based on user input or other logic in your app, you can change the visilbity to `true`, rendering it visible on the map

For the second case, the SDK effectively doesn't even know it exists:

* If you set an Active From and Active To date, and request the data outside of that date range, the data is not sent to the SDK
* If you set the Restriction on a Location to "Closed for all", or an App User Role that you then don't request the Solution data with, it's also not available to the SDK

### Selectable and searchable

Besides the rendering options related to Display Rules and Restrictions, you can also control whether a Location is "Selectable" and "Searchable".

Setting a Location to be Not Selectable, it is still rendered on the map with all of the visible parts of it, but you can not select it to see more details and get directions to it. In practice, you would likely use "Not Selectable" for office decoration like plants or a statue — elements that help create a great-looking environment on your map.

All of these Locations should also have Searchable turned off, given they are for decoration purposes. In practice, you *can* set them to be Searchable, but you end up with a list of search results full of Locations you should not navigate to. Turn off "Searchable" on your "Not Selectable" Locations to avoid problems.

Other times, you want to keep the Locations selectable on the map, but maybe not take up space in the search result lists. For those cases, turn off Searchable.


# Android

**Documentation reflects the latest version.**

You can find documentation on legacy versions here:

{% content-ref url="/pages/SOP3AtHFms8QTomXlekG" %}
[Legacy Docs](/legacy-docs)
{% endcontent-ref %}


# Getting Started

In this tutorial, you will build your own app from the ground up, gaining experience with the typical development process when working with the MapsIndoors Software Development Kit (SDK). Furthermore, you should be able to gain an understanding of the basic concepts, tools and terminology commonly used when interacting with the SDK. The goal of this guide is to enable you to develop a basic app, that is able to display a map, and incorporate a few basic features such as searching, directions and Live Data integration.

Parts of this guide rely on having access to a MapsIndoors Solution which supports Live Data Integration. If you do not have access to this through your own Solution, we recommend using our demo API key to access one: `mapspeople3d`.

#### Take-Away Skills​ <a href="#take-away-skills" id="take-away-skills"></a>

* Display an interactive map with MapsIndoors
* Implementing search functionality to interact with the displayed map
* Generate and show directions between two points on the map
* Display one type of Live Data on the map


# Prerequisites

MapsIndoors is built on top of Google Maps or Mapbox depending on the SDK flavor you decide to use. On this page, you'll create the necessary keys with the relevant APIs enabled, retrieve a MapsIndoors API key and install the necessary dependencies to get started building your own app.

{% tabs %}
{% tab title="Google Maps" %}
**Get Your Google Maps API key**[**​**](https://docs.mapsindoors.com/getting-started/android/v4/prerequisites#get-your-google-maps-api-key)

First, you need to [setup at a new project in the Google Cloud Console](https://developers.google.com/maps/gmp-get-started) (**Please note:** You are going to need a Google Billing Account for this step, so go ahead and [create one](https://cloud.google.com/billing/docs/how-to/manage-billing-account#create_a_new_billing_account) if you haven't already). When the project is created, the following APIs and the specific SDK you plan to use must be enabled from the [Maps API Library Page](https://console.cloud.google.com/apis/library?filter=category:maps).

* Google Maps Distance Matrix API
* Google Maps Directions API
* Google Places API Web Service
* Maps SDK for Android/iOS - if you're developing an app for Android/iOS respectively ***OR*** Maps JavaScript API if you're developing a web application.

When the above 3 APIs and the relevant SDK are enabled, you can retrieve the API key from the [Credentials page](https://console.cloud.google.com/project/_/apiui/credential). On the Credentials page, click *Create credentials* > *API key*.
{% endtab %}

{% tab title="Mapbox" %}
**Get your Mapbox Access Token**[**​**](https://docs.mapsindoors.com/getting-started/android/v4/prerequisites#get-your-mapbox-access-token)

When using Mapbox you need a Mapbox account and configure credentials to run a Mapbox map with MapsIndoors and downloading the SDK: [Installation](https://docs.mapbox.com/android/maps/guides/install/)

Once this is setup for the project, you can use the MapsIndoors Mapbox flavor.
{% endtab %}
{% endtabs %}

### Get Your MapsIndoors API key​ <a href="#get-your-mapsindoors-api-key" id="get-your-mapsindoors-api-key"></a>

If you are not a customer yet, you can use this demo MapsIndoors API key `02c329e6777d431a88480a09` to follow this guide, or you can [contact MapsPeople](https://resources.mapspeople.com/contact-us) to get your building drawings processed and hosted by us to receive a unique API key. For the purpose of this guide, both methods will work.

### Work with MapsIndoors SDK behind a Firewall​ <a href="#work-with-mapsindoors-sdk-behind-a-firewall" id="work-with-mapsindoors-sdk-behind-a-firewall"></a>

If you need to work with MapsIndoors SDK behind a firewall, you might need to [allowlist some IP-addresses](https://docs.mapsindoors.com/mapsindoors-sdk-firewall).


# Create a New Project

You begin by creating an initial application. Throughout this tutorial, you will modify and extend that starter application to create a simple application which covers the basic features of this guide.

### Set Up Your Environment​ <a href="#set-up-your-environment" id="set-up-your-environment"></a>

This guide explains how to start using a MapsIndoors map in your Android application using the MapsIndoors Android SDK v4.

We recommend using Android Studio for using this tutorial. Read how to set it up here: [Installing Android Studio](https://developer.android.com/studio/install)

If you do not have a Android device, you can [set up an emulator through Android Studio](https://developer.android.com/studio/run/emulator).

If you already have an Android device, make sure to [enable developer mode and USB debugging](https://developer.android.com/studio/debug/dev-options#enable)

To benefit from the guides, you will need basic knowledge about:

* Android Development
* Google Maps Android API

You can get started in two ways, either by reviewing and modifying the [basic example](https://github.com/MapsPeople/MapsIndoors-Android-Examples/tree/main/Google_Maps/mapsindoorsgettingstartedbasickotlin) or do the [clean setup](https://docs.mapsindoors.com/getting-started/android/v4/new-project#setup-mapsindoors). The clean setup is only written for Google Maps, and we recommend following the [basic example](https://github.com/MapsPeople/MapsIndoors-Android-Examples/tree/main/Google_Maps/mapsindoorsgettingstartedbasickotlin).

### Basic Example​ <a href="#basic-example" id="basic-example"></a>

The tutorial will be based on you starting from our basic map implementation. This contains basic UI implementations together with layout files and drawables used to create the UI. You will then be guided through how to implement the MapsIndoors SDK into this app.

The basic example contains a single `activity` app with already made `fragments` to host the different logic to get a complete app interacting with a map and `MapsIndoors` data.

You can find the basic example for Google Maps here: [Kotlin](https://github.com/MapsPeople/MapsIndoors-Android-Examples/tree/main/Google_Maps/mapsindoorsgettingstartedbasickotlin)

The Mapbox basic example is located here: [Kotlin](https://github.com/MapsPeople/MapsIndoors-Android-Examples/tree/main/MapBox/mapsindoorsgettingstartedbasickotlin)

You can open the project through Android Studio by navigating through **File -> New -> Project from Version Control -> GitHub**. Log in and clone the project.

You can also follow the steps below to start your app from scratch or to enhance the Basic Examples, more features will be explained in later guides.

### Setup MapsIndoors​ <a href="#setup-mapsindoors" id="setup-mapsindoors"></a>

If you don't already have a project, we recommend using the Google Maps Activity preset from Android Studio to getting started on developing your MapsIndoors project. You find the Google Maps Activity project through **File -> New -> New Project... -> Google Maps Activity**.

{% hint style="info" %}
On newer versions of android studio this preset has been moved. You can instead choose an empty activity and inside you package you can right click and choose **New -> Google -> Google Maps Activity**. It is explained in google maps documentation here: [Create a Google Maps project in Android Studio](https://developers.google.com/maps/documentation/android-sdk/start#create-project)
{% endhint %}

Add the MapsIndoors SDK as a dependency to your project. The *AAR* for the MapsIndoors SDK contains both Java classes, SDK resources and an `AndroidManifest.xml` template which gets merged into your application's `AndroidManifest.xml` during build process.

Add or merge in the following to your app's build gradle file (usually called `build.gradle`).

Make sure that the minimum Android SDK version is 21 (aka. "Android Lollipop", version 5.0) or above:

{% hint style="info" %}
Please note that mapsindoors uses java 8 language features, that requires desugaring if `minSdkVersion` is 24 or below. Read how to enable this in gradle here: [Use Java 8 language features and APIs](https://developer.android.com/studio/write/java8-support)
{% endhint %}

```gradle
android {
    defaultConfig {
        minSdkVersion 21
    }
    ...
}
```

MapsIndoors relies on Java 8 features, so you must add the following compile options, also in *android* section of your *build.gradle* file:

```gradle
android {
    ...
    compileOptions {
        sourceCompatibility JavaVersion.VERSION_1_8
        targetCompatibility JavaVersion.VERSION_1_8
    }
}
```

Add the following dependencies and the MapsIndoors maven repository:

`Gson` and `okhttp` is used by MapsIndoors to function properly with network calls and deserializing.

{% tabs %}
{% tab title="Google Maps" %}
`play-services-maps` is used for Google Maps which MapsIndoors is build on top of on Android.

```gradle
dependencies {
    ...
    implementation 'com.google.android.gms:play-services-maps:17.0.0'
    implementation 'com.google.code.gson:gson:2.8.6'
    implementation 'com.mapspeople.mapsindoors:googlemaps:4.12.3'
    implementation 'com.squareup.okhttp3:okhttp:4.9.0'
}
repositories{
    maven {
        url 'https://maven.mapsindoors.com/'
    }
}
```

Put those lines in your proguard-rules files:

```properties
-keep interface com.mapsindoors.core.** { *; }
-keep class com.mapsindoors.core.errors.** { *; }
-keepclassmembers class com.mapsindoors.core.models.** { <fields>; }
-keep class com.mapsindoors.core.MPDebugLog
```

Sync your project with gradle.

> This "Getting Started" guide is created using a specific version of the SDK. When moving beyond the "Getting Started" guide, please be sure to use the latest version of the SDK.
> {% endtab %}

{% tab title="Mapbox" %}

```gradle
dependencies {
    ...
    implementation ('com.mapbox.maps:android:11.13.1'){
        exclude group: 'group_name', module: 'module_name'
    }
    implementation 'com.google.code.gson:gson:2.8.6'
    implementation 'com.mapspeople.mapsindoors:mapbox-v11:4.12.3'
    implementation 'com.squareup.okhttp3:okhttp:4.9.0'
}
repositories{
    maven {
        url 'https://maven.mapsindoors.com/'
    }
}
```

Put those lines in your proguard-rules files:

```properties
-keep interface com.mapsindoors.core.** { *; }
-keep class com.mapsindoors.core.errors.** { *; }
-keepclassmembers class com.mapsindoors.core.models.** { <fields>; }
-keep class com.mapsindoors.core.MPDebugLog
```

Sync your project with gradle.

> This "Getting Started" guide is created using a specific version of the SDK. When moving beyond the "Getting Started" guide, please be sure to use the latest version of the SDK.
> {% endtab %}
> {% endtabs %}


# Show a Map

Your environment is now fully configured, and you have the necessary Google Maps and MapsIndoors API keys. Next you will learn how to load a map with MapsIndoors.

### Show a Map with MapsIndoors​ <a href="#show-a-map-with-mapsindoors" id="show-a-map-with-mapsindoors"></a>

{% hint style="info" %}
ASYNC

Please note that data in MapsIndoors is loaded asynchronously. This results in behavior where data might not have finished loading if you call methods accessing it immediately after initializing MapsIndoors. Best practice is to set up `listeners` or `delegates` to inform of when data is ready. Please be aware of this when developing using the MapsIndoors SDK.
{% endhint %}

## Initialize MapsIndoors​ <a href="#initialize-mapsindoors" id="initialize-mapsindoors"></a>

We start by initializing `MapsIndoors`. `MapsIndoors` is used to get and store all references to MapsIndoors-specific data. This includes access to all MapsIndoors-specific geodata.

Place the following initialization code in the `onCreate` method in the `MapsActivity` that displays the Google map. You should also assign the `mapFragment` view to a local variable, as we will use this later to initialize [`MapControl`](https://app.mapsindoors.com/mapsindoors/reference/android/v4/MapsIndoorsSDK/com.mapsindoors.core/-map-control/index.html?query=class%20MapControl) inside the `onCreate`, after it has been created:

{% tabs %}
{% tab title="Google Maps" %}
[MapsActivity.kt](https://github.com/MapsPeople/MapsIndoors-Android-Examples/blob/main/Google_Maps/mapsindoorsgettingstartedkotlin/src/main/java/com/mapspeople/mapsindoorsgettingstartedkotlin/MapsActivity.kt#L42-L105)

```kotlin
override fun onCreate(savedInstanceState: Bundle?) {
    ...
    MapsIndoors.load(applicationContext, "YOUR_MAPSINDOORS_API_KEY", null)

    mapFragment.view?.let {
        mapView = it
    }
    ...
}
```

{% endtab %}

{% tab title="Mapbox" %}
[MapsActivity.kt](https://github.com/MapsPeople/MapsIndoors-Android-Examples/blob/main/MapBox/mapsindoorsgettingstartedkotlin/src/main/java/com/mapspeople/mapsindoorsgettingstartedkotlin/MapsActivity.kt#L39-L96)

```kotlin
override fun onCreate(savedInstanceState: Bundle?) {
    ...
    MapsIndoors.load(applicationContext, "YOUR_MAPSINDOORS_API_KEY", null)
    ...
}
```

{% endtab %}
{% endtabs %}

If you do not have your own key, you can use this demo MapsIndoors API key: `02c329e6777d431a88480a09`.

#### Initialize MapsControl[​](https://docs.mapsindoors.com/getting-started/android/v4/map#initialize-mapscontrol) <a href="#initialize-mapscontrol" id="initialize-mapscontrol"></a>

We now want to add all the data we get by initializing `MapsIndoors` to our map. This is done by initializing [`MapControl`](https://app.mapsindoors.com/mapsindoors/reference/android/v4/MapsIndoorsSDK/com.mapsindoors.core/-map-control/index.html?query=class%20MapControl) onto the map. [`MapControl`](https://app.mapsindoors.com/mapsindoors/reference/android/v4/MapsIndoorsSDK/com.mapsindoors.core/-map-control/index.html?query=class%20MapControl) is used as a layer between the map provider and MapsIndoors.

{% hint style="info" %}
[`MapControl`](https://app.mapsindoors.com/mapsindoors/reference/android/v4/MapsIndoorsSDK/com.mapsindoors.core/-map-control/index.html?query=class%20MapControl) uses Google Maps listeneres to control some map logic. So be aware that using Google Maps listeners directly might break intended behavior of the MapsIndoors experience. We recommend to check our reference docs, and see if you can add a specific `Listener` through the [`MapControl`](https://app.mapsindoors.com/mapsindoors/reference/android/v4/MapsIndoorsSDK/com.mapsindoors.core/-map-control/index.html?query=class%20MapControl) and always use those when possible.
{% endhint %}

Start by creating an `initMapControl` method which is used to initiate the [`MapControl`](https://app.mapsindoors.com/mapsindoors/reference/android/v4/MapsIndoorsSDK/com.mapsindoors.core/-map-control/index.html?query=class%20MapControl) and assign it to mMap:

{% tabs %}
{% tab title="Google maps" %}
[MapsActivity.kt](https://github.com/MapsPeople/MapsIndoors-Android-Examples/blob/main/Google_Maps/mapsindoorsgettingstartedkotlin/src/main/java/com/mapspeople/mapsindoorsgettingstartedkotlin/MapsActivity.kt#L115-L131)

```kotlin
private fun initMapControl(view: View) {
    MPMapConfig mapConfig = new MPMapConfig.Builder(this, mMap, getString(R.string.google_maps_key), view, true).build();
    //Creates a new instance of MapControl
    MapControl.create(config) { mapControl, miError ->
        if (miError == null) {
            mMapControl = mapControl!!
            //Enable live data on the map
            enableLiveData()
            //No errors so getting the first venue (in the white house solution the only one)
            val venue = MapsIndoors.getVenues()?.currentVenue
            venue?.bounds?.let {
                runOnUiThread {
                    //Animates the camera to fit the new venue
                    mMap.animateCamera(CameraUpdateFactory.newLatLngBounds(LatLngBoundsConverter.toLatLngBounds(it), 19))
                }
            }
        }
    }
}
```

{% endtab %}

{% tab title="Mapbox" %}
[MapsActivity.kt](https://github.com/MapsPeople/MapsIndoors-Android-Examples/blob/main/MapBox/mapsindoorsgettingstartedkotlin/src/main/java/com/mapspeople/mapsindoorsgettingstartedkotlin/MapsActivity.kt#L98-L114)

```kotlin
private fun initMapControl() {
    //Creates a new instance of MapControl
    val config = MPMapConfig.Builder(this, mMap, mapView, getString(R.string.mapbox_access_token),true).build()
    MapControl.create(config) { mapControl, miError ->
        if (miError == null) {
            mMapControl = mapControl!!
            //Enable live data on the map
            enableLiveData()
            //No errors so getting the first venue (in the white house solution the only one)
            val venue = MapsIndoors.getVenues()?.currentVenue
            venue?.bounds?.let {
                runOnUiThread {
                    //Animates the camera to fit the new venue
                    mMap.flyTo(mMap.cameraForCoordinateBounds(CoordinateBoundsConverter.toCoordinateBounds(it)))
                }
            }
        }
    }
}
```

{% endtab %}
{% endtabs %}

In your `onMapReady` callback function, assign the `mMap` variable with the `GoogleMap` you get from the callback and call the `initMapControl` method with the `mMapView` you assigned in the `onCreate` to set up a Google map with MapsIndoors Venues, Buildings and Locations. For Mapbox you can simple call initMapControl inside your `onCreate`:\\

{% tabs %}
{% tab title="Google Maps" %}
[MapsActivity.kt](https://github.com/MapsPeople/MapsIndoors-Android-Examples/blob/main/Google_Maps/mapsindoorsgettingstartedkotlin/src/main/java/com/mapspeople/mapsindoorsgettingstartedkotlin/MapsActivity.kt#L107-L113)

```kotlin
override fun onMapReady(googleMap: GoogleMap) {
    mMap = googleMap

    mapView?.let { view ->
        initMapControl(view)
    }
}
```

{% endtab %}

{% tab title="Mapbox" %}
[MapsActivity.kt](https://github.com/MapsPeople/MapsIndoors-Android-Examples/blob/main/MapBox/mapsindoorsgettingstartedkotlin/src/main/java/com/mapspeople/mapsindoorsgettingstartedkotlin/MapsActivity.kt#L95)

```kotlin
override fun onCreate(savedInstanceState: Bundle?) {
    ...
    initMapControl();
    ...
}
```

{% endtab %}
{% endtabs %}

\
Expected result:

<figure><img src="/files/be1MtIX3kNKNp4faFpoy" alt=""><figcaption></figcaption></figure>

See the full example of MapsActivity here: [MapsActivity.kt](https://github.com/MapsPeople/MapsIndoors-Android-Examples/tree/main/Google_Maps/mapsindoorsgettingstartedkotlin)

The Mapbox examples can be found here: [MapsActivity.kt](https://github.com/MapsPeople/MapsIndoors-Android-Examples/blob/main/MapBox/mapsindoorsgettingstartedkotlin/src/main/java/com/mapspeople/mapsindoorsgettingstartedkotlin/MapsActivity.kt)


# Create a Search Experience

Now you have simple app showing a map. In this step, you'll create a simple search and display the search results in a list. You'll also learn how to filter the data displayed on the map based on the

## Create a Simple Query Search​ <a href="#create-a-simple-query-search" id="create-a-simple-query-search"></a>

Start by creating a new activity or *fragment* to facilitate searches on your application. Here we will be using a *fragment* for search and show to search results on, while using a bottom sheet to display the results. We also create a search input field on our main map *activity* for the user to input the text they want to search for. This is already setup in the basic example app.

To perform a search you will need to have initiated [`MapsIndoors`](https://app.mapsindoors.com/mapsindoors/reference/android/v4/MapsIndoorsSDK/com.mapsindoors.core/-maps-indoors/index.html?query=class%20MapsIndoors). This was shown in the previous section of the getting started tutorial how you do this.

For advanced usage of the search functionality read the Search guide and tutorials connected to it: [Search Guide](https://docs.mapsindoors.com/searching/)

## Show a List of Search Results​ <a href="#show-a-list-of-search-results" id="show-a-list-of-search-results"></a>

Create a search method that takes a search string as a parameter on your `MapsActivity` class. In this example we only use the [`setTake` on the `MPFilter`](https://app.mapsindoors.com/mapsindoors/reference/android/v4/MapsIndoorsSDK/com.mapsindoors.core/-m-p-filter/index.html?query=open%20class%20MPFilter) to limit our result to 30 locations. We will expand on this method later.

[MapsActivity.kt](https://github.com/MapsPeople/MapsIndoors-Android-Examples/blob/main/Google_Maps/mapsindoorsgettingstartedkotlin/src/main/java/com/mapspeople/mapsindoorsgettingstartedkotlin/MapsActivity.kt#L133-L172)

```kotlin
private fun search(searchQuery: String) {
    //Query with a string to search on
    val mpQuery = MPQuery.Builder().setQuery(searchQuery).build()
    //Filter for the search query, only taking 30 locations
    val mpFilter = MPFilter.Builder().setTake(30).build()

    //Query for the locations
    MapsIndoors.getLocationsAsync(mpQuery, mpFilter) { list: List<MPLocation?>?, miError: MIError? ->
      //Implement UI handling of the search result here
    }
}
```

To be able to search we will use a text input field where a user can write what they want to search for. This is placed at the top of the MapsActivity

To call our search method with the text in the search input field, we then add an `EditorActionListener` and a `OnClickListener` to the text input field and the search button in the `onCreate` of `MapsActivity`. Find the full `onCreate` example here: [MapsActivity.kt](https://github.com/MapsPeople/MapsIndoors-Android-Examples/blob/main/Google_Maps/mapsindoorsgettingstartedkotlin/src/main/java/com/mapspeople/mapsindoorsgettingstartedkotlin/MapsActivity.kt#L42-L105)

[MapsActivity.kt](https://github.com/MapsPeople/MapsIndoors-Android-Examples/blob/main/Google_Maps/mapsindoorsgettingstartedkotlin/src/main/java/com/mapspeople/mapsindoorsgettingstartedkotlin/MapsActivity.kt#L56-L81)

```kotlin
override fun onCreate(savedInstanceState: Bundle?) {
    ...
    mSearchTxtField = findViewById(R.id.search_edit_txt)
    //Listener for when the user searches through the keyboard
    mSearchTxtField.setOnEditorActionListener { textView, i, _ ->
        if (i == EditorInfo.IME_ACTION_DONE || i == EditorInfo.IME_ACTION_SEARCH) {
            if (textView.text.isNotEmpty()) {
                search(textView.text.toString())
            }
            return@setOnEditorActionListener true
        }
        return@setOnEditorActionListener false
    }

    //ClickListener to start a search, when the user clicks the search button
    var searchBtn = findViewById<ImageButton>(R.id.search_btn)
    searchBtn.setOnClickListener {
        if (mSearchTxtField.text?.length != 0) {
            //There is text inside the search field. So lets do the search.
            search(mSearchTxtField.text.toString())
        }
    }
    ...
}
```

Find the full `onCreate` example here: [MapsActivity.kt](https://github.com/MapsPeople/MapsIndoors-Android-Examples/blob/main/Google_Maps/mapsindoorsgettingstartedkotlin/src/main/java/com/mapspeople/mapsindoorsgettingstartedkotlin/MapsActivity.kt#L42-L105)

To accompany this we use the `SearchFragment` that is already created for you and a `BottomSheet` to handle the `SearchFragment`.

Observe that the `SearchFragment`is just a simple *fragment* with a `RecyclerView` and a `SearchItemAdapter` added to it

[SearchFragment.kt](https://github.com/MapsPeople/MapsIndoors-Android-Examples/blob/main/Google_Maps/mapsindoorsgettingstartedkotlin/src/main/java/com/mapspeople/mapsindoorsgettingstartedkotlin/SearchFragment.kt#L14-L37)

```kotlin
class SearchFragment : Fragment() {
    private var mLocations: List<MPLocation?>? = null
    private var mMapActivity: MapsActivity? = null

    override fun onViewCreated(view: View, @Nullable savedInstanceState: Bundle?) {
        val recyclerView = view as RecyclerView
        recyclerView.layoutManager = LinearLayoutManager(context)
        recyclerView.adapter = mLocations?.let { locations -> SearchItemAdapter(locations, mMapActivity) }
    }

    ...

    companion object {
        fun newInstance(locations: List<MPLocation?>?, mapsActivity: MapsActivity?): SearchFragment {
            val fragment = SearchFragment()
            fragment.mLocations = locations
            fragment.mMapActivity = mapsActivity
            return fragment
        }
    }
}
```

See the full example of `SearchFragment` here: [SearchFragment.kt](https://github.com/MapsPeople/MapsIndoors-Getting-Started-Android-Kotlin/blob/main/app/src/main/java/com/example/mapsindoorsgettingstartedkotlin/SearchFragment.kt)

Create a getter for your [`MapControl` object](https://app.mapsindoors.com/mapsindoors/reference/android/v4/MapsIndoorsSDK/com.mapsindoors.core/-map-control/index.html?query=class%20MapControl) on the `MapsActivity` so that it can be used in the `SearchAdapter`.

[MapsActivity.kt](https://github.com/MapsPeople/MapsIndoors-Android-Examples/blob/main/Google_Maps/mapsindoorsgettingstartedkotlin/src/main/java/com/mapspeople/mapsindoorsgettingstartedkotlin/MapsActivity.kt#L174-L176)

```kotlin
fun getMapControl(): MapControl {
    return mMapControl
}
```

Inside the `SearchItemAdapter` implement logic to display the locations you get from a search result. Here we show an image of the location marker and show the name of the locations.

[SearchItemAdapter.kt](https://github.com/MapsPeople/MapsIndoors-Android-Examples/blob/main/Google_Maps/mapsindoorsgettingstartedkotlin/src/main/java/com/mapspeople/mapsindoorsgettingstartedkotlin/SearchItemAdapter.kt)

```kotlin
internal class SearchItemAdapter(private val mLocations: List<MPLocation?>, private val mMapActivity: MapsActivity?) : RecyclerView.Adapter<ViewHolder>() {

    ...

    override fun onBindViewHolder(holder: ViewHolder, position: Int) {
        holder.text.text = mLocations[position]?.name

        if (mMapActivity != null) {
            mLocations[position]?.let { MapsIndoors.getDisplayRule(it) }?.getIconAsync {
                mMapActivity.runOnUiThread {
                    holder.imageView.setImageBitmap(it)
                }
            }
        }
    }

    ...

}

internal class ViewHolder(inflater: LayoutInflater, parent: ViewGroup?) : RecyclerView.ViewHolder(inflater.inflate(R.layout.fragment_search_list_item, parent, false)) {
    val text: TextView
    val imageView: ImageView

    init {
        text = itemView.findViewById(R.id.text)
        imageView = itemView.findViewById(R.id.location_image)
    }
}
```

See the full example of `SearchItemAdapter` and accompanying `ViewHolder` here: [SearchItemAdapter.kt](https://github.com/MapsPeople/MapsIndoors-Android-Examples/blob/main/Google_Maps/mapsindoorsgettingstartedkotlin/src/main/java/com/mapspeople/mapsindoorsgettingstartedkotlin/SearchItemAdapter.kt)

We have already implemented the BottomSheet in the UI. Now we add the search *fragment* to the `BottomSheet` in our search query method on our `MapsActivity`. You can use the `addFragmentToBottomSheet` too add the created *fragment* to the `BottomSheet`. When we have received the search results

[MapsActivity.kt](https://github.com/MapsPeople/MapsIndoors-Android-Examples/blob/main/Google_Maps/mapsindoorsgettingstartedkotlin/src/main/java/com/mapspeople/mapsindoorsgettingstartedkotlin/MapsActivity.kt#L133-L172)

```kotlin
private fun search(searchQuery: String) {
    //Query with a string to search on
    val mpQuery = MPQuery.Builder().setQuery(searchQuery).build()
    //Filter for the search query, only taking 30 locations
    val mpFilter = MPFilter.Builder().setTake(30).build()

    //Query for the locations
    MapsIndoors.getLocationsAsync(mpQuery, mpFilter) { list: List<MPLocation?>?, miError: MIError? ->
        //Check if there is no error and the list is not empty
        if (miError == null && !list.isNullOrEmpty()) {
            //Create a new instance of the search fragment
            mSearchFragment = SearchFragment.newInstance(list, this)
            //Make a transaction to the bottom sheet
            addFragmentToBottomSheet(mSearchFragment)
            //Clear the search text, since we got a result
            mSearchTxtField.text?.clear()
            ...
        }
    }
}
```

See the full example of the search method here: [MapsActivity.kt](https://github.com/MapsPeople/MapsIndoors-Android-Examples/blob/main/Google_Maps/mapsindoorsgettingstartedkotlin/src/main/java/com/mapspeople/mapsindoorsgettingstartedkotlin/MapsActivity.kt)

## Filter Locations on Map Based on Search Results​ <a href="#filter-locations-on-map-based-on-search-results" id="filter-locations-on-map-based-on-search-results"></a>

When getting a search result, you might want to only show those search results on the map. You can do this through [calling `displaySearchResults(List<MPLocation> locations)` on `MapControl`](https://app.mapsindoors.com/mapsindoors/reference/android/v4/MapsIndoorsSDK/com.mapsindoors.core/-map-control/index.html?query=class%20MapControl). This method has different parameters to make it easier for you as a developer to fit your exact need in terms of animation and more. This can be read in the [JavaDoc of `MapControl`](https://app.mapsindoors.com/mapsindoors/reference/android/v3/com/mapsindoors/mapssdk/MapControl.html).

The standard implementation animates the camera to fit all Locations on the map and show the info window of a Location, if it's a list of only one Location.

When you are done showing the search results you can [call `clearMap()` on `MapControl`](https://app.mapsindoors.com/mapsindoors/reference/android/v4/MapsIndoorsSDK/com.mapsindoors.core/-map-control/index.html?query=class%20MapControl).

Since the default `displaySearchResults(List<MPLocation> locations)` uses camera animation we will call it from the UI Thread and implement it in our search method inside the `getLocationsAsync` result with the list from the method.

[MapsActivity.kt](https://github.com/MapsPeople/MapsIndoors-Android-Examples/blob/main/Google_Maps/mapsindoorsgettingstartedkotlin/src/main/java/com/mapspeople/mapsindoorsgettingstartedkotlin/MapsActivity.kt#L150)

```kotlin
private fun search(searchQuery: String) {
    MapsIndoors.getLocationsAsync(mpQuery, mpFilter) { list: List<MPLocation?>?, miError: MIError? ->
        //Calling displaySearchResults on the ui thread as camera movement is involved
        runOnUiThread { mMapControl.setFilter(list, MPFilterBehavior.DEFAULT) }
    }
}
```

Expected result:

<figure><img src="/files/2CMNq7CamrII5yKQsJtb" alt=""><figcaption></figcaption></figure>

The accompanying UI and implementation of this search experience can be found in the getting started app sample. [Getting Started App sample](https://github.com/MapsPeople/MapsIndoors-Android-Examples/tree/main/Google_Maps/mapsindoorsgettingstartedkotlin)


# Getting Directions

Now we have a simple map with a floor selector where you can search for locations. When finishing this step you'll be able to create a directions between two points and change the transportation mode.

### Get Directions Between Two Locations​ <a href="#get-directions-between-two-locations" id="get-directions-between-two-locations"></a>

After having created our list of search results, we have a good starting point for creating directions between two Locations. Since our search only supports a single search, we will query a random Location within the venue when requesting a route, and use that as the basis for our Origin. Then we'll create a route, navigate to a view of the navigation details, and show a route on the map from the Origin to the Destination.

Now we will create a method that can generate a route for us with a Location (picked from the search list). Start by implementing `OnRouteResultListener` to your MapsActivity.

{% tabs %}
{% tab title="Kotlin - Google Maps" %}
[MapsActivity.kt](https://github.com/MapsPeople/MapsIndoors-Android-Examples/blob/main/Google_Maps/mapsindoorsgettingstartedkotlin/src/main/java/com/mapspeople/mapsindoorsgettingstartedkotlin/MapsActivity.kt#L26)

```kotlin
class MapsActivity : FragmentActivity(), OnMapReadyCallback, OnRouteResultListener
```

{% endtab %}

{% tab title="Kotlin - Mapbox" %}
[MapsActivity.kt](https://github.com/MapsPeople/MapsIndoors-Android-Examples/blob/main/MapBox/mapsindoorsgettingstartedkotlin/src/main/java/com/mapspeople/mapsindoorsgettingstartedkotlin/MapsActivity.kt#L24)

```kotlin
class MapsActivity : FragmentActivity(), OnRouteResultListener
```

{% endtab %}
{% endtabs %}

Implement the [`onRouteResult` method](https://app.mapsindoors.com/mapsindoors/reference/android/v4/MapsIndoorsSDK/com.mapsindoors.core/-on-route-result-listener/on-route-result.html?query=abstract%20fun%20onRouteResult\(route:%20MPRoute,%20error:%20MIError\)) and create a method called `createRoute(MPLocation mpLocation)` on your `MapsActivity`.

Use this method to query the [`MPDirectionsService`](https://app.mapsindoors.com/mapsindoors/reference/android/v4/MapsIndoorsSDK/com.mapsindoors.core/-m-p-directions-service/index.html?query=class%20MPDirectionsService%20:%20MPDirectionsServiceInterface), which generates a route between two coordinates. We will use this to query a route with our hardcoded `mUserLocation` and a point from a MPLocation.

To generate a route with the `MPLocation`, we start by creating an `onClickListener` on our search `ViewHolder` inside the `SearchItemAdapter`. In the method `onBindViewHolder` we will call our `createRoute` on the `MapsActivity` for our route to be generated.

[SearchItemAdapter.kt](https://github.com/MapsPeople/MapsIndoors-Android-Examples/blob/main/Google_Maps/mapsindoorsgettingstartedkotlin/src/main/java/com/mapspeople/mapsindoorsgettingstartedkotlin/SearchItemAdapter.kt#L18-L32)

```kotlin
override fun onBindViewHolder(holder: ViewHolder, position: Int) {
    ...
    holder.itemView.setOnClickListener {
        mLocations[position]?.let { locations -> mMapActivity?.createRoute(locations) }
        //Clearing map to remove the location filter from our search result
        mMapActivity?.getMapControl()?.clearFilter()
    }
    ...
}
```

We start by implementing logic to our createRoute method to query a route through [`MPDirectionsService`](https://app.mapsindoors.com/mapsindoors/reference/android/v4/MapsIndoorsSDK/com.mapsindoors.core/-m-p-directions-service/index.html?query=class%20MPDirectionsService%20:%20MPDirectionsServiceInterface) and assign the onRouteResultListener to the activity. When we call the `createRoute` through our `onClickListener` we will receive a result through our `onRouteResult` implementation.

When we receive a result on our listener, we render the route through the `MPDirectionsRenderer`.

We create global variables of the [`MPdirectionsRenderer`](https://app.mapsindoors.com/mapsindoors/reference/android/v4/MapsIndoorsSDK/com.mapsindoors.core/-m-p-directions-renderer/index.html?query=class%20MPDirectionsRenderer) and [`MPDirectionsService`](https://app.mapsindoors.com/mapsindoors/reference/android/v4/MapsIndoorsSDK/com.mapsindoors.core/-m-p-directions-service/index.html?query=class%20MPDirectionsService%20:%20MPDirectionsServiceInterface) and create a getter to the [`MPdirectionsRenderer`](https://app.mapsindoors.com/mapsindoors/reference/android/v4/MapsIndoorsSDK/com.mapsindoors.core/-m-p-directions-renderer/index.html?query=class%20MPDirectionsRenderer) to access it from *fragments* later on.

[MapsActivity.kt](https://github.com/MapsPeople/MapsIndoors-Android-Examples/blob/main/Google_Maps/mapsindoorsgettingstartedkotlin/src/main/java/com/mapspeople/mapsindoorsgettingstartedkotlin/MapsActivity.kt#L182-L237)

```kotlin
fun createRoute(mpLocation: MPLocation) {
    //If MPRoutingProvider has not been instantiated create it here and assign the results call back to the activity.
    if (mpRoutingProvider == null) {
        mpRoutingProvider = MPDirectionsService(this)
        mpRoutingProvider?.setRouteResultListener(this)
        mpRoutingProvider?.setTravelMode(MPTravelMode.WALKING)
    }

    //Use the locations venue to query an origin point for the route. Within the venue bounds.
    if (mpLocation.venue == null) {
        //Open dialog telling user to try another location, as no venue is assigned to the location.
        AlertDialog.Builder(this)
            .setTitle("No venue assigned")
            .setMessage("Please try another location")
            .show()
    } else {
        val venue = MapsIndoors.getVenues()?.getVenueByName(mpLocation.venue!!)
        MapsIndoors.getLocationsAsync(null, MPFilter.Builder().setMapExtend(MPMapExtend(venue!!.bounds!!)).build()) { list: List<MPLocation?>?, miError: MIError? ->
            if (!list.isNullOrEmpty()) {
                list.first()?.let { location ->
                    //Queries the MPRouting provider for a route with the hardcoded user location and the point from a location.
                    mpRoutingProvider?.query(location.point, mpLocation.point)
                }
            } else {
                AlertDialog.Builder(this)
                    .setTitle("No locations found within venue of location")
                    .setMessage("Please try another location")
                    .show()
            }
        }
    }
}

override fun onRouteResult(@Nullable route: Route?, @Nullable miError: MIError?) {
    ...
    //Create the MPDirectionsRenderer if it has not been instantiated.
    if (mpDirectionsRenderer == null) {
        mpDirectionsRenderer = MPDirectionsRenderer(mMapControl)
    }
    //Set the route on the Directions renderer
    mpDirectionsRenderer?.setRoute(route)
    //Create a new instance of the navigation fragment
    mNavigationFragment = NavigationFragment.newInstance(route, this)
    //Start a transaction and assign it to the BottomSheet
    addFragmentToBottomSheet(mNavigationFragment)
}
```

See the full implementation of these methods here: [MapsActivity.kt](https://github.com/MapsPeople/MapsIndoors-Android-Examples/blob/main/Google_Maps/mapsindoorsgettingstartedkotlin/src/main/java/com/mapspeople/mapsindoorsgettingstartedkotlin/MapsActivity.kt#L182-L237)

Now we will implement logic to our `NavigationFragment` that we can put into our BottomSheet and show the steps for each route, as well as the time and distance it takes to travel the route.

Here we'll use a `viewpager` to allow the user to switch between each step, as well as display a "close" button so we are able to remove the route and the bottom sheet from the activity.

We will start by making a getter for our [`MPdirectionsRenderer`](https://app.mapsindoors.com/mapsindoors/reference/android/v4/MapsIndoorsSDK/com.mapsindoors.core/-m-p-directions-renderer/index.html?query=class%20MPDirectionsRenderer) that we store on `MapsActivity`:

[MapsActivity.kt](https://github.com/MapsPeople/MapsIndoors-Android-Examples/blob/main/Google_Maps/mapsindoorsgettingstartedkotlin/src/main/java/com/mapspeople/mapsindoorsgettingstartedkotlin/MapsActivity.kt#L178-L180)

```kotlin
fun getMpDirectionsRenderer(): MPDirectionsRenderer? {
    return mpDirectionsRenderer
}
```

Inside the `NavigationFragment` we will implement logic to navigate through Legs of our Route.

[NavigationFragment.kt](https://github.com/MapsPeople/MapsIndoors-Android-Examples/blob/main/Google_Maps/mapsindoorsgettingstartedkotlin/src/main/java/com/mapspeople/mapsindoorsgettingstartedkotlin/NavigationFragment.kt)

```kotlin
class NavigationFragment : Fragment() {
    private var mRoute: MPRoute? = null
    private var mMapsActivity: MapsActivity? = null

    ...
    override fun onViewCreated(view: View, @Nullable savedInstanceState: Bundle?) {
        val routeCollectionAdapter = RouteCollectionAdapter(this)
        val mViewPager: ViewPager2 = view.findViewById(R.id.view_pager)
        mViewPager.adapter = routeCollectionAdapter
        mViewPager.registerOnPageChangeCallback(object : OnPageChangeCallback() {
            override fun onPageSelected(position: Int) {
                super.onPageSelected(position)
                //When a page is selected call the renderer with the index
                mMapsActivity?.getMpDirectionsRenderer()?.selectLegIndex(position)
                //Update the floor on mapcontrol if the floor might have changed for the routing
                mMapsActivity?.getMpDirectionsRenderer()?.selectedLegFloorIndex?.let {floorIndex ->
                    mMapsActivity?.getMapControl()?.selectFloor(floorIndex)
                }
            }
        })

        ...

        //Button for closing the bottom sheet. Clears the route through directionsRenderer as well, and changes map padding.
        closeBtn.setOnClickListener {
            mMapsActivity!!.removeFragmentFromBottomSheet(this)
            mMapsActivity!!.getMpDirectionsRenderer()?.clear()
        }

        //Next button for going through the legs of the route.
        nextBtn.setOnClickListener {
            mViewPager.setCurrentItem(
                mViewPager.currentItem + 1,
                true
            )
        }

        //Back button for going through the legs of the route.
        backBtn.setOnClickListener {
            mViewPager.setCurrentItem(
                mViewPager.currentItem - 1,
                true
            )
        }

        //Describing the distance in meters
        distanceTxtView.text = "Distance: " + mRoute?.getDistance().toString() + " m"
        //Describing the time it takes for the route in minutes
        infoTxtView.text = "Time for route: " + mRoute?.duration?.toLong()?.let {duration ->
            TimeUnit.MINUTES.convert(duration, TimeUnit.SECONDS).toString()
        } + " minutes"
    }

    inner class RouteCollectionAdapter(fragment: Fragment?) :
        ...
    }

    companion object {
        fun newInstance(route: Route?, mapsActivity: MapsActivity?): NavigationFragment {
            val fragment = NavigationFragment()
            fragment.mRoute = route
            fragment.mMapsActivity = mapsActivity
            return fragment
        }
    }
}
```

See the full implementation of `NavigationFragment` and the accompanying adapter here: [NavigationFragment.kt](https://github.com/MapsPeople/MapsIndoors-Android-Examples/blob/main/Google_Maps/mapsindoorsgettingstartedkotlin/src/main/java/com/mapspeople/mapsindoorsgettingstartedkotlin/NavigationFragment.kt)

We will then create a simple textview to describe each step of the Route Leg in the `RouteLegFragment` for the `ViewPager`:

[RouteLegFragment.kt](https://github.com/MapsPeople/MapsIndoors-Android-Examples/blob/main/Google_Maps/mapsindoorsgettingstartedkotlin/src/main/java/com/mapspeople/mapsindoorsgettingstartedkotlin/RouteLegFragment.kt)

```kotlin
class RouteLegFragment : Fragment() {
    private var mRouteLeg: MPRouteLeg? = null

    ...

    override fun onViewCreated(view: View, @Nullable savedInstanceState: Bundle?) {
        super.onViewCreated(view, savedInstanceState)
        //Assigning views
        val fromTxtView = view.findViewById<TextView>(R.id.from_text_view)
        var stepsString = ""
        //A loop to write what to do for each step of the leg.
        for (i in mRouteLeg!!.steps.indices) {
            val routeStep = mRouteLeg!!.steps[i]
            stepsString += """
                Step ${i + 1}${routeStep.maneuver}
                """.trimIndent()
        }

        fromTxtView.text = stepsString
    }

    companion object {
        fun newInstance(routeLeg: MPRouteLeg?): RouteLegFragment {
            val fragment = RouteLegFragment()
            fragment.mRouteLeg = routeLeg
            return fragment
        }
    }
}
```

See the full implementation of the fragment here: [RouteLegFragment.kt](https://github.com/MapsPeople/MapsIndoors-Android-Examples/blob/main/Google_Maps/mapsindoorsgettingstartedkotlin/src/main/java/com/mapspeople/mapsindoorsgettingstartedkotlin/RouteLegFragment.kt)

### Change Transportation Mode​ <a href="#change-transportation-mode" id="change-transportation-mode"></a>

In MapsIndoors, the transportation mode is referred to as **travel mode**. There are four travel modes, **walking**, **bicycling**, **driving** and **transit** (public transportation). The travel modes generally applies for outdoor navigation. Indoor navigation calculations are based on **walking** travel mode.

To swap Travel Modes you set the Travel Mode before making a query for the route:

```kotlin
fun createRoute(mpLocation: MPLocation) {
    //If MPDirectionsService has not been instantiated create it here and assign the results call back to the activity.
    if (mpDirectionsService == null) {
        mpDirectionsService = MPDirectionsService(this)
        mpDirectionsService?.setRouteResultListener(this)
    }
    mpDirectionsService?.setTravelMode(MPTravelMode.WALKING)
    //Queries the MPRouting provider for a route with the hardcoded user location and the point from a location.
    mpDirectionsService?.query(mUserLocation, mpLocation.point)
}
```

Expected result:

<figure><img src="/files/m1aCfuTaKECwzhXfIYvz" alt=""><figcaption></figcaption></figure>

Congratulations! You're at the end of your journey (for now), and you've accomplished a lot! 🎉

* You learned which prerequisites is needed to start building with MapsIndoors.
* You loaded a interactive map with MapsIndoors locations and added a floor selector for navigating between floors.
* You created a search experience to search for specific locations on the map.
* You added functionality for getting directions from one Location to another.

This concludes the "Getting Started" tutorial, but there's always more to discover. To get more inspiration on what to build next please visit our [showcase page](https://www.mapspeople.com/showcases) to see how other clients use MapsIndoors! For more documentation, please visit the rest of our Docs site!.


# Enable Live Data

As opposed to *static data*, which does not change unless data is synchronized, Live Data can change in real time, and these changes can be instantly reflected on the map and in searches.

Common use-cases are:

* Changing the appearance of meeting rooms or workspace desks on a map, or in a list, based on occupancy information. For example, change the icon in order to indicate that a room is occupied.
* Changing the position of a POI representing a vehicle.

Support for Live Data requires that server-side integrations are in place. For example, visualizing live occupancy data requires that a calendar or booking system integration is in place. An integration like that is set up in [collaboration with MapsPeople](https://www.mapspeople.com/mapsindoors-integrations/).

The following section relies on the existence of Live Position Data. If you do not have access to a MapsIndoors Dataset that have a Live Data integration, you should use our demo API key: `d876ff0e60bb430b8fabb145`.

Enabling Live Data through [`MapControl`](https://app.mapsindoors.com/mapsindoors/reference/android/v4/MapsIndoorsSDK/com.mapsindoors.core/-map-control/index.html?query=class%20MapControl) is as simple as [calling `mapControl.enableLiveData()`](https://app.mapsindoors.com/mapsindoors/reference/android/v4/MapsIndoorsSDK/com.mapsindoors.core/-map-control/enable-live-data.html?query=open%20fun%20enableLiveData\(domainType:%20String\)) with a [Domain Type](https://app.mapsindoors.com/mapsindoors/reference/android/v3/index.html).

We will create a new method on our `MapsActivity` called `enableLiveData()` to enable Live Data for the Solution.

[MapsActivity.kt](https://github.com/MapsPeople/MapsIndoors-Android-Examples/blob/79a8b7c22751048c7c064a63b067eb740cf5e50f/Google_Maps/mapsindoorsgettingstartedkotlin/src/main/java/com/mapspeople/mapsindoorsgettingstartedkotlin/MapsActivity.kt#L223-L228)

```kotlin
private fun enableLiveData() {
    //Enabling Live Data for the three known Live Data Domains enabled for this Solution.
    mMapControl.enableLiveData(LiveDataDomainTypes.AVAILABILITY_DOMAIN)
    mMapControl.enableLiveData(LiveDataDomainTypes.OCCUPANCY_DOMAIN)
    mMapControl.enableLiveData(LiveDataDomainTypes.POSITION_DOMAIN)
}
```

By consequence, [`MapControl`](https://app.mapsindoors.com/mapsindoors/reference/android/v4/MapsIndoorsSDK/com.mapsindoors.core/-map-control/index.html?query=class%20MapControl) will manage the Live Data subscriptions needed for the currently visible map and provide a default rendering of the Live Data updates depending on the Domain Type.

In the context of your view controller showing a map, add the call after creating your [`MapControl`](https://app.mapsindoors.com/mapsindoors/reference/android/v4/MapsIndoorsSDK/com.mapsindoors.core/-map-control/index.html?query=class%20MapControl) object used in the `Activity` in the `initMapControl()` method created earlier.

[MapsActivity.kt](https://github.com/MapsPeople/MapsIndoors-Android-Examples/blob/79a8b7c22751048c7c064a63b067eb740cf5e50f/Google_Maps/mapsindoorsgettingstartedkotlin/src/main/java/com/mapspeople/mapsindoorsgettingstartedkotlin/MapsActivity.kt#L124)

```kotlin
private fun initMapControl(view: View) {
    ...
    //Creates a new instance of MapControl
    MapControl.create(config) { mapControl, miError ->
        if (miError == null) {
            mMapControl = mapControl!!
            //Enable live data on the map
            enableLiveData()
            ...
        }
    }
    ...
}
```

Using the demo API key you should now be able to see a "Staff Person" moving from one end to the other at ground floor in The White House main building.

Expected result:

<figure><img src="/files/hqkZZbJMnbg0QYfTFFbp" alt=""><figcaption></figcaption></figure>

Learn more about controlling and rendering Live Data in MapsIndoors in the [introduction to Live Data](https://docs.mapsindoors.com/live-data-intro/).

### Summary​ <a href="#summary" id="summary"></a>

Congratulations! You're at the end of your journey (for now), and you've accomplished a lot! 🎉

* You learned which prerequisites is needed to start building with MapsIndoors.
* You loaded a interactive map with MapsIndoors locations and added a floor selector for navigating between floors.
* You created a search experience to search for specific locations on the map.
* You added functionality for getting directions from one Location to another.
* You learned how to enable different types of Live Data Domains in your app.

This concludes the "Getting Started" tutorial, but there's always more to discover. To get more inspiration on what to build next please visit our [showcase page](https://www.mapspeople.com/showcases) to see how other clients use MapsIndoors! For more documentation, please visit the rest of our Docs site!.


# Integrating MapsIndoors into your own App

The **MapsIndoors Template** is a downloadable starting point for you to integrate basic usage of MapsIndoors, containing search and directions functionalities, into your existing app. If you just want to get started with a simple solution with no customisation, this should fulfil your needs. Going through this guide will also teach you some principles on how MapsIndoors interacts with an app, and is a natural next step after the "Getting Started" guides.

If you need more customisation you can implementing your own solution using the documentation found on this site, or modify this code as needed.

**MapsIndoors Template** is provided as is, and can be integrated into your existing app. If you need further features, or want to customize existing ones, you're free to modify this one to your needs. However, MapsPeople offers no support or responsibility for changes made.

### Prerequisites[​](https://docs.mapsindoors.com/getting-started/android/v4/mapsindoors-template#prerequisites) <a href="#prerequisites" id="prerequisites"></a>

Before you get started, you need to get the API keys needed. This process is the same for both platforms.

#### Get Your Google Maps API key​ <a href="#get-your-google-maps-api-key" id="get-your-google-maps-api-key"></a>

First, you need to [setup at a new project in the Google Cloud Console](https://developers.google.com/maps/gmp-get-started), just like you did in the ["Getting Started"](https://docs.mapsindoors.com/getting-started/android/v4/getting-started/android) guide (**Please note:** You are going to need a Google Billing Account for this step, so go ahead and [create one](https://cloud.google.com/billing/docs/how-to/manage-billing-account#create_a_new_billing_account) if you haven't already). When the project is created, the following APIs and the specific SDK you plan to use must be enabled from the [Maps API Library Page](https://console.cloud.google.com/apis/library?filter=category:maps).

* Google Maps Distance Matrix API
* Google Maps Directions API
* Google Places API Web Service
* Maps SDK for Android/iOS

When the above 3 APIs and the relevant SDK are enabled, you can retrieve the API key from the [Credentials page](https://console.cloud.google.com/project/_/apiui/credential). On the Credentials page, click *Create credentials* > *API key*.

#### Get Your MapsIndoors API key​ <a href="#get-your-mapsindoors-api-key" id="get-your-mapsindoors-api-key"></a>

If you are not a customer yet, you can use this demo MapsIndoors API key `{{sdk.tutorialAPIKey}}` to follow this guide, or you can [contact MapsPeople](https://resources.mapspeople.com/contact-us) to get your building drawings processed and hosted by us to receive a unique API key. For the purpose of this guide, both methods will work.

### Integrating the App​ <a href="#integrating-the-app" id="integrating-the-app"></a>

{% hint style="warning" %}
This app was designed to be displayed in Portrait Mode. While it will work in Landscape Mode, some UI elements may look distorted or out-of-place.
{% endhint %}

First, download or clone the pre-made project from GitHub: <https://github.com/MapsPeople/MapsIndoorsTemplate-Android>.

* Open the project you just downloaded, and copy the classes located in `java/com/mapspeople/mapsindoorstemplate` into your own App
* Add the Maven repository (<http://maven.mapsindoors.com/>) to your project's `build.gradle` file
* Add the following dependencies from `build.gradle`:

```gradle
implementation 'com.google.code.gson:gson:2.8.6'
implementation 'com.mapspeople.mapsindoors:mapsindoorssdk:3.12.1'
implementation 'com.squareup.okhttp3:okhttp:4.9.0'
implementation "com.google.android.gms:play-services-maps:16.1.0"
```

* For the next step, this project uses [Glide](https://bumptech.github.io/glide/) for image handling in your application. If you are not using Glide, either import it, or if you use a different image library, you need to change some lines of code in the app. What you need to change them to, depends on the library you use. The lines are:

```bash
DirectionStepFragment.kt: 50
DirectionStepFragment.kt: 53
DirectionStepFragment.kt: 56
DirectionStepFragment.kt: 61
MPSearchItemRecyclerViewAdapter.kt: 31
```

{% hint style="info" %}
Material 1.5 is used for this app. If another version is used some UI elements might differ from the initial application. If you do not want to use the Material library you will need to find alternatives for some view elements inside the fragments.
{% endhint %}

* Copy the layout and drawables from the `res` folder into your app
* Copy the `String` values from `res/values` into your app
* Copy the `google_maps_api.xml` file to your project and insert a valid Google Maps API key - [See more info on how to do that here.](https://docs.mapsindoors.com/getting-started/android/v4/prerequisites/)
* Add the API key to the manifest file under the `Application` tag like so:

```xml
<meta-data
        android:name="com.google.android.geo.API_KEY"
        android:value="@string/google_maps_key" />
```

* Change the places where the navigation graph is used, if you are not using navigation. Alternatively, create a navigation action for MapsFragment. If so, change the navigation controller call on `line: 74` inside `MapsFragment.kt` under the TODO
* Check the `FirstFragment.kt` class on how to apply User Roles to the map fragment

#### The Final Result​ <a href="#the-final-result" id="the-final-result"></a>

### Summary​ <a href="#summary" id="summary"></a>

Congratulations! You now have a functioning map in your own app, with the ability to both search for Locations and generate directions! If you want more advanced features, check out [further documentation](https://docs.mapsindoors.com/display-rules/), or modify the existing code from this tutorial to suit your needs!

[<br>](https://docs.mapsindoors.com/getting-started/android/v4/livedata)


# Migrating from V3 to V4

The Android SDK for MapsIndoors has been upgraded from V3 to V4, which comes with improved interfaces and flexibility for developing your own map experience. The MapsIndoors SDK now supports Mapbox as a map provider, alongside some reworked and refactored features that simplify development and SDK behavior. This guide will cover specific changes to the SDK and how to use it to provide you with a guide on how to upgrade from V3 to V4.

### MapsIndoors SDK Map Engine Flavors​ <a href="#mapsindoors-sdk-map-engine-flavors" id="mapsindoors-sdk-map-engine-flavors"></a>

With the release of V4 the MapsIndoors SDK is released as two separate libraries depending on the map provider - Google Maps or Mapbox. You can get them through Maven by changing your dependency to get:

```gradle
implementation 'com.mapspeople.mapsindoors:googlemaps:4.2.5'

implementation 'com.mapspeople.mapsindoors:mapbox:4.2.5'
```

### MapsIndoors Initialization​ <a href="#mapsindoors-initialization" id="mapsindoors-initialization"></a>

MapsIndoors is a singleton class, which can be described as the data layer of the SDK. Below you will find an example that demonstrates how initialization has been simplified between V3 and V4.

**V3​**

In V3, SDK initialization is started with:

```java
MapsIndoors.initialize(getApplicationContext(), "mapsindoors-key", listener);
```

And subsequently setting the Google API key using:

```java
MapsIndoors.setGoogleAPIKey(getString(R.string.google_maps_key));
```

If you want to change the MapsIndoors API key of an already initialized SDK you invoke:

```kotlin
MapsIndoors.setApiKey("new key")
```

And to close down the SDK, call:

```kotlin
MapsIndoors.onApplicationTerminate()
```

**V4​**

In V4, initialization is started by the new function `MapsIndoors.load()`:

```java
MapsIndoors.load(getApplicationContext(), "mapsindoors-key", listener);
```

Map engine specific API keys are handled by `MPMapConfig`, covered in the "MapControl Initialization" section of this guide.

Switching to another MapsIndoors API key, such as for switching active solutions, is now done by invoking `MapsIndoors.load()` again with a new key. The SDK will close down, and reload with the new API key.

To close down the SDK without reloading a new API key, invoke:

```kotlin
MapsIndoors.destroy()
```

### MapControl Initialization​ <a href="#mapcontrol-initialization" id="mapcontrol-initialization"></a>

MapControl instantiation and initialization are separate concepts. You create a new instance of `MapControl` and configure it with a map and view - optionally you could set clustering, overlapping and other behavior on the object.

**V3​**

In V3, `MapControl.init()` is a separate asynchronous call:

```java
mMapControl = new MapControl(this);
mMapControl.setGoogleMap(mMap, view);
mMapControl.init(miError -> {
    // MapControl init complete
});
```

**V4​**

In V4, `MapControl` now requires a `MPMapConfig` object, which is acquired using a builder on the class `MPMapConfig`. Here you must provide an activity, a map provider (Google Maps or Mapbox), a `mapview` and a map engine API key.

```java
MPMapConfig mapConfig = new MPMapConfig.Builder(activity, googleMap, "google-api-key", view, true)
        .setShowFloorSelector(true)
        .build();
```

With a `MPMapConfig` instance, you may create a new `MapControl` instance. This now happens through a factory pattern. This both instantiates and initializes your `MapControl` object asynchronously. If everything succeeds, you will receive a ready-to-use `MapControl` instance - if not, you will get an error and receive no `MapControl` instance.

```java
MapControl.create(mapConfig, (mapControl, miError) -> {
    // MapControl init complete
});
```

Please note that this factory method will wait to return until a valid MapsIndoors solution is loaded, therefore it is safe to invoke `MapControl.create()` prior to, or in parallel with `MapsIndoors.load()`.

### SolutionConfig & AppConfig​ <a href="#solutionconfig--appconfig" id="solutionconfig--appconfig"></a>

**V3​**

In V3, AppConfig contained information about clustering (`POI_GROUPING`) and collisions (`POI_HIDE_ON_OVERLAP`), which could be fetched and updated like this:

```java
// get whether collisions are enabled... as a string
MapsIndoors.getAppConfig().getAppSettings().get(AppConfig.APP_SETTING_POI_HIDE_ON_OVERLAP);

// set whether clustering is enabled... with a string
MapsIndoors.getAppConfig().getAppSettings().put(AppConfig.APP_SETTING_POI_GROUPING, "true");
```

**V4​**

In V4, these settings have been moved to `MPSolutionConfig`, which is located on the MPSolution. Now these settings have types (a boolean and an Enum type). This helps ensure that the settings are easier to configure and have no parsing errors. They can be fetched and updates like this:

```java
// get the config from the solution
MPSolutionConfig config = MapsIndoors.getSolution().getConfig();

// get the collisionHandling enum from the config
MPCollisionHandling collisionHandling = config.getCollisionHandling();

// update the config
config.setEnableClustering(true);
config.setCollisionHandling(MPCollisionHandling.ALLOW_OVERLAP);
```

NB: As a consequence the SDK will no longer respect these settings in the appConfig, they will have to be set in the solutionConfig.

### Venue Name​ <a href="#venue-name" id="venue-name"></a>

**V3​**

In V3, the `getName()` method return the venue's *Administrative ID*, shadowing its *Display Name*.

**V4​**

In V4, the `getName()` method now returns the venue's *Display Name*. A new method has been added: `getAdministrativeId()` which returns the venue's *Administrative ID*.

### Display Rules​ <a href="#display-rules" id="display-rules"></a>

The manner in which the SDK handles Display Rules has recieved a major overhaul in V4. This is intended to simplify usage, such as editing Display Rules for certain Locations.

**V3​**

In V3 you would create new DisplayRule objects and add them onto Locations through MapControl.

**Editing a single location​**

```java
LocationDisplayRule singleLocationDisplayRule = new LocationDisplayRule.Builder("singleRule").setVectorDrawableIcon(R.drawable.ic_baseline_air_24).setLabel("single display rule").build();
MPLocation mpLocation = MapsIndoors.getLocationById("MyLocationId");
mMapControl.setDisplayRule(singleLocationDisplayRule, mpLocation);
```

**Editing multiple locations​**

```java
multipleLocationDisplayRule = new LocationDisplayRule.Builder("multipleRule").setVectorDrawableIcon(R.drawable.ic_baseline_air_24).setLabel("multiple display rule").build();
MapsIndoors.getLocationsAsync(null, new MPFilter.Builder().setTypes(Collections.singletonList("Meetingroom")).build(), (locations, miError) -> {
    if (locations != null) {
        mMapControl.setDisplayRule(multipleLocationDisplayRule, locations);
    }
});
```

**V4​**

In V4, DisplayRules have been changed to a reference-based approach. You now receive `MPDisplayRules` through MapsIndoors and are able to change the values, and see it reflected on the map instantly.

**Editing a single DisplayRule**[**​**](https://docs.mapsindoors.com/getting-started/android/v4/v4-migration-guide#editing-a-single-displayrule)

```java
MPLocation mpLocation = MapsIndoors.getLocationById("MyLocationId");
MPDisplayRule mpDisplayRule = MapsIndoors.getDisplayRule(mpLocation);
if (mpDisplayRule != null) {
    mpDisplayRule.setIcon(R.drawable.ic_baseline_air_24, Color.GRAY);
}
```

**Editing multiple DisplayRules**[**​**](https://docs.mapsindoors.com/getting-started/android/v4/v4-migration-guide#editing-multiple-displayrules)

```java
MapsIndoors.getLocationsAsync(null, new MPFilter.Builder().setTypes(Collections.singletonList("Meetingroom")).build(), (locations, error) -> {
    if (locations != null) {
        MPDisplayRuleOptions displayRuleOptions = new MPDisplayRuleOptions().setIcon(R.drawable.ic_baseline_chair_24)
                .setPolygonStrokeColor(Color.BLUE)
                .setPolygonVisible(true)
                .setLabel("Meeting Room");
        for (MPLocation location : locations) {
            MPDisplayRule displayRule = MapsIndoors.getDisplayRule(location);
            if (displayRule != null) {
                displayRule.applyOptions(displayRuleOptions);
            }
        }
    }
});
```

**Resetting Display Rules**[**​**](https://docs.mapsindoors.com/getting-started/android/v4/v4-migration-guide#resetting-display-rules)

```java
MapsIndoors.getLocationsAsync(null, new MPFilter.Builder().setTypes(Collections.singletonList("Meetingroom")).build(), (locations, error) -> {
    if (locations != null) {
        for (MPLocation location : locations) {
            MPDisplayRule displayRule = MapsIndoors.getDisplayRule(location);
            if (displayRule != null) {
                displayRule.reset();
            }
        }
    }
});
```

Building outlines and selections are now also DisplayRules, so that you can customize the looks just like you can when doing it on locations.

> Please note that MapsIndoors has to have finished loading for these DisplayRules to not be `null`.

**Editing Selection and Building Outline**[**​**](https://docs.mapsindoors.com/getting-started/android/v4/v4-migration-guide#editing-selection-and-building-outline)

The following methods are examples of how you can use DisplayRules to set the outline color of a building, or if selecting a building highlights it.

```java
MapsIndoors.getDisplayRule(MPSolutionDisplayRule.BUILDING_OUTLINE).setPolygonStrokeColor(Color.BLUE);
MapsIndoors.getDisplayRule(MPSolutionDisplayRule.SELECTION_HIGHLIGHT).setPolygonVisible(false);
```

### DirectionsService & DirectionsRenderer​ <a href="#directionsservice--directionsrenderer" id="directionsservice--directionsrenderer"></a>

There are two basic functions here - Retrieving, or querying a route, and rendering it onto the map.

#### Query Route​ <a href="#query-route" id="query-route"></a>

**V3​**

In V3, the process to query a route is to instantiate a `MPRoutingProvider` and set the desired travel mode, departure/arrival time, etc. You should also instantiate an `OnRouteResultListener` to receive the result (or error in case of failure).

```java
int timeNowSeconds = (int) (System.currentTimeMillis() / 1000);
MPRoutingProvider routingProvider = new MPRoutingProvider();
routingProvider.setTravelMode(TravelMode.WALKING);
routingProvider.setDateTime(timeNowSeconds, true);
routingProvider.setOnRouteResultListener((route, error) -> {
    // You get your route (or error) here!
});

Point from = new Point(57.039395177203936, 9.939182484455051);
Point to = new Point(57.03238690202058, 9.93220061362637);

routingProvider.query(from, to);
```

**V4​**

In V4, `MPRoutingProvider` has been renamed to `MPDirectionsService`, to align with other platforms. It has also changed the method of setting a departure or arrival, as shown below.

Instantiate a new `MPDirectionsService`, and apply the settings needed for a route. Use the `query()` method to search for a route between two points.

```java
Date date = new Date();
MPDirectionsService directionsService = new MPDirectionsService();
directionsService.setIsDeparture(true);
directionsService.setTime(date);
directionsService.setTravelMode(TravelMode.WALKING);

directionsService.setOnRouteResultListener((route, error) -> {
    // You get your route (or error) here!
})

MPPoint from = new MPPoint(57.039395177203936, 9.939182484455051);
MPPoint to = new MPPoint(57.03238690202058, 9.93220061362637);
directionsService.query(from, to);
```

#### Render Route​ <a href="#render-route" id="render-route"></a>

**V3​**

To render a given route in V3, instantiate a `MPDirectionsRenderer` with parameters. Then your IDE should be able to show you the various configurable attributes (various animation settings and styling) as well as setting the route. Alternatively, refer to further documentation. To start the renderer/animation, invoke `initMap()`.

```java
MPDirectionsRenderer directionsRenderer = new MPDirectionsRenderer(this, mMap, mMapControl, null);
directionsRenderer.setPolylineAnimated(true);
directionsRenderer.setAnimated(true);
directionsRenderer.setRoute(route);
runOnUiThread( ()-> {
    directionsRenderer.initMap(true);
    directionsRenderer.setRouteLegIndex(0);
});
```

**V4​**

In V4, this has been simplified. Given a route, you can instantiate a new `MPDirectionsRenderer`, and set the route using `setRoute()`. Use the `MPDirectionsRenderer` object to navigate through the route (next/previous leg) as well as configure the animation and styling of the route on the map. By default the route is animated and repeating, but this is customizable on the `MPDirectionsRenderer` instance.

```java
MPDirectionsRenderer renderer = new MPDirectionsRenderer(mMapControl);
renderer.setRoute(route);
```

### Map & Camera Behavior Configs​ <a href="#map--camera-behavior-configs" id="map--camera-behavior-configs"></a>

In V3, there were many overloaded methods for selection and filtering, where various boolean and integer/double values were set. In V4, the preferred method is configuration objects for heavily configurable use cases. Thus, filtering and selection methods are now dependent on `MP...Behavior` objects.

We have introduced `MPFilterBehavior` and `MPSelectionBehavior`. These object contains behavioral configuration to describe how and if the camera should behave. The following can be configured:

* `setZoomToFit(boolean)`
* `setMoveCamera(boolean)`
* `setShowInfoWindow(boolean)`
* `setAnimationDuration(int)`
* `setAllowFloorChange(boolean)`

There are statically defined defaults available on the classes.

### The "Go-To" Function​ <a href="#the-go-to-function" id="the-go-to-function"></a>

In V4 `MapControl.goTo(MPEntity)` is introduced. This is an easy way to quickly move the camera to almost any MapsIndoors geographical object (referred to as `MPEntity`). The method implements pre-determined defaults for camera behavior, which cannot be configured.

The following classes are of type `MPEntity`:

* `MPLocation`
* `MPFloor`
* `MPBuilding`
* `MPVenue`

### Map Filtering​ <a href="#map-filtering" id="map-filtering"></a>

**V3​**

In V3, filtering map content is performed with `MapControl.displaySearchResult()`. This results in a lot of undesirable overloads.

Clearing the map filter is done by invoking `MapControl.clearMap()`.

```java
boolean displaySearchResults(@NonNull List<MPLocation> locations)
boolean displaySearchResults(@NonNull List<MPLocation> locations, boolean animateCamera)
boolean displaySearchResults(@NonNull List<MPLocation> locations, @Nullable ReadyListener readyListener)
boolean displaySearchResults(@NonNull List<MPLocation> locations, boolean animateCamera, int cameraPadding)
boolean displaySearchResults(@NonNull List<MPLocation> locations, boolean animateCamera, int cameraPadding, boolean showInfoWindow)
boolean displaySearchResults(@NonNull List<MPLocation> locations, boolean animateCamera, int cameraPadding, @Nullable ReadyListener readyListener)
boolean displaySearchResults(@NonNull List<MPLocation> locations, boolean animateCamera, int cameraPadding, boolean showInfoWindow, @Nullable CameraUpdate googleMapCameraUpdate, int durationMs, GoogleMap.CancelableCallback googleMapCancelableCallback)
boolean displaySearchResults(@NonNull List<MPLocation> locations, boolean animateCamera, int cameraPadding, boolean showInfoWindow, @Nullable CameraUpdate googleMapCameraUpdate, int durationMs, GoogleMap.CancelableCallback googleMapCancelableCallback, @Nullable ReadyListener readyListener)
```

**V4​**

To avoid the aforementioned undesirable overloads, in V4, filtering map content is now performed with `MapControl.setFilter(List<MPLocation>, MPFilterBehavior)` or alternatively `MapControl.setFilter(MPFilter, MPFilterBehavior, MPSuccessListener)`. To clear the filter, invoke `MapControl.clearFilter()`.

One way to perform map filtering, is given a list of `MPLocation`, display only these locations on the map.

```java
MapsIndoors.getLocationsAsync(new MPQuery.Builder().setQuery("stairs").build(), null, (locations, error) -> {
    if(error == null && !locations.isEmpty()) {
        mMapControl.setFilter(locations, MPFilterBehavior.DEFAULT);
    }
});
```

Another way is to configure a `MPFilter` object. This is an easy way to only show locations of a given type or category on the map.

```java
MPFilter filter = new MPFilter.Builder().setTypes(Collections.singletonList("Stairs")).build();
mMapControl.setFilter(filter, MPFilterBehavior.DEFAULT, null);
```

### Positioning Providers​ <a href="#positioning-providers" id="positioning-providers"></a>

**V3​**

In V3, the snippet below is the `PositionProvider` interface. While perfectly functional, it leaves a lot be desired in terms of readability and clarity, and avoiding bloat in the code.

```java
public interface PositionProvider {
  @NonNull String[] getRequiredPermissions();
  boolean isPSEnabled();
  void startPositioning( @Nullable String arg );
  void stopPositioning( @Nullable String arg );
  boolean isRunning();
  void addOnPositionUpdateListener( @Nullable OnPositionUpdateListener listener );
  void removeOnPositionUpdateListener( @Nullable OnPositionUpdateListener listener );
  void setProviderId( @Nullable String id );
  void addOnStateChangedListener( @Nullable OnStateChangedListener onStateChangedListener );
  void removeOnStateChangedListener( @Nullable OnStateChangedListener onStateChangedListener );
  void checkPermissionsAndPSEnabled( @Nullable PermissionsAndPSListener permissionAPSlist );
  @Nullable String getProviderId();
  @Nullable PositionResult getLatestPosition();
  void startPositioningAfter( @IntRange(from = 0, to = Integer.MAX_VALUE) int delayInMs, @Nullable String arg );
  void terminate();
}
```

**V4​**

To fix this in V4, `PositionProvider` has been optimized and renamed to `MPPositionProvider`, to fall in line with other naming conventions. It has been renamed with the MP-prefix and has been heavily trimmed, to only describe the necessary interface for the MapsIndoors SDK to utilize a position provider sufficiently.

```java
public interface MPPositionProvider {
    void addOnPositionUpdateListener(@NonNull OnPositionUpdateListener listener);
    void removeOnPositionUpdateListener(@NonNull OnPositionUpdateListener listener);
    @Nullable MPPositionResultInterface getLatestPosition();
}
```

### SDK Interface Changes​ <a href="#sdk-interface-changes" id="sdk-interface-changes"></a>

#### Removed Classes & Interfaces​ <a href="#removed-classes--interfaces" id="removed-classes--interfaces"></a>

| Removed                           |
| --------------------------------- |
| ImageSize                         |
| SphericalUtil                     |
| Convert                           |
| DirectionsRenderer (interface)    |
| DisplayRule                       |
| Feature                           |
| FloorTileOfflineManager           |
| GeometryCollectionGeometry        |
| GoogleMapsDirectionStatusCodes    |
| JavaClusteringEngine              |
| JSONUtil                          |
| LineStringGeometry                |
| LintTestClass                     |
| ListenerCallbacks                 |
| LocationsUpdatedListener          |
| MapView (interface)               |
| MathUtil                          |
| MPAuthClient                      |
| MPBadgeType                       |
| MPBookingListener                 |
| MPBookingListListener             |
| MPDataSetCacheManagerSyncListener |
| MPDistanceMatrixReceiver          |
| MPFloatRange                      |
| MPLocationCluster                 |
| MPLocationClusteringEngine        |
| MPLocationListListener            |
| MPOrdering                        |
| MultiLineStringGeometry           |
| MultiPointGeometry                |
| NodeLabel                         |
| PolyUtil                          |
| PositionIndicator                 |
| Renderer                          |
| RouteVertex                       |
| TileCacheStrategy                 |
| TileSize                          |
| UriLoaderListener                 |
| Utils                             |
| DSCUnzipFileTask                  |
| DSCUrlDownloadingTask             |

#### Renamed Classes & Interfaces​ <a href="#renamed-classes--interfaces" id="renamed-classes--interfaces"></a>

| V3                            | V4                                                                  |
| ----------------------------- | ------------------------------------------------------------------- |
| AppConfig                     | MPAppConfig                                                         |
| BadgePosition                 | MPBadgePosition                                                     |
| Building                      | MPBuilding                                                          |
| BuildingCollection            | MPBuildingCollection                                                |
| BuildingInfo                  | MPBuildingInfo                                                      |
| Category                      | MPCategory                                                          |
| CategoryCollection            | MPCategoryCollection                                                |
| DataField                     | MPDataField                                                         |
| DataSet                       | MPDataSet                                                           |
| DataSetManagerStatus          | MPDataSetManagerStatus                                              |
| dbglog                        | MPDebugLog                                                          |
| DistanceMatrixResponse        | MPDistanceMatrixResponse                                            |
| FastSphericalUtils            | MPFastSphericalUtils                                                |
| Floor                         | MPFloor                                                             |
| FloorSelectorInterface        | MPFloorSelectorInterface                                            |
| GeocodedWaypoints             | MPGeocodedWaypoints                                                 |
| GeoData                       | MPGeoData                                                           |
| Geometry                      | MPGeometry                                                          |
| Highway                       | MPHighway                                                           |
| IFloorSelector                | MPFloorSelectorInterface                                            |
| ImageProvider                 | MPImageProvider                                                     |
| LocationDisplayRule           | MPDisplayRule                                                       |
| LocationPropertyNames         | MPLocationPropertyNames                                             |
| Maneuver                      | MPManeuver                                                          |
| MapExtend                     | MPMapExtend                                                         |
| MapStyle                      | MPMapStyle                                                          |
| MenuInfo                      | MPMenuInfo                                                          |
| MPApiKeyValidatorService      | MPApiKeyValidator                                                   |
| MPBaseType                    | MPLocationBaseType                                                  |
| MPLocationClusterImageAdapter | MPClusterIconAdapter                                                |
| MPRoutingProvider             | MPDirectionsService                                                 |
| MultiPolygonGeometry          | MPMultiPolygonGeometry                                              |
| NodeData                      | MPNodeData                                                          |
| Object                        | MPObject                                                            |
| PermissionsAndPSListener      | MPPermissionsAndPSListener                                          |
| Point                         | MPPoint                                                             |
| POIType                       | MPPOIType                                                           |
| PolygonDisplayRule            | MPPolygonDisplayRule                                                |
| PolygonGeometry               | MPPolygonGeometry                                                   |
| PositionProvider              | MPPositionProvider                                                  |
| PositionResult                | MPPositionResult & MPPositionResultInterface                        |
| PropertyData                  | MPPropertyData                                                      |
| ReadyListener                 | MPReadyListener                                                     |
| Route                         | MPRoute                                                             |
| RouteCoordinate               | MPRouteCoordinate                                                   |
| RouteLeg                      | MPRouteLeg                                                          |
| RoutePolyline                 | MPRoutePolyline                                                     |
| RouteProperty                 | MPRouteProperty                                                     |
| RouteResult                   | MPRouteResult                                                       |
| RouteSegmentPath              | MPRouteSegmentPath                                                  |
| RouteStep                     | MPRouteStep                                                         |
| RoutingProvider               | MPDirectionsServiceInterface & MPDirectionsServiceExternalInterface |
| Solution                      | MPSolution                                                          |
| SolutionInfo                  | MPSolutionInfo                                                      |
| TransitDetails                | MPTransitDetails                                                    |
| TravelMode                    | MPTravelMOde                                                        |
| URITemplate                   | MPURITemplate                                                       |
| UrlResourceGroupType          | MPUrlResourceGroupType                                              |
| UserRole                      | MPUserRole                                                          |
| Venue                         | MPVenue                                                             |
| VenueCollection               | MPVenueCollection                                                   |
| VenueInfo                     | MPVenueInfo                                                         |


# Migrating to Mapbox V11

This documentation refers to the change of the Mapbox engine in 4.5.0

## Migrating to Mapbox V11

With the release of Mapbox V11, we are migrating the V4 SDK to use Mapbox v11 to make use of the new features offered by Mapbox. As this version bump can include breaking changes for your implementation. We will still be maintaining a V10 based SDK. This will retain the maven naming as of now. Where Mapbox V11 will move to:

```gradle
implementation("com.mapspeople.mapsindoors:mapbox-v11:4.8.5")
```

For the migration of your Mapbox code implementation read the Mapbox guide here: [Mapbox - Migrate to V11](https://docs.mapbox.com/android/maps/guides/migrate-to-v11/)

### Mapsindoors changes

While no breaking changes are introduced from the Mapsindoors SDK. Some visual changes are introduced with the use of Mapbox V11.

#### Mapbox Standard Style

With Mapbox V11 they have introduced a new map style. That is being used by the Mapsindoors SDK. This includes new 3D visuals on the map, like extruded buildings, 3D landmarks, Trees etc. Giving a great aesthetic experience.

With this, if you are using the Mapsindoors default style this will be a part of your map. We have introduced a Mapsindoors transition level, that enable/disable the extruded buildings and Mapbox POI's to not clash with the Mapsindoors data. This is based on zoom level, and is by default 17. It can be configured through the `MPMapConfig`.

#### 3D Models

With the Mapbox V11 release, android also supports rendering 3D models on your map. Read more about this:

#### Toggling MapsIndoors features

With 4.5.0 you can now also hide specific features, allowing you to toggle between 2d and 3d.

You can read about that feature here: [Enabling and Disabling features on the map](/sdks-and-frameworks/android/displaying-objects/enabling-and-disabling-features-on-the-map)


# Directions

Android V4

As a key element in the MapsIndoors platform, we offer API's for effeciently calculating and displaying the most optimal routes from anywhere in the world to any Location inside a Building in MapsIndoors. In the case of travelling internally at a Venue, this calculation can be done on a local map provided by MapsIndoors. In the case of travelling between Venues or from outdoors to indoors, MapsIndoors provide a seamless journey outline from a specified *Origin* through automatically selected *Entry Points* at the edge of your Venues to the specified *destination*.

In order to provide a route between Venues, MapsIndoors integrate with external and global map providers. Our preferred provider is Google Maps.

The central components that utilize a Directions experience is the [Directions Service](https://docs.mapsindoors.com/directions-service/) and the [Directions Renderer](https://docs.mapsindoors.com/directions-renderer/). But before we get to the fun part, let's examine some key concepts first.

### Entry Points​ <a href="#entry-points" id="entry-points"></a>

Entry Points are specified points in a MapsIndoors Venue that enable a transition between a global or regional map and the local map in MapsIndoors. The Entry Point often specify which travel modes are suitable for entering/exiting the Venue. There are four travel modes: *Walking*, *Bicycling*, *Driving* and *Transit* (Public Transportation). As such, the Entry Point may be a bike shed for the Bicycling travel mode, a carpark for Driving and a bus stop for Transit. As a consequence, it is often at the Entry Point that the Travel Mode changes from Bicycling, Driving or Transit to Walking. The selection of an entry point for transitioning between route networks is based on a combination of automatic calculation, estimation and optimisation.

### The Route Model​ <a href="#the-route-model" id="the-route-model"></a>

When requesting Routes in MapsIndoors Directions Service The Route model in MapsIndoors is seperated into Legs and these Legs are again seperated into Steps.

#### The Route Leg Model​ <a href="#the-route-leg-model" id="the-route-leg-model"></a>

A Leg represents a logical subset of the journey from Origin to Destination. A Route will break into Legs when:

* Travelling from one floor level to another.
* Changing context, such as entering or exiting a building.
* Changing travel mode, for example parking your car and continuing by foot.

If you examine the illustration above, you will see that the blue line representing the Route have been marked with blue circles where the Route would be seperated into Legs.

#### The Route Step Model​ <a href="#the-route-step-model" id="the-route-step-model"></a>

A Route Step can have different representations depending on where on a Route it is placed. A Step may represent yet another subset of the journey within a Leg. Furthermore, it may represent a required action and/or maneuver, such as traversing floors, changing directions (Left, Right etc.). A step will also contain textual instructions. Examples include “Make a right turn”, “Continue straight ahead”, “Take the elevator to Floor 4” and the like.


# Directions Service

Android v4

The class `MPDirectionsService` is used to request routes from one point to another. The minimum required input to receive a route is an `origin` and a `destination`.

This example shows how to setup and execute a query for a Route:

{% tabs %}
{% tab title="Kotlin" %}

```kotlin
val directionsService = MPDirectionsService()
val directionsRenderer = MPDirectionsRenderer(mapControl)
val origin = MPPoint(57.057917, 9.950361, 0.0)
val destination = MPPoint(57.058038, 9.950509, 0.0)
directionsService.setRouteResultListener { route, error -> }
directionsService.query(origin, destination)
```

{% endtab %}

{% tab title="Java" %}

```java
MPDirectionsService directionsService = new MPDirectionsService();
MPDirectionsRenderer directionsRenderer = new MPDirectionsRenderer(mapControl);
MPPoint origin = new MPPoint(57.057917, 9.950361, 0.0);
MPPoint destination = new MPPoint(57.058038, 9.950509, 0.0);
directionsService.setRouteResultListener((route, error) -> {
});
directionsService.query(origin, destination);
```

{% endtab %}
{% endtabs %}

The route can be customized via the `directionsRenderer`. An example could be the color of the rendered path and the background color of the rendered line. This can be set like this:

{% tabs %}
{% tab title="Kotlin" %}

```kotlin
val directionsRenderer = MPDirectionsRenderer(mapControl)
directionsRenderer.setPolylineColors(Color.GREEN, Color.BLACK)
```

{% endtab %}

{% tab title="Java" %}

```java
MPDirectionsRenderer directionsRenderer = MPDirectionsRenderer(mapControl);
directionsRenderer.setPolylineColors(Color.GREEN, Color.BLACK);
```

{% endtab %}
{% endtabs %}

### Change Transportation Mode​ <a href="#change-transportation-mode" id="change-transportation-mode"></a>

In MapsIndoors, the transportation mode is referred to as **travel mode**. There are four travel modes, **walking**, **bicycling**, **driving** and **transit** (public transportation). The travel modes generally applies for outdoor navigation. Indoor navigation calculations are based on **walking** travel mode.

Set the **travel mode** on your request using the `setTravelMode` method on `MPDirectionsService`:

{% tabs %}
{% tab title="Kotlin" %}

```kotlin
fun createRoute(mpLocation: MPLocation) {
    // if MPDirectionsService has not been instantiated create it here and assign the results call back to the activity.
    if (mpDirectionsService == null) {
        mpDirectionsService = MPDirectionsService()
        mpDirectionsService?.setRouteResultListener(this::onRouteResult)
    }
    mpDirectionsService?.setTravelMode(MPTravelMode.WALKING)
    // queries the MPDirectionsService for a route with the hardcoded user location and the point from a location.
    mpDirectionsService?.query(mUserLocation, mpLocation.point)
}
```

{% endtab %}

{% tab title="Java" %}

```java
void createRoute(MPLocation mpLocation) {
    // if MPDirectionsService has not been instantiated create it here and assign the results call back to the activity.
    if (mpDirectionsService == null) {
        mpDirectionsService = new MPDirectionsService();
        mpDirectionsService.setRouteResultListener(this::onRouteResult);
    }
    mpDirectionsService.setTravelMode(MPTravelMode.WALKING);
    // queries the MPDirectionsService for a route with the hardcoded user location and the point from a location.
    mpDirectionsService.query(mUserLocation, mpLocation.getPoint());
}
```

{% endtab %}
{% endtabs %}

The travel modes generally only apply for outdoor navigation. Indoor navigation calculations are based on the **walking** travel mode.

### Route Restrictions​ <a href="#route-restrictions-2" id="route-restrictions-2"></a>

There are several ways to influence the calculated route by applying various restrictions to the directions query:

* **Avoid** and/or **exclude** certain **way types** under certain circumstances
* Apply restrictions based on User Roles

#### Avoid and exclude way types <a href="#route-restrictions-2" id="route-restrictions-2"></a>

It is possible to avoid and/or exclude certain way types when calculating a route. **Avoiding** a way type means that `DirectionsService` will do its best to find a route without the avoided way types, but if no route can be found without them, it will try to find a route where the avoided way types may be used. To eliminate certain way types entirely, add them as **excluded** way types. If a way type is both avoided and excluded, excluded will be obeyed.

It may for example be desirable to provide a route better suited for users with physical disabilities by avoiding e.g. stairs. This can be achieved by avoiding that **way type** on the route using the `avoidWayTypes` property:

{% tabs %}
{% tab title="Kotlin" %}

```kotlin
val directionsService: MPDirectionsService = MPDirectionsService()
directionsService.addAvoidWayType(MPHighway.STEPS)
```

{% endtab %}

{% tab title="Java" %}

```java
MPDirectionsService directionsService = new MPDirectionsService();
directionsService.addAvoidWayType(MPHighway.STEPS);
```

{% endtab %}
{% endtabs %}

In an emergency situation it may be required to not use elevators at all. This can be achieved by adding the way type elevator to the `excludeWayTypes` property:

{% tabs %}
{% tab title="Kotlin" %}

```kotlin
val directionsService: MPDirectionsService = MPDirectionsService()
directionsService.addExcludeWayType(MPHighway.ELEVATOR)
```

{% endtab %}

{% tab title="Java" %}

```java
MPDirectionsService directionsService = new MPDirectionsService();
directionsService.addExcludeWayType(MPHighway.ELEVATOR);
```

{% endtab %}
{% endtabs %}

When Route restrictions are set on the `MPDirectionsService` they will be applied to any subsequent queries as well. You can remove them again by calling `clearAvoidWayType` or `clearExcludeWayType`.

{% tabs %}
{% tab title="Kotlin" %}

```kotlin
val directionsService: MPDirectionsService = MPDirectionsService()
directionsService.clearAvoidWayType()
directionsService.clearExcludeWayType()
```

{% endtab %}

{% tab title="Java" %}

```java
MPDirectionsService directionsService = new MPDirectionsService();
directionsService.clearAvoidWayType();
directionsService.clearExcludeWayType();
```

{% endtab %}
{% endtabs %}

#### App User Role Restrictions​ <a href="#app-user-role-restrictions" id="app-user-role-restrictions"></a>

In the MapsIndoors CMS it is possible to restrict certain **ways** in the Route Network to only be accessible by users belonging to certain Roles.

You can get the available Roles with help of the `MapsIndoors.getAppliedUserRoles`:

{% tabs %}
{% tab title="Kotlin" %}

```kotlin
fun getUserRoles(): List<MPUserRole>? {
  return MapsIndoors.getAppliedUserRoles()
}
```

{% endtab %}

{% tab title="Java" %}

```java
List<MPUserRole> getUserRoles() {
  return MapsIndoors.getAppliedUserRoles();
}
```

{% endtab %}
{% endtabs %}

User Roles can be set on a global level using `MapsIndoors.applyUserRoles`.

{% tabs %}
{% tab title="Kotlin" %}

```kotlin
 fun setUserRoles(userRoles: List<MPUserRole>) {
    MapsIndoors.applyUserRoles(userRoles)
}
```

{% endtab %}

{% tab title="Java" %}

```java
void setUserRoles(List<MPUserRole> userRoles) {
    MapsIndoors.applyUserRoles(userRoles);
}
```

{% endtab %}
{% endtabs %}

This will affect all following Directions requests as well as search queries with `MapsIndoors`.

For more information about App User Roles, see [this documentation](https://docs.mapsindoors.com/app-user-roles/).

### Transit Departure and Arrival Time​ <a href="#transit-departure-and-arrival-time" id="transit-departure-and-arrival-time"></a>

When using the Transit travel mode, you must set a **departure date** or an **arrival date** on the route using the `setTime` method on `MPDirectionsService` and declaring if it is a departure or not through `setIsDeparture`. The `date` parameter is the epoch time, in seconds, as an integer, and it is only possible to use one of these properties at a time.

{% tabs %}
{% tab title="Kotlin" %}

```kotlin
fun setDepartureTime(date: Date?) {
    mpDirectionsService.setIsDeparture(true)
    mpDirectionsService.setTime(date)
}
fun setArrivalTime(date: Date?) {
    mpDirectionsService.setIsDeparture(false)
    mpDirectionsService.setTime(date)
}
```

{% endtab %}

{% tab title="Java" %}

```java
void setDepartureTime(Date date) {
    mpDirectionsService.setIsDeparture(true);
    mpDirectionsService.setTime(date);
}
void setArrivalTime(Date date) {
    mpDirectionsService.setIsDeparture(false);
    mpDirectionsService.setTime(date);
}
```

{% endtab %}
{% endtabs %}


# Directions Renderer

Android v4

{% tabs %}
{% tab title="Java" %}
When getting the resulting Route from a [Directions Service](https://docs.mapsindoors.com/directions-service/), you may want to display this Route on a map. To perform this task the `MPDirectionsRenderer` can be used.

This example shows how to setup a query for a route and display the result on a Google Map using the `MPDirectionsRenderer`:

```java
void getRoute() {
    MPDirectionsService directionsService = new MPDirectionsService(this);
    MPDirectionsRenderer directionsRenderer = new MPDirectionsRenderer(mMapControl);
    MPPoint origin = new MPPoint(57.057917, 9.950361, 0.0);
    MPPoint destination = new MPPoint(57.058038, 9.950509, 0.0);
    directionsService.setRouteResultListener((route, error) -> {
        if (route != null) {
            directionsRenderer.setRoute(route);
        }
    });
    directionsService.query(origin, destination);
}
```

**Controlling the Visible Segments on the Directions Renderer**[**​**](https://docs.mapsindoors.com/directions-renderer#controlling-the-visible-segments-on-the-directions-renderer)

As previously mentioned, the route object is seperated into objects of `MPRouteLeg`. Each leg is again separated into objects of `MPRouteStep`.

Unless the Route only contains one Leg, the Directions Renderer does not allow the full Route to be rendered all at once. Therefore, if a Leg contains multiple Steps, they will all be shown on the map at the same time, but once the Leg is changed, the previous Steps are not visible anymore.

A specific segment of the route can be rendered by setting the `legIndex` on the `MPDirectionsRenderer`.

```java
void setLegIndex(int position) {
    mpDirectionsRenderer.selectLegIndex(position);
}
```

The length of the `legs` array from `getLegs` on the `MPRoute` object determines the possible values of `routeLegIndex` (`0 ..< length`).

**Reacting to Label Tapping**[**​**](https://docs.mapsindoors.com/directions-renderer#reacting-to-label-tapping)

**Directions Labels** refer to the labels shown at the end of the rendered route segment path, that may provide contextual information, or show instructions for a required user action at that point. The labels are created as simple `Marker` instances that are rendered as markers on the map. A user is able to long press these, and an event will be forwarded to the listener `OnLegSelectedListener` in `MPDirectionsRenderer`. This can be used to change the Leg to the next Leg in line on the Route.

```java
void getRoute() {
    MPDirectionsService directionsService = new MPDirectionsService(this);
    MPDirectionsRenderer directionsRenderer = new MPDirectionsRenderer(mMapControl);
    MPPoint origin = new MPPoint(57.057917, 9.950361, 0.0);
    MPPoint destination = new MPPoint(57.058038, 9.950509, 0.0);
    directionsService.setRouteResultListener((route, error) -> {
        if (route != null) {
            directionsRenderer.setRoute(route);
        }
    });
    directionsRenderer.setOnLegSelectedListener(i -> {
        directionsRenderer.selectLegIndex(i);
    });
    directionsService.query(origin, destination);
}
```

`MPDirectionsRenderer` also has convenience methods to change the active leg to previous and next Leg.

```java
void nextLeg() {
    mpDirectionsRenderer.nextLeg();
}
void previousLeg() {
    mpDirectionsRenderer.previousLeg();
}
```

**Show Content of Nearby Locations**[**​**](https://docs.mapsindoors.com/directions-renderer#show-content-of-nearby-locations)

It is possible to show contextual information on the end points of the rendered path of a route segment by configuring the directions renderer to look for nearby Locations or POIs.

This is done by creating an appropriate `MPContextualInfoSettings` object and passing that to the Directions Renderer. If it is not set or is null, no contextual information will be shown.

The `MPContextualInfoSetting` can be applied on `MPDirectionsRenderer` by calling `useContentOfNearbyLocations(MPContextualInfoSettings)`. Like this:

```java
//Sets the contextual info to be of locations that has the type "entries" and searches within a max distance of 30 meters from the end point of the current route segment
mpDirectionsRenderer.useContentOfNearbyLocations(new MPContextualInfoSettings.Builder()
        .setTypes(Collections.singletonList("entries"))
        .setMaxDistance(30.0)
        .build());
```

The defaults of the `ContextualInfoSettings` builder are `maxDistance` at 5 meters and the `ContextualInfoScope` as icon and name. No Types or Categories are set as default. Not applying any Types or Categories will make it search through all Locations to use as contextual information.
{% endtab %}

{% tab title="Kotlin" %}
When getting the resulting Route from a [Directions Service](https://docs.mapsindoors.com/directions-service/), you may want to display this Route on a map. To perform this task the `MPDirectionsRenderer` can be used.

This example shows how to setup a query for a route and display the result on a Google Map using the `MPDirectionsRenderer`:

```kotlin
fun getRoute() {
    val directionsService = MPDirectionsService(this)
    val directionsRenderer = MPDirectionsRenderer(mMapControl)
    val origin = MPPoint(57.057917, 9.950361, 0.0)
    val destination = MPPoint(57.058038, 9.950509, 0.0)
    directionsService.setRouteResultListener { route, error ->
        route?.let { mpRoute ->
            directionsRenderer.setRoute(mpRoute)
        }
    }
    directionsService.query(origin, destination)
}
```

**Controlling the Visible Segments on the Directions Renderer**[**​**](https://docs.mapsindoors.com/directions-renderer#controlling-the-visible-segments-on-the-directions-renderer-1)

As previously mentioned, the route object is seperated into objects of `MPRouteLeg`. Each leg is again separated into objects of `MPRouteStep`.

Unless the Route only contains one Leg, the Directions Renderer does not allow the full Route to be rendered all at once. Therefore, if a Leg contains multiple Steps, they will all be shown on the map at the same time, but once the Leg is changed, the previous Steps are not visible anymore.

A specific segment of the route can be rendered by setting the `legIndex` on the `MPDirectionsRenderer`.

```kotlin
fun setRouteLegIndex(position: Int) {
    mpDirectionsRenderer?.selectLegIndex(position)
}
```

The length of the `legs` array from `getLegs` on the `MPRoute` object determines the possible values of `routeLegIndex` (`0 ..< length`).

**Reacting to Label Tapping**[**​**](https://docs.mapsindoors.com/directions-renderer#reacting-to-label-tapping-1)

**Directions Labels** refer to the labels shown at the end of the rendered route segment path, that may provide contextual information, or show instructions for a required user action at that point. The labels are created as simple `Marker` instances that are rendered as markers on the map. A user is able to long press these, and an event will be forwarded to the listener `OnLegSelectedListener` in `MPDirectionsRenderer`. This can be used to change the Leg to the next Leg in line on the Route.

```kotlin
fun getRoute() {
    val directionsService = MPDirectionsService(this)
    val directionsRenderer = MPDirectionsRenderer(mMapControl)
    val origin = MPPoint(57.057917, 9.950361, 0.0)
    val destination = MPPoint(57.058038, 9.950509, 0.0)
    directionsService.setRouteResultListener { route, error ->
        route?.let { mpRoute ->
            directionsRenderer.setRoute(mpRoute)
        }
    }
    directionsRenderer.setOnLegSelectedListener {
        mpDirectionsRenderer?.selectLegIndex(it)
    }
    directionsService.query(origin, destination)
}
```

`MPDirectionsRenderer` also has convenience methods to change the active leg to previous and next Leg.

```kotlin
fun nextLeg() {
    mpDirectionsRenderer?.nextLeg()
}
fun previousLeg() {
    mpDirectionsRenderer?.previousLeg()
}
```

**Show Content of Nearby Locations**[**​**](https://docs.mapsindoors.com/directions-renderer#show-content-of-nearby-locations-1)

It is possible to show contextual information on the end points of the rendered path of a route segment by configuring the directions renderer to look for nearby Locations or POIs.

This is done by creating an appropriate `MPContextualInfoSettings` object and passing that to the Directions Renderer. If it is not set or is null, no contextual information will be shown.

The `MPContextualInfoSetting` can be applied on `MPDirectionsRenderer` by calling `useContentOfNearbyLocations(MPContextualInfoSettings)`. Like this:

```kotlin
//Sets the contextual info to be of locations that has the type "entries" and searches within a max distance of 30 meters from the end point of the current route segment
mpDirectionsRenderer?.useContentOfNearbyLocations(MPContextualInfoSettings.Builder()
            .setTypes(Collections.singletonList("entries"))
            .setMaxDistance(30.0)
            .build())
```

The defaults of the `ContextualInfoSettings` builder are `maxDistance` at 5 meters and the `ContextualInfoScope` as icon and name. No Types or Categories are set as default. Not applying any Types or Categories will make it search through all Locations to use as contextual information.
{% endtab %}
{% endtabs %}


# User's Location as Point of Origin

Often you may want to get directions starting from a user's actual current position, instead of from another fixed Location. The following code snippet gives an example on how to implement this.

To query for a route, create a `MPPoint` from the Latitude, longitude and the z-index of the user, and use that on the `DirectionsService.query` function, like this:

```kotlin
val directionsService = MPDirectionsService(mContext)
//Create an Origin MPPoint with the users latitude, longitude and Z-index. If no Z-index is available just use 0.0
val origin = MPPoint(userLatitude, userLongitude, userZIndex)
val destination = destinationLocation.getPoint()
directionsService.setRouteResultListener { route, error ->
  //Handle the route result here
}
directionsService.query(origin, destination)
```

`userLatitude`, `userLongitude`. `userZIndex` and `destinationLocation` are all placeholder variable names where you insert your data.

Further details on how user positioning works, and how to display it, can be found [here](https://docs.mapsindoors.com/blue-dot/).

This results in directions queries originating from the user's current location.a


# Wayfinding Instructions

Android v4

This tutorial will show how to work with the route model returned from a directions service call. It will also show how you can utilize interactions between the route rendering on the map, and text-based instructions showed in another view.

This tutorial will be based off the **MapsIndoors Samples** example found here: [WayFinding](https://github.com/MapsPeople/MapsIndoors-Android-Examples/tree/main/MapsIndoorsSamples/app/src/main/java/com/mapspeople/mapsindoorssamples/ui/wayfinding).

An example of the view XML file for the `WayfindingFragment` this guide will use can be found here: [Wayfinding view](https://github.com/MapsPeople/MapsIndoors-Android-Examples/blob/main/MapsIndoorsSamples/app/src/main/res/layout/fragment_wayfinding.xml).

First, create variables for `MPLocation` and `MPRoute` objects to use later in describing wayfinding. Also create a Variable for `MPDirectionsRenderer` so we can control rendering through changes in the `ViewPager`.

[WayfindingFragment.kt](https://github.com/MapsPeople/MapsIndoors-Android-Examples/blob/main/MapsIndoorsSamples/app/src/main/java/com/mapspeople/mapsindoorssamples/ui/wayfinding/WayfindingFragment.kt#L31-L32)

```kotlin
private var mRoute: MPRoute? = null
private var mLocation: MPLocation? = null
```

Next step we will create the `Fragment` that will contain a short description of each Leg of the route inside the `ViewPager`

An example of the view XML file for the `RouteLegFragment`, that this guide will use, can be found here: [RouteLeg view](https://github.com/MapsPeople/MapsIndoors-Android-Examples/blob/main/MapsIndoorsSamples/app/src/main/res/layout/fragment_route_leg.xml).

We will start by adding the code inside the `WayfindingFragment`.

First, start by changing the code inside `onCreateView`.

[WayfindingFragment.kt](https://github.com/MapsPeople/MapsIndoors-Android-Examples/blob/main/MapsIndoorsSamples/app/src/main/java/com/mapspeople/mapsindoorssamples/ui/wayfinding/WayfindingFragment.kt#L36-L57)

```kotlin
override fun onCreateView(view: View, @Nullable savedInstanceState: Bundle?) {
    _binding = FragmentWayfindingBinding.inflate(inflater, container, false)

    MapsIndoors.load(requireActivity().applicationContext, "gettingstarted", null)

    val routeLegAdapter = RouteCollectionAdapter(this)
    val viewPager = binding.stepViewPager
    viewPager.adapter = routeLegAdapter
    viewPager.registerOnPageChangeCallback(object : ViewPager2.OnPageChangeCallback() {
        override fun onPageSelected(position: Int) {
            super.onPageSelected(position)
        }
    })

    val root: View = binding.root
    val supportMapFragment = childFragmentManager.findFragmentById(R.id.map) as SupportMapFragment
    mMapView = supportMapFragment.view
    supportMapFragment.getMapAsync(this)
    return root
}
```

Next we will create `FragmentStateAdapter` that will be used on the `ViewPager` to contain `RouteLegFragments`

[WayfindingFragment.kt](https://github.com/MapsPeople/MapsIndoors-Android-Examples/blob/main/MapsIndoorsSamples/app/src/main/java/com/mapspeople/mapsindoorssamples/ui/wayfinding/WayfindingFragment.kt#L169-L197)

```kotlin
inner class RouteCollectionAdapter(fragment: Fragment) : FragmentStateAdapter(fragment) {
    override fun getItemCount(): Int {
        mRoute?.legs?.let { legs->
            return legs.size
        }
        return 0
    }

    override fun createFragment(position: Int): Fragment {
        if (position == mRoute?.legs?.size!! - 1) {
            return RouteLegFragment.newInstance("Walk to " + mLocation?.name, mRoute?.legs!![position]?.distance?.toInt(), mRoute?.legs!![position]?.duration?.toInt())
        } else {
            var leg = mRoute?.legs!![position]
            var firstStep = leg.steps.first()
            var lastFirstStep = mRoute?.legs!![position + 1].steps.first()
            var lastStep = mRoute?.legs!![position + 1].steps.last()

            var firstBuilding = MapsIndoors.getBuildings()?.getBuilding(firstStep.startPoint.latLng)
            var lastBuilding  = MapsIndoors.getBuildings()?.getBuilding(lastStep.startPoint.latLng)
            return if (firstBuilding != null && lastBuilding != null) {
                RouteLegFragment.newInstance(getStepName(lastFirstStep, lastStep), leg.distance.toInt(), leg.duration.toInt())
            }else if (firstBuilding != null) {
                RouteLegFragment.newInstance("Exit: " + firstBuilding.name,  leg.distance.toInt(), leg.duration.toInt())
            }else {
                RouteLegFragment.newInstance("Enter: " + lastBuilding?.name,  leg.distance.toInt(), leg.duration.toInt())
            }
        }
    }
}
```

Let's create a method to textually describe each Leg. This method creates a string that takes the first and last step of the next leg to create a description for the user on what to do at the end of the currently shown leg. You will also create a method to get a list of the different highway types the route can give the user. These are found as enums through the `MPHighway` class in the MapsIndoors SDK.

[WayfindingFragment.kt](https://github.com/MapsPeople/MapsIndoors-Android-Examples/blob/main/MapsIndoorsSamples/app/src/main/java/com/mapspeople/mapsindoorssamples/ui/wayfinding/WayfindingFragment.kt#L120-L167)

```kotlin
fun getStepName(startStep: MPRouteStep, endStep: MPRouteStep): String {
    val startStepZindex: Double = startStep.startLocation!!.zIndex
    val startStepFloorName: String = startStep.startLocation.floorName!!
    var highway: String? = null
    for (actionName in getActionNames()) {
        if (startStep.highway == actionName) {
            highway = if (actionName == MPHighway.STEPS) {
                "stairs"
            } else {
                actionName
            }
        }
    }
    if (highway != null) {
        return java.lang.String.format(
            "Take %s to %s %s",
            highway,
            "level",
            if (endStep.endLocation.floorName!!.isEmpty()) endStep.endLocation.zIndex else endStep.endLocation.floorName
        )
    }
    if (startStepFloorName == endStep.endLocation.floorName) {
        return "Walk to next step"
    }
    val endStepFloorName: String = endStep.endLocation.floorName!!
    return if (endStepFloorName.isEmpty()) java.lang.String.format(
        "Level %s to %s",
        startStepFloorName.ifEmpty { startStepZindex },
        endStep.endPoint.floorIndex
    ) else String.format(
        "Level %s to %s",
        startStepFloorName.ifEmpty { startStepZindex },
        endStepFloorName
    )
}

private fun getActionNames(): ArrayList<String> {
    val actionNames: ArrayList<String> = ArrayList()
    actionNames.add(MPHighway.ELEVATOR)
    actionNames.add(MPHighway.ESCALATOR)
    actionNames.add(MPHighway.STEPS)
    actionNames.add(MPHighway.TRAVELATOR)
    actionNames.add(MPHighway.RAMP)
    actionNames.add(MPHighway.WHEELCHAIRLIFT)
    actionNames.add(MPHighway.WHEELCHAIRRAMP)
    actionNames.add(MPHighway.LADDER)
    return actionNames
}
```

Now, lets create the `RouteLegFragment` to give context for the Legs in the `WayfindingFragment`

[RouteLegFragment.kt](https://github.com/MapsPeople/MapsIndoors-Android-Examples/blob/main/MapsIndoorsSamples/app/src/main/java/com/mapspeople/mapsindoorssamples/ui/wayfinding/RouteLegFragment.kt#L47-L55)

```kotlin
private var mStep: String? = null
private var mDuration: Int? = null
private var mDistance: Int? = null

companion object {
    @JvmStatic
    fun newInstance(step: String, distance: Int?, duration: Int?) =
        RouteLegFragment().apply {
            mStep = step
            mDistance = distance
            mDuration = duration
        }
}
```

You must also update the `onViewCreated` method to use the new views added earlier in the tutorial.

[RouteLegFragment.kt](https://github.com/MapsPeople/MapsIndoors-Android-Examples/blob/main/MapsIndoorsSamples/app/src/main/java/com/mapspeople/mapsindoorssamples/ui/wayfinding/RouteLegFragment.kt#L29-L47)

```kotlin
override fun onViewCreated(view: View, savedInstanceState: Bundle?) {
    super.onViewCreated(view, savedInstanceState)
    binding.stepTextView.text = mStep

    if (Locale.getDefault().country == "US") {
        binding.distanceTextView.text = (mDistance?.times(3.281))?.toInt().toString() + " feet"
    }else {
        binding.distanceTextView.text = mDistance?.toString() + " m"
    }
    mDuration?.let {
        if (it < 60) {
            binding.durationTextView.text = "$it sec"
        }else {
            binding.durationTextView.text = TimeUnit.MINUTES.convert(it.toLong(), TimeUnit.SECONDS).toString() + " min"
        }
    }
}
```

Now you have the revised UI for providing the user with a more explanatory route description when navigating. Now it needs to be rendered onto the map.

We will create a method named getRoute that queries a route between two location, we know exist on the current solution. When we receive the route we will assign the route to the fragment as well as calling `setRoute` on the `MPDirectionsRenderer` with the received Route. We will also notify the ViewPager that the route is updated with `notifyDataSetChanged`.

[WayfindingFragment.kt](https://github.com/MapsPeople/MapsIndoors-Android-Examples/blob/main/MapsIndoorsSamples/app/src/main/java/com/mapspeople/mapsindoorssamples/ui/wayfinding/WayfindingFragment.kt#L98-L118)

```kotlin
fun getRoute() {
    val directionsService = MPDirectionsService(requireContext())
    if (mDirectionsRenderer == null) {
        mDirectionsRenderer = MPDirectionsRenderer(mMapControl!!)
    }

    directionsService.setRouteResultListener { mpRoute, miError ->
        if (miError == null && mpRoute != null) {
            mRoute = mpRoute
            mDirectionsRenderer?.setRoute(mpRoute)
            requireActivity().runOnUiThread {
                binding.stepViewPager.adapter?.notifyDataSetChanged()
            }
        }
    }
    val location = MapsIndoors.getLocationById("5a07435a4e074edc9396b2ff")
    mLocation = MapsIndoors.getLocationById("24ede0c9a5004a148bd01d96")
    if (location != null && mLocation != null) {
        directionsService.query(location.point, mLocation!!.point)
    }
}
```

To change the routing when swapping between tabs on the viewpager, use the call back that we added further up inside the `onViewCreated` of `NavigationFragment`.

[WayfindingFragment.kt](https://github.com/MapsPeople/MapsIndoors-Android-Examples/blob/main/MapsIndoorsSamples/app/src/main/java/com/mapspeople/mapsindoorssamples/ui/wayfinding/WayfindingFragment.kt#L41-L50)

```kotlin
val routeLegAdapter = RouteCollectionAdapter(this)
val viewPager = binding.stepViewPager
viewPager.adapter = routeLegAdapter
viewPager.registerOnPageChangeCallback(object : ViewPager2.OnPageChangeCallback() {
    override fun onPageSelected(position: Int) {
        super.onPageSelected(position)
        mDirectionsRenderer?.selectLegIndex(position)
        mDirectionsRenderer?.selectedLegFloorIndex
    }
})
```

You should now have a Fragment with a map that has a route rendered on it. With descriptions of each Leg of the Route inside a ViewPager that will display the Leg related to the page that is viewed.

The full working example can be found here: [WayFinding](https://github.com/MapsPeople/MapsIndoors-Android-Examples/tree/main/MapsIndoorsSamples/app/src/main/java/com/mapspeople/mapsindoorssamples/ui/wayfinding).


# See Route Element Details

Android v4

In this tutorial we will request a route and list the route parts. A MapsIndoors route is made of one or more legs, each containing one or more steps.

Start by creating a `BaseAdapter` implementation with a `MPRoute` property, and include all the required functions.

```kotlin
class RouteListAdapter(private val context: Context) : BaseAdapter() {
    private var route: MPRoute? = null
 
    override fun getCount(): Int {
        TODO("Not yet implemented")
    }

    override fun getItem(position: Int): Any {
        TODO("Not yet implemented")
    }

    override fun getItemId(position: Int): Long {
        TODO("Not yet implemented")
    }

    override fun getView(position: Int, convertView: View?, parent: ViewGroup?): View {
        TODO("Not yet implemented")
    }
}
```

Inside the `init` section, setup a directions service, call the directions service and save the route result to your `route` property

```kotlin
init {
    val origin = MPPoint(57.057917, 9.950361, 0.0)
    val destination = MPPoint(57.058038, 9.950509, 1.0)
    val service = MPDirectionsService()
    service.setRouteResultListener { route, error ->
        route?.let {
            this.route = it
            notifyDataSetChanged()
        }
        error?.let {
            Log.e("RouteListAdapter", it.toString())
        }
    }
    service.query(origin, destination)
}
```

Override the `getCount` function to return the number of steps

```kotlin
override fun getCount(): Int {
    return route?.collapsedSteps?.size ?: 0
}
```

Override the `getView` function to create your views that should be displayed in the list

```kotlin
override fun getView(position: Int, convertView: View?, parent: ViewGroup?): View {

    //inflate you view, in this example we will just use a textView
    val view = TextView(context)

    view.text = route?.let {
        "step #$position: ${route?.collapsedSteps?.get(position)?.htmlInstructions}"
    } ?: "No Route"

    return view
}
```

Override `getItem` and `getItemId` to let click events work corretly

```kotlin
override fun getItem(position: Int): MPRouteStep {
    return route?.collapsedSteps?.get(position) ?: throw IllegalStateException("Cannot select step that does not exist")
}

override fun getItemId(position: Int): Long {
    return 0L
}
```

Now you can add the adapter to your `ListView` and show the route elements

```kotlin
val routeAdapter = RouteListAdapter()
listview.adapter = routeAdapter
```


# Using multi-stop navigation

Multi-stop navigation has been introduced with the release of 4.8.0. This allows users to be navigated to multiple stops within a single route.

### Querying a multi-stop route

To query a multistop route a new overload `MPDirectionsService.query` has been introduced `MPDirectionsService.query(from: MPPoint, to: MPPoint, stops: List<MPPoint>?, optimize: Boolean)`.

<pre class="language-kotlin"><code class="lang-kotlin">private var directionsService: MPDirectionsService = MPDirectionsService()

//Example of querying an optimized route with multiple stops
fun getRoute() {
    if (directionsService != null) {
        directionsService = MPDirectionsService()
<strong>    }
</strong><strong>    //Setting listener to receive the queried route
</strong><strong>    directionsService.setRouteResultListener { route, error ->
</strong><strong>        if (error == null &#x26;&#x26; route != null) {
</strong>            //Route is received
        } else {
            Log.i("Directions", "Error: $error")
        }
<strong>    }
</strong><strong>    //Creating variables to use for the query
</strong><strong>    val origin = MPPoint(57.05800975, 9.949916517)
</strong>    val destination = MPPoint(57.058278, 9.9512196, 10.0)
    val stops = listOf(MPPoint(57.0582701, 9.9508396, 0.0), MPPoint(57.0580431, 9.9505475, 0.0), MPPoint(57.0580843, 9.9506085, 10.0))
    
    directionsService.query(origin, destination, stops, true)
}
</code></pre>

### Showing and configuring a multi-stop route on the map

With the introduction of the multi-stop routes. There has also been added new functionality to the `MPDirectionsRenderer` to facilitate the new multi-stop routes.

You can still render the route as a Route with stops, using `setRoute(route: MPRoute)` on the DirectionsRenderer. But the interface of the `MPDirectionsRenderer` has been expanded with a `defaultStopIcon` as well as an overload of: `setRoute(route: MPRoute, icons: HashMap<Integer, MPRouteStopIconProvider>?)`

<figure><img src="/files/01KONsA5CgAK3t4AmVB8" alt="" width="375"><figcaption><p>By default route stops will be shown as a red pin with numbers</p></figcaption></figure>

The `defaultStopIcon` can be configured to show any image. It can also be set to null, to not show any icon for the stops on the Route. We supply the `MPRouteStopIconConfig` that allows you to customize the default pin to fit your application.

```kotlin
//Changing the default icon to be blue, with a Meeting Room label and with no number inside the pin
val defaultRouteStopIcon = MPRouteStopIconConfig.Builder(myContext)
                                .setColor(Color.BLUE)
                                .setNumbered(false)
                                .setLabel("Meeting Room")
                                .build()
directionsRenderer?.setDefaultRouteStopIconConfig(defaultRouteStopIcon)
```

<figure><img src="/files/qbdDHwMlmRoHxJvg0cNs" alt="" width="375"><figcaption><p>Customized MPRouteStopIcon</p></figcaption></figure>

To use your own images, you can extend the MPRouteStopIconProvider with your own class. Here is an example using a bitmap for the image

```kotlin
class BitmapRouteStopIcon(val image: Bitmap) : MPRouteStopIconProvider() {
    override fun getImage(): Bitmap? {
        return image
    }
}
```

#### Adding a custom image to a specific waypoint

It is also possible to render an image specific to a single stop. By using `setRoute(route: MPRoute, icons: HashMap<Integer, MPRouteStopIconProvider>?)`

```kotlin
val stopIcons = mapOf(2 to MPRouteStopIconConfig.Builder(this).setColor(Color.BLUE).build())
directionsRenderer?.setRoute(route, HashMap(stopIcons))
```

Here we will show a blue icon for the third stop. Leaving the first two indexes as null, means that the renderer will use the `defaultStopIcon`. If you want to render a specific known stop on an optimized route. You can find the ordering of the stops on an optimized route through `MPRoute.orderedStopIndexes`.


# Searching

Searching through your MapsIndoors data is an integral part of a great user experience with your maps. Users can look for places to go, or filter what is shown on the map.

Searches work on all MapsIndoors geodata. It is up to you to create a search experience that fits your use case. To aid you in this, there are a range of filters you can apply to the search queries to get the best results. E.g. you can filter by Categories, search only a specific part of the map or search near a Location.

All three return a list of Locations from your Solution matching the parameters they are given. The results are ranked upon the 3 following factors:

* If a "near" parameter is set, how close is the origin point to the result?
* How well does the search input text match the text of the result (using the "Levenshtein distance" algorithm)?
* Which kind of geodata is the result (e.g. Buildings are ranked over POIs)?

This means that the first item in the search result list will be the one matching the 3 factors best and so forth.

See the full list of parameters:

| Parameter  | Description                                                                                                                                 | Class    |
| ---------- | ------------------------------------------------------------------------------------------------------------------------------------------- | -------- |
| take       | Max number of Locations to get                                                                                                              | MPFilter |
| Skip       | Skip the first number of entries                                                                                                            | MPFilter |
| categories | A list of Categories to limit the search to                                                                                                 | MPFilter |
| Parents    | A list of Building or Venue IDs to limit the search to                                                                                      | MPFilter |
| Types      | A list of Types to limit the search to                                                                                                      | MPFilter |
| Bounds     | Limits the result of Locations to a bounding area                                                                                           | MPFilter |
| Floor      | Limits the result of Locations to be on a specific Floor                                                                                    | MPFilter |
| Near       | Sorts the list of Locations on which Location is nearest the point given                                                                    | MPQuery  |
| Depth      | The Depth property makes it possible to get "x" amount of descendants to the given parent. The default for this is 1 (eg. Building > Floor) |          |

#### Example of Creating a Search Query <a href="#example-of-creating-a-search-query" id="example-of-creating-a-search-query"></a>

{% tabs %}
{% tab title="Java" %}
{% code overflow="wrap" lineNumbers="true" %}

```java
void findRestroom() {
    //Here we will create an empty query because we are only interested in getting locations that match a category. If you want to be more specific here where you can add a query text like "Unisex Restroom"
    MPQuery mpQuery = new MPQuery
            .Builder()
            .build();

    List<String> categories = new ArrayList<>();
    categories.add("RESTROOMS");

    // Init the filter builder and build a filter, the criteria in this case we want maximum 50 restrooms
    MPFilter mpFilter = new MPFilter
            .Builder()
            .setCategories(categories)
            .setTake(50)
            .build();

    MapsIndoors.getLocationsAsync(mpQuery, mpFilter, (locations, error) -> {
        //Check if there is an error and iterate through the list to do what you need with the search
    });
}
```

{% endcode %}
{% endtab %}

{% tab title="Kotlin" %}
{% code overflow="wrap" lineNumbers="true" %}

```kotlin
fun findRestroom() {
    //Here we will create an empty query because we are only interrested in getting locations that match a category. If you want to be more specific here where you can add a query text like "Unisex Restroom"
    val mpQuery = MPQuery.Builder()
        .build()
    val categories: MutableList<String> = ArrayList()
    categories.add("RESTROOMS")

    // Init the filter builder and build a filter, the criteria in this case we want maximum 50 restrooms
    val mpFilter = MPFilter.Builder()
        .setCategories(categories)
        .setTake(50)
        .build()

    MapsIndoors.getLocationsAsync(mpQuery, mpFilter) { locations: List<MPLocation?>?, error: MIError? ->
        //Check if there is an error and iterate through the list to do what you need with the search
    }
}
```

{% endcode %}
{% endtab %}
{% endtabs %}

### Display Search Results on the Map​ <a href="#display-search-results-on-the-map" id="display-search-results-on-the-map"></a>

When displaying the search results it is helpful to filter the map to only show matching Locations. Matching Buildings and Venues will still be shown on the map, as they give context to the user, even if they aren't selectable on the map.

#### Example of Filtering the Map to Display Searched Locations on the Map <a href="#example-of-filtering-the-map-to-display-searched-locations-on-the-map" id="example-of-filtering-the-map-to-display-searched-locations-on-the-map"></a>

{% tabs %}
{% tab title="Java" %}
{% code overflow="wrap" lineNumbers="true" %}

```java
MapsIndoors.getLocationsAsync(mpQuery, mpFilter, (locations, error) -> {
    if (locations != null && !locations.isEmpty()) {
        //Query with the locations from the query result. Use default camera behavior
        mMapControl.setFilter(locations, MPFilterBehavior.DEFAULT);
    }
});
```

{% endcode %}
{% endtab %}

{% tab title="Kotlin" %}
{% code overflow="wrap" lineNumbers="true" %}

```kotlin
MapsIndoors.getLocationsAsync(mpQuery, mpFilter) { locations, error ->
    //Query with the locations from the query result. Use default camera behavior
    mMapControl.setFilter(locations, MPFilterBehavior.DEFAULT)
};
```

{% endcode %}
{% endtab %}
{% endtabs %}

### Clearing the Map of Your Filter​ <a href="#clearing-the-map-of-your-filter" id="clearing-the-map-of-your-filter"></a>

After displaying the search results on your map you can then clear the filter so that all Locations show up on the map again.

#### Example of Clearing Your Map Filter to Show All Locations Again <a href="#example-of-clearing-your-map-filter-to-show-all-locations-again" id="example-of-clearing-your-map-filter-to-show-all-locations-again"></a>

{% tabs %}
{% tab title="Java" %}
{% code overflow="wrap" lineNumbers="true" %}

```java
mMapControl.clearFilter();
```

{% endcode %}
{% endtab %}

{% tab title="Kotlin" %}
{% code overflow="wrap" lineNumbers="true" %}

```kotlin
mMapControl.clearFilter()
```

{% endcode %}
{% endtab %}
{% endtabs %}

### Searching for Nested Categories <a href="#searching-for-nested-categories" id="searching-for-nested-categories"></a>

If your solution uses nested categories, searching for them is now much more intuitive. When you search for a parent category, all of its sub-categories are automatically included in the search – no extra setup is required.

#### Understanding Nested Categories

Suppose you have three categories: `Restroom`, `Unisex`, and `Handicap`. Here, `Unisex` and `Handicap` are sub-categories of `Restroom`. This hierarchy allows you to organize your data more flexibly and makes searching more powerful.

Before searching, you might want to inspect the category structure in the SDK. For example, you can check if a category has specific children, or list all sub-categories:

{% code overflow="wrap" lineNumbers="true" %}

```kotlin
val categoryCollection = MapsIndoors.getCategories()

// check whether a category has a named child category
val isChild = categoryCollection?.getCategory("Restroom")?.childKeys?.contains("Unisex")
if (isChild == true) {
    print("Restroom has a child with the key 'Unisex'!")
}

// fetch sub-categories with the child keys
val keys = categoryCollection?.getCategory("Restroom").childKeys
for (key in keys ?: emptyList()) {
    val category = categoryCollection?.getCategory(key)
    if (category != null) {
        print("Restroom has category ${category.value} as a child!")
    }
}
```

{% endcode %}

#### Searching with Nested Categories

When you perform a search for a parent category, such as `Restroom`, the SDK will automatically include all its sub-categories (`Unisex`, `Handicap`, etc.) in the search results. This means you only need to specify the parent category in your filter, and all relevant locations will be found.

{% code overflow="wrap" lineNumbers="true" %}

```kotlin
// we are only searching for the category, so lets set an empty query
val query = MPQuery.Builder().build()
// add the super-category Restroom to the list of categories
val filter = MPFilter.Builder().setCategories(listOf("Restroom")).build()

MapsIndoors.getLocationsAsync(query, filter) { locations, error -> 

    // lets see if we have found any Locations that have the type "Unisex"
    if (locations?.any { loc -> loc.categories?.any { cat -> cat == "Unisex" } == true } == true) {
        // success
        print("Locations with Unisex category found")
    }
}
```

{% endcode %}

> **Note:** When you search for a parent category, all of its sub-categories are always included in the results, there is no way to limit the search to only the parent category itself. If you need more granular control (for example, to only return locations with a specific sub-category), consider organizing your categories so that each search target has its own unique sub-category. This way, you can search for exactly the locations you want by specifying the appropriate sub-category in your filter.


# Searching on a Map

Use the `MapsIndoors.getLocationsAsync()` method to search for content in your MapsIndoors Solution.

#### Setup a query for the nearest single best matching location and display the result on the map​ <a href="#setup-a-query-for-the-nearest-single-best-matching-location-and-display-the-result-on-the-map" id="setup-a-query-for-the-nearest-single-best-matching-location-and-display-the-result-on-the-map"></a>

```java
// Init the query builder and build a query, in this case we will query for coffee machines ***/
MPQuery query = new MPQuery.Builder().
        setQuery("coffee machine").
        build();
// Init the filter builder and build a filter, the criteria in this case we want 1 coffee machine from the 1st floor
MPFilter filter = new MPFilter.Builder().
        setTake(1).
        setFloorIndex(1).
        build();
// Query the data
MapsIndoors.getLocationsAsync( query, filter, ( locs, err ) -> {
    if( locs != null && locs.size() != 0 ) {
        mMapControl.setFilter( locs, MPFilterBehavior.DEFAULT );
    }
} );
```

#### Setup a query for a group of locations and display the result on the map​ <a href="#setup-a-query-for-a-group-of-locations-and-display-the-result-on-the-map" id="setup-a-query-for-a-group-of-locations-and-display-the-result-on-the-map"></a>

```java
// Init the query builder and build a query, in this case we will query for all to toilets
MPQuery query = new MPQuery.Builder().
        setQuery("Toilet").
        build();
// Init the filter builder and build a filter, the criteria in this case we want maximum 50 toilets from the 1st floor
MPFilter filter = new MPFilter.Builder().
        setTake( 50 ).
        setFloorIndex( 1 ).
        build();
// Query the data
MapsIndoors.getLocationsAsync(query, filter, (locs, err) -> {
    if(locs != null && locs.size() != 0 ){
        mMapControl.setFilter( locs, MPFilterBehavior.DEFAULT );
    }
});
```

Please note that you are not guaranteed that the visible floor contains any search results, so that is why we change floor in the above example.


# Creating a Search Experience

This is an example of creating a simple search experience using MapsIndoors. We will create a map with a search button that leads to another Fragment that handles the search and selection. On selection of a location, we go back to the map and shows the selected location on the map.

First create a Fragment or Activity with a map and MapsIndoors loaded.

We will create a Fragment that will contain a textInput field and a RecyclerView that will show a list of `MPLocations` received from the search.

```kotlin
class FullscreenSearchFragment : Fragment() {
```

As we will be using a `RecyclerView` we will need to create a `RecyclerView Adapter` to show our Location results. In this guide we will hijack the Adapter from the Template app:

```kotlin
class MPSearchItemRecyclerViewAdapter : RecyclerView.Adapter<MPSearchItemRecyclerViewAdapter.ViewHolder>() {
    private var mLocations: List<MPLocation> = ArrayList()
    private lateinit var context: Context
    private var mOnLocationSelectedListener: OnLocationSelectedListener? = null
    override fun onCreateViewHolder(parent: ViewGroup, viewType: Int): ViewHolder {
        context = parent.context
        return ViewHolder(FragmentSearchItemBinding.inflate(LayoutInflater.from(parent.context), parent, false))
    }
    override fun onBindViewHolder(holder: ViewHolder, position: Int) {
        val item = mLocations[position]
        var iconUrl = getTypeIcon(item)
        iconUrl?.let {
            MapsIndoors.getImageProvider().loadImageAsync(it) { bitmap, error ->
                if (bitmap != null && error == null) {
                    holder.icon.setImageBitmap(bitmap)
                }
            }
        }
        holder.nameView.text = item.name
        if (item.floorName != null && item.buildingName != null) {
            val buildingName = MapsIndoors.getBuildings()?.getBuilding(item.point.latLng)?.name
            if (buildingName != null) {
                holder.subTextView.text = "Floor: " + item.floorName + " - " + buildingName
            }else {
                holder.subTextView.text = "Floor: " + item.floorName + " - " + item.buildingName
            }
        }else {
            holder.subTextView.visibility = View.GONE
        }
        holder.itemView.setOnClickListener {
            if (mOnLocationSelectedListener != null) {
                mOnLocationSelectedListener?.onLocationSelected(item)
            }
        }
    }
    private fun getTypeIcon(mpLocation: MPLocation): String? {
        MapsIndoors.getSolution()?.let {
            it.types?.forEach { type ->
                if (mpLocation.type?.equals(type.name, true) == true) {
                    return type.icon
                }
            }
        }
        return null
    }
    fun setOnLocationSelectedListener(onLocationSelectedListener: OnLocationSelectedListener) {
        mOnLocationSelectedListener = onLocationSelectedListener
    }
    override fun getItemCount(): Int = mLocations.size
    fun setLocations(locations: List<MPLocation>) {
        mLocations = locations;
    }
    fun clear() {
        mLocations = ArrayList()
        notifyDataSetChanged()
    }
    inner class ViewHolder(binding: FragmentSearchItemBinding) :
        RecyclerView.ViewHolder(binding.root) {
        val icon: ImageView = binding.locationIconView
        val nameView: TextView = binding.locationName
        val subTextView: TextView = binding.locationSubtext
        override fun toString(): String {
            return super.toString() + " '" + subTextView.text + "'"
        }
    }
}
```

Setup member variables for `FullscreenSearchFragment`:

* A RecyclerView to contain the locations
* The Adapter and LayoutManager for the RecyclerView
* Some view components

```kotlin
private lateinit var mRecyclerView: RecyclerView
private lateinit var mLinearLayoutManager: LinearLayoutManager
private val mAdapter: MPSearchItemRecyclerViewAdapter = MPSearchItemRecyclerViewAdapter()
private lateinit var searchInputTextView: TextInputEditText
private var searchHandler: Handler? = null
```

Init and setup the `RecyclerView`:

```kotlin
mRecyclerView = binding.searchList
mLinearLayoutManager = LinearLayoutManager(requireContext())
mRecyclerView.apply {
    layoutManager = mLinearLayoutManager
    adapter = mAdapter
}
```

Init and setup the view components to handle searching inside the `onViewCreated`

```kotlin
searchInputTextView = binding.searchInputEditText
val imm = requireActivity().getSystemService(Activity.INPUT_METHOD_SERVICE) as InputMethodManager
searchInputTextView.addTextChangedListener {
    searchHandler = Handler(Looper.myLooper()!!)
    searchHandler!!.postDelayed(searchRunner, 1000)
}
searchInputTextView.setOnEditorActionListener { textView, i, keyEvent ->
    if (i == EditorInfo.IME_ACTION_DONE || i == EditorInfo.IME_ACTION_SEARCH) {
        if (textView.text.isNotEmpty()) {
            search(textView.text.toString())
        }
        //Making sure keyboard is closed.
        imm.hideSoftInputFromWindow(textView.windowToken, 0)
        return@setOnEditorActionListener true
    }
    return@setOnEditorActionListener false
}
```

create a Runnable to execute a search

```kotlin
private val searchRunner: Runnable = Runnable {
    val text = searchInputTextView.text
    if (text?.length!! >= 2) {
        search(text.toString())
    }
}
```

Add a listener to the Adapter for when a user selects a location, to navigate back to the map and show the selected location. Here we use navigation together with a bundle to tell the other fragment of the selected location

```kotlin
mAdapter.setOnLocationSelectedListener { location ->
    if (location != null) {
        val bundle = Bundle()
        bundle.putString("locationId", location.locationId)
        findNavController().navigate(R.id.action_nav_search_fullscreen_to_nav_search, bundle)
        return@setOnLocationSelectedListener true
    }
    return@setOnLocationSelectedListener false
}
```

[See the sample in FullscreenSearchFragment.kt](https://github.com/MapsPeople/MapsIndoors-Android-Examples/blob/main/MapsIndoorsSamples/app/src/main/java/com/mapspeople/mapsindoorssamples/ui/search/FullscreenSearchFragment.kt) Now we will implement the `FullscreenSearchFragment` together with our Fragment or Activity containing a MapsIndoors Map. Add a Button to open the `FullscreenSearchFragment` inside your Activity or Fragment view and a assign a Click listener to it.

```kotlin
binding.searchButton.setOnClickListener {
    openSearchFragment()
}
```

Create the `openSearchFragment` method to navigate to the `FullScreenSearchFragment`

```kotlin
private fun openSearchFragment() {
    val navController = findNavController()
    navController.navigate(R.id.action_nav_search_to_nav_search_fullscreen)
}
```

Finally create a way to handle the selected location when a user is navigated to your fragment again. How this example is set up the Map will be reloaded when navigated to it. Therefor we will handle the selection after `MapControl` is created.

```kotlin
MapControl.create(mapConfig) { mapControl: MapControl?, miError: MIError? ->
    mMapControl = mapControl
    //Enable Live Data on the map
    if (miError == null) {
        var locationId = arguments?.get("locationId") as String?
        if (locationId != null) {
            mMapControl?.selectLocation(locationId, MPSelectionBehavior.DEFAULT)
        }else {
            //No errors so getting the first venue (in the white house solution the only one)
            val venue = MapsIndoors.getVenues()?.defaultVenue
            activity?.runOnUiThread {
                if (venue != null) {
                    //Animates the camera to fit the new venue
                    mMap!!.animateCamera(
                        CameraUpdateFactory.newLatLngBounds(
                            LatLngBoundsConverter.toLatLngBounds(venue.bounds!!),
                            19
                        )
                    )
                }
            }
        }
    }
}
```

[See the sample in SearchFragment.kt](https://github.com/MapsPeople/MapsIndoors-Android-Examples/blob/main/MapsIndoorsSamples/app/src/main/java/com/mapspeople/mapsindoorssamples/ui/search/SearchFragment.kt)


# Additional Location Details

MapsIndoors locations can have a variety of additional details, such as phone numbers, websites, emails, and opening hours. These details can be managed in the CMS, read [this article](https://github.com/MapsPeople/documentation/blob/main/sdks-and-frameworks/android/products/cms/additional-location-details.md) for how to set them up or edit them.

This guide shows how to access and display these details in your Android app, both in code and in a Jetpack Compose UI.

***

## Accessing Additional Details in Code

Each `MPLocation` object contains an `additionalDetails` property, which is a list of detail objects. Each detail has a type, value, key, and other fields. You can iterate through these details and handle them according to their type.

{% code title="Print all details example" overflow="wrap" lineNumbers="true" %}

```kotlin
fun printDetails(location: MPLocation) {
    // Get the list of additional details from the location
    val details = location.additionalDetails
    if (details.isNullOrEmpty()) return // No details to print

    for (detail in details) {
        // Only print active details
        if (detail.active != true) continue

        // Print a message depending on the detail type
        print(
            when (detail.detailType) {
                MPDetailType.Text ->
                    // Text details (e.g. description)
                    "${location.name} additional information: ${detail.value}"
                MPDetailType.Phone ->
                    // Phone details (all details have a key for identification)
                    "${location.name}'s phone number (${detail.key}): ${detail.value}"
                MPDetailType.URL ->
                    // URL details (details can have user friendly display text)
                    "${location.name}'s website: ${detail.value} (label: ${detail.displayText})"
                MPDetailType.Email ->
                    // Email details (details can be supplied with an icon URL)
                    "${location.name}'s email: ${detail.value} (icon: ${detail.icon})"
                MPDetailType.OpeningHours ->
                    // Opening hours (has a special field 'openingHours' that is only used for this)
                    "${location.name} opening hours: ${detail.openingHours?.toString()}"
                null ->
                    // Unknown detail type
                    "Unknown detail type for ${location.name}"
            }
        )
    }
}
```

{% endcode %}

> **Note:** A single location can have multiple details of the same type. Use unique keys to distinguish them.

### Filtering and Printing Specific Details

Your locations can have multiple details, in this case the location has multiple phone numbers: customer service and sales with the respective keys `customerService` and `sales`, you can filter and print them by key:

{% code title="Print specific phone numbers example" overflow="wrap" lineNumbers="true" %}

```kotlin
fun printPhoneNumbers(location: MPLocation) {
    // Get the list of additional details
    val details = location.additionalDetails
    if (details.isNullOrEmpty()) return

    // Filter for phone number details
    details.filter { it.detailType == MPDetailType.Phone }.forEach { phoneDetail ->
        // Print a message based on the key
        when (phoneDetail.key) {
            "customerService" -> print("Reach Customer Service: ${phoneDetail.value}")
            "sales" -> print("Reach Sales: ${phoneDetail.value}")
            else -> print("Reach ${phoneDetail.displayText} number: ${phoneDetail.value}")
        }
    }
}
```

{% endcode %}

***

## Displaying Additional Details in Jetpack Compose UI

You can present additional details in your app's UI using Jetpack Compose. Below are two examples: one for showing all phone numbers, and one for showing all details in a single list.

### Example: Show All Phone Numbers

{% code title="PhoneNumbersList composable" overflow="wrap" lineNumbers="true" %}

```kotlin
@Composable
fun PhoneNumbersList(location: MPLocation) {
    // Filter for phone number details
    val phoneDetails = location.additionalDetails
        ?.filter { it.detailType == MPDetailType.Phone }
        .orEmpty()

    if (phoneDetails.isEmpty()) {
        // Show a message if there are no phone numbers
        Text("No phone numbers available")
        return
    }

    // Display each phone number in a column
    Column {
        phoneDetails.forEach { detail ->
            // Choose a label based on the key
            val label = when (detail.key) {
                "customerService" -> "Customer Service"
                "sales" -> "Sales"
                else -> detail.displayText ?: "Other"
            }
            // Show the label and value
            Text("$label: ${detail.value}")
        }
    }
}
```

{% endcode %}

***

### Example: Show All Details in a Single UI

You can display all available details for a location in a single composable. This example shows phone numbers, emails, URLs, text, and opening hours in a unified list, with comments explaining each step:

{% code title="LocationDetailsList composable" overflow="wrap" lineNumbers="true" %}

```kotlin
@Composable
fun LocationDetailsList(location: MPLocation) {
    // Get all active details for the location
    val details = location.additionalDetails.orEmpty().filter { it.active == true }

    if (details.isEmpty()) {
        // Show a message if there are no details
        Text("No details available")
        return
    }

    // Display all details in a column, sorted by type for grouping
    Column {
        details.sortedBy { it.detailType?.ordinal ?: 0 }.forEach { detail ->
            when (detail.detailType) {
                MPDetailType.Phone -> {
                    // Show phone numbers with a label based on the key
                    val label = when (detail.key) {
                        "customerService" -> "Customer Service"
                        "sales" -> "Sales"
                        else -> detail.displayText ?: "Other Phone"
                    }
                    Text("$label: ${detail.value}")
                }
                MPDetailType.Email -> {
                    // Show email address
                    Text("Email: ${detail.value}")
                }
                MPDetailType.URL -> {
                    // Show website with display text if available
                    val label = detail.displayText ?: "Website"
                    Text("$label: ${detail.value}")
                }
                MPDetailType.Text -> {
                    // Show generic text info
                    Text("Info: ${detail.value}")
                }
                MPDetailType.OpeningHours -> {
                    // Show opening hours, or N/A if missing
                    Text("Opening hours: ${detail.openingHours?.toString() ?: "N/A"}")
                }
                else -> {
                    // Fallback for unknown types
                    Text("Other: ${detail.value}")
                }
            }
        }
    }
}
```

{% endcode %}

This composable will show all the different types of additional details for a location in a single list, making it easy to present all relevant information to the user.


# Switching Solutions

Some larger organisations may have not just multiple Venues, but also multiple Solutions in the MapsIndoors system. Therefore, it is naturally important to be able to switch between them.

At it's core, this is done simply by switching out the API key and reloading the system. However, there are a few more steps that can be done to ensure smooth transition between Solutions.

## Starting a Solution​ <a href="#starting-a-solution" id="starting-a-solution"></a>

To initialize MapsIndoors, do the following:

### Google Maps

{% tabs %}
{% tab title="Java" %}

```java
protected void onCreate(Bundle savedInstanceState) {
    ...
    mMapView = mapFragment.getView();
    MapsIndoors.load(getApplicationContext(), "YOUR_MAPSINDOORS_API_KEY", null);
    mapFragment.getMapAsync(this);
    ...
}
@Override
public void onMapReady(GoogleMap googleMap) {
    mMap = googleMap;

   if (mMapView != null) {
       initMapControl(mMapView);
   }
}
void initMapControl(View view) {
    MPMapConfig mapConfig = new MPMapConfig.Builder(this, mMap, getString(R.string.google_maps_key), view, true).build();
    MapControl.create(mapConfig, (mapControl, miError) -> {
        mMapControl = mapControl;
        if (miError == null) {
            //Orient your map to where you need data to be shown. This could be done by getting the default venue through MapsIndoors and panning the camera there
        }
    });
}
```

{% endtab %}

{% tab title="Kotlin" %}

```kotlin
override fun onCreate(savedInstanceState: Bundle?) {
    ...
    MapsIndoors.load(applicationContext, "YOUR_MAPSINDOORS_API_KEY", null)

    mapFragment.view?.let {
        mapView = it
    }
    ...
}
override fun onMapReady(googleMap: GoogleMap) {
    mMap = googleMap

    mapView?.let { view ->
        initMapControl(view)
    }
}
fun initMapControl(view: View) {
    MPMapConfig mapConfig = new MPMapConfig.Builder(this, mMap, getString(R.string.google_maps_key), view, true).build();
    //Creates a new instance of MapControl
    MapControl.create(config) { mapControl, miError ->
        if (miError == null) {
            mMapControl = mapControl!!
             //Orient your map to where you need data to be shown. This could be done by getting the default venue through MapsIndoors and panning the camera there
        }
    }
}
```

{% endtab %}
{% endtabs %}

### Mapbox

{% tabs %}
{% tab title="Java" %}

```java
protected void onCreate(Bundle savedInstanceState) {
    ...
    MapsIndoors.load(getApplicationContext(), "YOUR_MAPSINDOORS_API_KEY", null);
    ...
}
void initMapControl(View view) {
    MPMapConfig mapConfig = new MPMapConfig.Builder(this, mMapboxMap, mMapView, getString(R.string.mapbox_access_token),true).build();
    //Creates a new instance of MapControl
    MapControl.create(mapConfig, (mapControl, miError) -> {
        mMapControl = mapControl;
        if (miError == null) {
            //Orient your map to where you need data to be shown. This could be done by getting the default venue through MapsIndoors and panning the camera there
        }
    });
}
```

{% endtab %}

{% tab title="Kotlin" %}

```kotlin
override fun onCreate(savedInstanceState: Bundle?) {
    ...
    MapsIndoors.load(applicationContext, "YOUR_MAPSINDOORS_API_KEY", null)
    ...
}
fun initMapControl(view: View) {
    val config = MPMapConfig.Builder(this, mMap, mapView, getString(R.string.mapbox_access_token),true).build()
    //Creates a new instance of MapControl
    MapControl.create(config) { mapControl, miError ->
        if (miError == null) {
            //Orient your map to where you need data to be shown. This could be done by getting the default venue through MapsIndoors and panning the camera there
        }
    }
}
```

{% endtab %}
{% endtabs %}

## Switching Solutions​ <a href="#switching-solutions" id="switching-solutions"></a>

You switch Solutions by changing the active API key using `setAPIKey()`.

We recommend creating your own function to call in the future for this purpose, like the example here with `switchSolution()`:

### Google maps

{% tabs %}
{% tab title="Java" %}

```java
protected void switchSolution() {
    mMapControl.onDestroy();
    MapsIndoors.load(getApplication(), "YOUR_SECONDARY_API_KEY", null);
    mMapView.getMapAsync(this);
}
```

{% endtab %}

{% tab title="Kotlin" %}

```kotlin
private fun switchSolution() {
    mMapControl.onDestroy()
    MapsIndoors.load(applicationContext, "YOUR_SECONDARY_API_KEY", null)
    mMapView.getMapAsync(this)
}
```

{% endtab %}
{% endtabs %}

### Mapbox

{% tabs %}
{% tab title="Java" %}

```java
mMapControl.onDestroy();
MapsIndoors.load(getApplicationContext(), "YOUR_SECONDARY_API_KEY", null);
initMapControl(mMapBoxMap, mMapView);
```

{% endtab %}

{% tab title="Kotlin" %}

```kotlin
mMapControl.onDestroy()
MapsIndoors.load(applicationContext, "YOUR_SECONDARY_API_KEY", null)
initMapControl(mMapBoxMap, mMapView)
```

{% endtab %}
{% endtabs %}


# Caching & Offline Data

{% tabs %}
{% tab title="Java" %}
**Cacheable Data​**

MapsIndoors has three levels of caching:

1. **Basic Data**: All descriptions, geometries and metadata about POIs, rooms, areas, buildings and venues.
2. **Detailed Data**: The same as **Basic Data**, plus images referenced by the data.
3. **Full Dataset**: The same as **Detailed Data**, plus Map Tiles.

Full Dataset caching requires that Map Tiles are prepared specifically for this purpose. Contact MapsPeople in order to arrange this.

**Automatic Caching​**

Out of the box, MapsIndoors automatically caches all basic data for the **active** dataset on the device, whereas images and Map Tiles are cached only as they are used.

This means all MapsIndoors-specific data is cached automatically, but images are only cached after they have been needed for map display. Likewise, Map Tiles are only cached when needed for map display, so all parts of the map that has been shown are cached. Areas and Zoom Levels that have not been shown as part of user interaction are not cached.

**Tweaking Caching Behaviour**[**​**](https://docs.mapsindoors.com/offline-data#tweaking-caching-behaviour)

Applications have a few ways to change the default caching behaviour:

The synchronization process can be started manually:

```java
MapsIndoors.synchronizeContent((e) -> {
    ...
});
```

The level of caching can be changed:

```java
MPDataSetCache dataSet = MPDataSetCacheManager.getInstance().getDataSetByID("API KEY");
dataSet.setScope(mContext, MPDataSetCacheScope.DETAILED);
MPDataSetCacheManager.getInstance().synchronizeDataSets(Collections.singletonList(dataSet));
```

**Caching of Multiple Datasets​**

The most common use of MapsIndoors involves only one dataset, but for large deployments, data may be partitioned into multiple datasets.

Offline caching of multiple simultaneous datasets is fully supported, and is mostly limited by the available storage space on device.

**NOTE**: Only one dataset is active at any point in time.

Management of multiple datasets is done via `MPDataSetCacheManager`, which allows querying, adding, modifying and removing datasets.

**Listing Managed Datasets​**

All datasets currently managed are accessible via the `MPDataSetCacheManager`:

```java
for (MPDataSetCache dataSet : MPDataSetCacheManager.getInstance().getManagedDataSets()) {
    Log.i("dataset", dataSet.getSolutionId() + ": size " + dataSet.getCacheItem().getSyncSize());
}
```

This can be used to build a management user interface, and information about individual datasets can be accessed from the `MPDataSetCache` and `MPDataSetCacheItem` classes.

**Adding Datasets for Offline Caching​**

Datasets are scheduled for caching using `MPDataSetCacheManager`:

```java
MPDataSetCacheManager.getInstance().addDataSetWithCachingScope("API KEY", MPDataSetCacheScope.BASIC);
```

The current MapsIndoors API key is automatically added as a managed dataset with `MPDataSetCacheScope.BASIC`.

**Removing Datasets​**

Datasets are removed from caching using `MPDataSetCacheManager.getInstance().removeDataSetCache(MPDataSetCache);`:

```java
MPDataSetCacheManager.getInstance().removeDataSetCache(MPDataSetCache);
```

**NOTE:** The currently active dataset is not removed.

**Changing Caching Parameters​**

To change the extent of caching, for example in a management menu:

```java
MPDataSetCache dataSet = MPDataSetCacheManager.getInstance().getDataSetByID("API KEY");
dataSet.setScope(mContext, MPDataSetCacheScope.DETAILED);
MPDataSetCacheManager.getInstance().synchronizeDataSets(Collections.singletonList(dataSet));
```

**Determining the Caching Size of a Dataset**[**​**](https://docs.mapsindoors.com/offline-data#determining-the-caching-size-of-a-dataset)

The estimated and cached size of a dataset is available via:

```java
dataSet.getCacheItem().getCacheSize(mContext);
dataSet.getCacheItem().getSyncSize();
```

To refresh or get the size of a synced dataset:

```java
MPDataSetCacheManager.getInstance().getSyncSizesForDataSetCaches(Collections.singletonList(dataSet), this);
```

This is an asynchronous process, and a `MPDataSetCacheManagerSizeListener` is needed for getting information about progress and results.

**Synchronizing Data with MPDataSetCacheManager​**

The `MPDataSetCacheManager`allows for detailed control over which datasets are synchronized, and allows for cancellation:

```java
MPDataSetCacheManager dataSetCacheManager = MPDataSetCacheManager.getInstance();

// sync all managed datasets
dataSetCacheManager.synchronizeDataSets();

// sync specific datasets
dataSetCacheManager.synchronizeDataSets(dataSets);
```

{% endtab %}

{% tab title="Kotlin" %}
**Cacheable Data**[**​**](https://docs.mapsindoors.com/offline-data#cacheable-data-1)

MapsIndoors has three levels of caching:

1. **Basic Data**: All descriptions, geometries and metadata about POIs, rooms, areas, buildings and venues.
2. **Detailed Data**: The same as **Basic Data**, plus images referenced by the data.
3. **Full Dataset**: The same as **Detailed Data**, plus Map Tiles.

Full Dataset caching requires that Map Tiles are prepared specifically for this purpose. Contact MapsPeople in order to arrange this.

**Automatic Caching**[**​**](https://docs.mapsindoors.com/offline-data#automatic-caching-1)

Out of the box, MapsIndoors automatically caches all basic data for the **active** dataset on the device, whereas images and Map Tiles are cached only as they are used.

This means all MapsIndoors-specific data is cached automatically, but images are only cached after they have been needed for map display. Likewise, Map Tiles are only cached when needed for map display, so all parts of the map that has been shown are cached. Areas and Zoom Levels that have not been shown as part of user interaction are not cached.

**Tweaking Caching Behaviour**[**​**](https://docs.mapsindoors.com/offline-data#tweaking-caching-behaviour-1)

Applications have a few ways to change the default caching behaviour:

The synchronization process can be started manually:

```kotlin
MapsIndoors.synchronizeContent { error ->
    ...
}
```

The level of caching can be changed:

```kotlin
val dataset = MPDataSetCacheManager.getInstance().getDataSetByID("API KEY")
dataset?.setScope(mContext, MPDataSetCacheScope.DETAILED)
MPDataSetCacheManager.getInstance().synchronizeDataSets(Collections.singletonList(dataset))
```

**Caching of Multiple Datasets**[**​**](https://docs.mapsindoors.com/offline-data#caching-of-multiple-datasets-1)

The most common use of MapsIndoors involves only one dataset, but for large deployments, data may be partitioned into multiple datasets.

Offline caching of multiple simultaneous datasets is fully supported, and is mostly limited by the available storage space on device.

**NOTE**: Only one dataset is active at any point in time.

Management of multiple datasets is done via `MPDataSetCacheManager`, which allows querying, adding, modifying and removing datasets.

**Listing Managed Datasets**[**​**](https://docs.mapsindoors.com/offline-data#listing-managed-datasets-1)

All datasets currently managed are accessible via the `MPDataSetCacheManager`:

```kotlin
for (dataSet in MPDataSetCacheManager.getInstance().managedDataSets) {
    Log.i("dataset", dataSet.solutionId + ": size " + dataSet.cacheItem.syncSize)
}
```

This can be used to build a management user interface, and information about individual datasets can be accessed from the `MPDataSetCache` and `MPDataSetCacheItem` classes.

**Adding Datasets for Offline Caching**[**​**](https://docs.mapsindoors.com/offline-data#adding-datasets-for-offline-caching-1)

Datasets are scheduled for caching using `MPDataSetCacheManager`:

```kotlin
MPDataSetCacheManager.getInstance()
        .addDataSetWithCachingScope("API KEY", MPDataSetCacheScope.BASIC)
```

The current MapsIndoors API key is automatically added as a managed dataset with `MPDataSetCacheScope.BASIC`.

**Removing Datasets**[**​**](https://docs.mapsindoors.com/offline-data#removing-datasets-1)

Datasets are removed from caching using `MPDataSetCacheManager.getInstance().removeDataSetCache(MPDataSetCache);`:

```kotlin
MPDataSetCacheManager.getInstance().removeDataSetCache(MPDataSetCache)
```

**NOTE:** The currently active dataset is not removed.

**Changing Caching Parameters**[**​**](https://docs.mapsindoors.com/offline-data#changing-caching-parameters-1)

To change the extent of caching, for example in a management menu:

```kotlin
val dataset = MPDataSetCacheManager.getInstance().getDataSetByID("API KEY")
dataset?.setScope(mContext, MPDataSetCacheScope.DETAILED)
MPDataSetCacheManager.getInstance().synchronizeDataSets(Collections.singletonList(dataset))
```

**Determining the Caching Size of a Dataset**[**​**](https://docs.mapsindoors.com/offline-data#determining-the-caching-size-of-a-dataset-1)

The estimated and cached size of a dataset is available via:

```kotlin
dataSet?.cacheItem?.getCacheSize(mContext)
dataSet?.cacheItem?.syncSize
```

To refresh or get the size of a synced dataset:

```kotlin
MPDataSetCacheManager.getInstance().getSyncSizesForDataSetCaches(listOf(dataSet), this)
```

This is an asynchronous process, and a `MPDataSetCacheManagerSizeListener` is needed for getting information about progress and results.

**Synchronizing Data with MPDataSetCacheManager**[**​**](https://docs.mapsindoors.com/offline-data#synchronizing-data-with-mpdatasetcachemanager-1)

The `MPDataSetCacheManager`allows for detailed control over which datasets are synchronized, and allows for cancellation:

```kotlin
MPDataSetCacheManager dataSetCacheManager = MPDataSetCacheManager.getInstance();

// sync all managed datasets
dataSetCacheManager.synchronizeDataSets()

// sync specific datasets
dataSetCacheManager.synchronizeDataSets(dataSets)
```

{% endtab %}
{% endtabs %}


# Display Language

The language of MapsIndoors is independent of the chosen language on the device on which the app is used. This means that you need to explicitly tell MapsIndoors which language to use.

If you do not specify a language, MapsIndoors will show information in the default language defined in the MapsIndoors CMS. Likewise, if you specify a language that is not supported, MapsIndoors will also show information in the default language.

Additionally, aside from methods mentioned here, you can provide translations via the standard method for your device, such as using individual localized strings.

### Configuring POI translations in CMS​ <a href="#configuring-poi-translations-in-cms" id="configuring-poi-translations-in-cms"></a>

To provide multiple languages for items in the MapsIndoors CMS, such as "Meeting Room" or "Restroom", the translation must be provided by the user in the CMS. A translation can be provided in any language. In order to add support for additional languages that we currently do not support, please contact your MapsIndoors representative, and we will enable you to add translations in your desired language.

Once your language of choice has been created, you can add the translation by clicking on any POI, which will open a menu on the left side of the screen. Here, you will see the following menu point, where you can enter translations for the languages you wish. If a field is left empty, the fallback language is English. In the example below, English (en) and Danish (da) are the enabled languages.

#### Use Fixed Language​ <a href="#use-fixed-language" id="use-fixed-language"></a>

The MapsIndoors language can be fixed to a specific language by supplying an [ISO 639-1 language code](https://en.wikipedia.org/wiki/List_of_ISO_639-1_codes), for example French:

```kotlin
MapsIndoors.setLanguage("fr")
```

#### Use Device Language​ <a href="#use-device-language" id="use-device-language"></a>

The MapsIndoors language can be aligned with the device language by supplying the current language code of the device:

```kotlin
val lang = resources.configuration.locales[0].language
MapsIndoors.setLanguage(lang)
```

#### Translate HTML instructions on directions.

When requesting routes from MapsIndoors at the moment only external routes are translated into the current language set on `MapsIndoors`. The internal routes are always returned in english. Here is an example of how to achieve translated HTML instructions on internal routes.

First add strings that corresponds to the directions received from HTML instructions on the route, to the Application resources `res/values/strings.xml`:

```xml
<resources>
    <string name="direction_right">Turn right</string>
    <string name="direction_left">Turn left</string>
    <string name="direction_straight">Continue straight ahead</string>
    <string name="direction_slightly_right">Turn slight right</string>
    <string name="direction_slightly_left">Turn slight left</string>
    <string name="direction_sharp_right">Turn sharp right</string>
    <string name="direction_sharp_left">Turn sharp left</string>
    <string name="direction_make_uturn">Turn around</string>
    <string name="direction_elevator">Take elevator to %1$s</string>
    <string name="direction_stairs">Take stairs to %1$s</string>
</resources>
```

Now inside the code where you handle the `MPRoute` route response you can create a method to receive the translated instruction.

```kotlin
//Populate a map with localized strings, remember to repopulate the map if the MapsIndoors language is changed
fun setupNames() {
    directionNames["Turn left"] = res.getString(R.string.direction_left)
    directionNames["Turn slight left"] = res.getString(R.string.direction_slightly_left)
    directionNames["Turn sharp left"] = res.getString(R.string.direction_sharp_left)
    directionNames["Turn right"] = res.getString(R.string.direction_right)
    directionNames["Turn slight right"] = res.getString(R.string.direction_slightly_right)
    directionNames["Turn sharp right"] = res.getString(R.string.direction_sharp_right)
    directionNames["Continue straight ahead"] = res.getString(R.string.direction_straight)
    directionNames["Turn around"] = res.getString(R.string.direction_make_uturn_right)
}

//Use this method to get a translated HTML instruction for a step
fun getInstructionFromStep(@NonNull routeStep: MPRouteStep): String? {
    var instruction: String? = routeStep.htmlInstructions
    //Check if route step is a step or elevator as they have floor level specific instruction
    if (routeStep.highway == "steps") {
        instruction = "Take stairs to level " + routeStep.endFloorName
    } else if (routeStep.highway == "elevator") {
        instruction = "Take elevator to " + routeStep.endFloorName
    } else if (directionNames.containsKey(routeStep.htmlInstructions)){
        instruction = directionNames[routeStep.htmlInstructions]
    }

    return instruction
}
```

#### Translate Route Labels

When using the Directions Renderer, the route use labels to describe the action when clicking on them. These values are not solution specific, and does not contain translations for any language. If you want them to be translated you have to assign a value in a language specific string resource. Currently only 2 values are used:

```xml
<resources>
    <string name="misdk_level">Level</string>
    <string name="misdk_next">Next</string>
</resources>
```


# Displaying Objects


# Application User Roles

*Application User Roles* are a feature that lets you define various roles you can assign to your users, or they can choose between themselves.

You might have parts of your map that can only be accessed by employees, so you define "Employee" and "Visitor" roles. When using the application to search for directions, users assigned to the "Visitor" role may be shown a different route from "Employee" users based on what they have access to.

### How to Configure App User Roles​ <a href="#how-to-configure-app-user-roles" id="how-to-configure-app-user-roles"></a>

App User Roles are configured via the MapsIndoors CMS. Go to `Solution Details > App Settings > App Configuration`, and find `App User Roles` on the page. Here, you can configure existing roles, and add new ones.

Click `Add App User Role` and enter the name of the newly created Role in all defined languages for your Solution.

### How to Assign/Change a Role to a User​ <a href="#how-to-assignchange-a-role-to-a-user" id="how-to-assignchange-a-role-to-a-user"></a>

Assigning or changing App User Roles to users is done in the app itself. The method depends on which platform you're developing for. Here are some examples:

To fetch User Roles from the SDK, you call `MapsIndoors.getUserRoles()` to retrieve a collection of `MPUserRoles` tied to a loaded solution:

```java
final List<MPUserRole> cmsUserRoles = MapsIndoors.getUserRoles().getUserRoles();
```

To set User Roles, `applyUserRoles` is used:

```java
MapsIndoors.applyUserRoles(savedUserRoles);
```

> For more information, see the [reference documentation](https://app.mapsindoors.com/mapsindoors/reference/android/v3/index.html).

### Features Affected by App User Roles​ <a href="#features-affected-by-app-user-roles" id="features-affected-by-app-user-roles"></a>

The App User Roles are useful for setting limits on who can find certain Locations. App User Rules influence the map in three ways; which Locations are displayed on the map, whether they show up in search results, and the directions you can get.

For any Location defined on the map, there is a menu named `Restrictions`, where you are presented with options for limiting functionality certain App User Roles.

<figure><img src="/files/jPITIiTbuJo1KMu4N380" alt=""><figcaption></figcaption></figure>

* **Open for all** - All users can view, search for, and get directions to this Location.
* **Open for specific App User Roles** - Select which App User Roles have access to viewing, searching and getting directions to this specific Location.
* **Closed for All** - No users will see this Location on the map.

#### The Map​ <a href="#the-map" id="the-map"></a>

If a Location has been restricted to certain App User Roles, it will not be displayed on the map for those who do not have permission.

#### Search​ <a href="#search" id="search"></a>

Similarly to the effect on the map, if a Location has restrictions, it will not show up in the search results for users without sufficient permissions.

#### Directions​ <a href="#directions" id="directions"></a>

App User Roles can be used to determine the directions users get. For instance, you can restrict Doors between two Locations to only be passable by a certain App User Role.

Note: If you restrict a Room to only be accessible to certain App User Roles, you restrict both directions *to* and *through* that Room. It effectively sets restrictions on all Doors leading to that Room as well.

[<br>](https://docs.mapsindoors.com/managing-3d-maps)


# Getting a Polygon from a Location

Some locations in MapsIndoors can have additional polygon information. These polygons can be used to render a room or area in a special way or make geofences, calculating whether another point or location is contained within the polygon. If a `MPLocation` has polygons, these can be retrieved using:

```kotlin
val geometry: MPGeometry = location.geometry
when (geometry.iType) {
    MPGeometry.TYPE_POINT -> {
        val point = geometry
    }
    MPGeometry.TYPE_POLYGON -> {
        val polygon: MPPolygonGeometry = geometry as MPPolygonGeometry
        // Using GMS helper classes
        // Get all the paths in the polygon
        val paths: List<List<MPLatLng>> = polygon.gmsPath
        val pathCount = paths.size
        // Outer ring (first)
        val path = paths[0]
        for (coordinate in path) {
            val lat = coordinate.lat
            val lng = coordinate.lng
        }
        // Optional: Inner rings (holes)
        var i = 1
        while (i < pathCount) {
            val hole = paths[i]
            for (coordinate in hole) {
                val lat = coordinate.lat
                val lng = coordinate.lng
            }
            i++
        }
    }
}
```

As demonstrated above, a polygon's outer ring/path as well as holes are arranged as \[longitude, latitude] pairs. As not all locations has polygons, the polygon array may be empty. On the contrary, some locations, like entire building floors, might have more than polygon.


# Location Clustering

This is an example of enabling and disabling location clustering on the map as well as providing custom cluster tapping behaviour and custom cluster images.

Enabling and disabling clustering is done through the `SolutionConfig`, in the following way:

```kotlin
//Enabling clustering
MapsIndoors.getSolution()?.config?.setEnableClustering(true)
//Disabling clustering
MapsIndoors.getSolution()?.config?.setEnableClustering(false)
```

To create custom icons for clusters you can set a `MPClusterIconAdapter` either on the `MPMapConfig` when you are creating a new instance of `MapControl` or you can do it on runtime by setting a `MPClusterIconAdapter` directly on a `MapControl` object. Here is an example of doing it when creating a new MapControl:

```kotlin
private fun initMapControl(view: View) {
    val mapConfig: MPMapConfig = MPMapConfig.Builder(requireActivity(), mMap!!, getString(R.string.google_maps_key), view, true).setClusterIconAdapter { return@setClusterIconAdapter getCircularImageWithText(it.size.toString(), 15, 30, 30) }.build()
    MapControl.create(mapConfig) { mapControl: MapControl?, miError: MIError? -> }
}
private fun getCircularImageWithText(text: String, textSize: Int, width: Int, height: Int): Bitmap {
    val background = Paint()
    background.color = Color.WHITE
    // Now add the icon on the left side of the background rect
    val result = Bitmap.createBitmap(width, height, Bitmap.Config.ARGB_8888)
    val canvas = Canvas(result)
    val radius = width shr 1
    canvas.drawCircle(radius.toFloat(), radius.toFloat(), radius.toFloat(), background)
    background.color = Color.BLACK
    background.style = Paint.Style.STROKE
    background.strokeWidth = 3f
    canvas.drawCircle(radius.toFloat(), radius.toFloat(), (radius - 2).toFloat(), background)
    val tp = TextPaint()
    tp.textSize = textSize.toFloat()
    tp.color = Color.BLACK
    val bounds = Rect()
    tp.getTextBounds(text, 0, text.length, bounds)
    val textHeight: Int = bounds.height()
    val textWidth: Int = bounds.width()
    val textPosX = width - textWidth shr 1
    val textPosY = height + textHeight shr 1
    canvas.drawText(text, textPosX.toFloat(), textPosY.toFloat(), tp)
    return result
}
```

Applying a ClusterIconAdapter on runtime can be done like this:

```kotlin
mMapControl.setClusterIconAdapter {
    return@setClusterIconAdapter getCircularImageWithText(it.size.toString(), 15, 30, 30)
}
```

[See the sample in LocationClusteringFragment.kt](https://github.com/MapsPeople/MapsIndoors-Android-Examples/blob/main/MapsIndoorsSamples/app/src/main/java/com/mapspeople/mapsindoorssamples/ui/locationclustering/LocationClusteringFragment.kt)


# Location Data Sources

In this tutorial we will show how you can build a custom Location Source, representing locations of robot vacuums. The robots locations will be served from a mocked list and displayed on a map.

We will start by creating our implementation of a location source.

Create the class `RobotVacuumLocationSource` that implements `MPLocationSource`:

Implement the methods from MPLocationSource and extend the constructor of the `RobotVacuumLocationSource` to accept a list of locations that will represent the Robot vacuums.

```kotlin
class RobotVacuumLocationSource(private val robots: ArrayList<MPLocation>): MPLocationSource {
    private val mObservers = ArrayList<MPLocationsObserver>()
    private var mStatus = MPLocationSourceStatus.NOT_INITIALIZED
    override fun getLocations(): MutableList<MPLocation> {
        return robots
    }
    override fun addLocationsObserver(observer: MPLocationsObserver?) {
        if (observer != null) {
            mObservers.add(observer)
        }
    }
    override fun removeLocationsObserver(observer: MPLocationsObserver?) {
        if (observer != null) {
            mObservers.remove(observer)
        }
    }
    private fun notifyUpdateLocations() {
        for (observer in mObservers) {
            observer.onLocationsUpdated(robots, this)
        }
    }
    override fun getStatus(): MPLocationSourceStatus {
        return mStatus
    }
    override fun getSourceId(): Int {
        return 10101010
    }
    override fun clearCache() {
        robots.clear()
        mObservers.clear()
    }
    override fun terminate() {
        robots.clear()
        mObservers.clear()
    }
}
```

Create a `Fragment` or `Activity` that contains a map with MapsIndoors loaded.

Add a `BASE_POSITION MPLatLng` that will be used to calculate a random location for the Robot Vacuums.

```kotlin
private val BASE_POSITION = MPLatLng(57.0582502, 9.9504788)
```

Then we need to add some variables:

```kotlin
private var baseDisplayRule: WeakReference<MPDisplayRule?>? = null
private var robotDisplayRule: MPDisplayRule? = null
private var mLocations: ArrayList<MPLocation>? = null
private var mRobotVacuumLocationSource: RobotVacuumLocationSource? = null
```

Create the baseDisplayRule after `MapsIndoors` has loaded:

```kotlin
MapsIndoors.load(requireActivity().applicationContext, "MY_API_KEY") { error ->
    if (error == null) {
        baseDisplayRule = WeakReference(MapsIndoors.getMainDisplayRule())
        setupLocationSource()
    }
}
```

create a method to setup the `RobotVacuumLocationSource` inside your fragment:

```kotlin
private fun setupLocationSource() {
    if (mLocations == null) {
        generateLocations()
    }
    val locationSource = RobotVacuumLocationSource(mLocations!!)
    MapsIndoors.addLocationSources(Collections.singletonList(locationSource) as List<MPLocationSource>) {
    }
    locationSource.setup()
    startUpdatingPositions()
}
```

As seen in the example above we add the `RobotVacuumLocationSource` through `MapsIndoors.addLocationSources` and call `RobotVacuumLocationSource.setup()`

This method sets the status to of the source to available and notifies `MapsIndoors` that locations are updated.

```kotlin
fun setup() {
    status = MPLocationSourceStatus.AVAILABLE
    notifyUpdateLocations()
}
fun setStatus(status: MPLocationSourceStatus) {
    mStatus = status
    for (observer in mObservers) {
        observer.onStatusChanged(mStatus, this)
    }
}
```

In the `setupLocationSource` method we call `generateLocations` to populate the location list with new locations:

```kotlin
private fun generateLocations() {
    mLocations = ArrayList()
    for (i in 0..15) {
        val robotName = "vacuum$i"
        val startPosition = getRandomPosition()
        val charge = nextInt(1, 100)
        val floorIndex = nextInt(4) * 10
        var mpLocation = MPLocation.Builder(robotName)
            .setPosition(startPosition.lat, startPosition.lng)
            .setFloorIndex(floorIndex)
            .setName(robotName)
            .setBuilding("Stigsborgvej")
            .build()
        robotDisplayRule = MPDisplayRule(robotName, baseDisplayRule!!)
        robotDisplayRule?.isVisible = true
        if (charge >= 60) {
            robotDisplayRule?.setIcon(R.drawable.ic_baseline_robo_vacuum, Color.GREEN)
        }else if (charge >= 30) {
            robotDisplayRule?.setIcon(R.drawable.ic_baseline_robo_vacuum, Color.YELLOW)
        }else {
            robotDisplayRule?.setIcon(R.drawable.ic_baseline_robo_vacuum, Color.RED)
        }
        MapsIndoors.addDisplayRuleForLocation(mpLocation, robotDisplayRule!!)
        mLocations?.add(mpLocation)
    }
}
private fun getRandomPosition(): MPLatLng {
    val lat: Double = BASE_POSITION.lat + (-4 + nextInt(20)) * 0.000005
    val lng: Double = BASE_POSITION.lng + (-4 + nextInt(20)) * 0.000010
    return MPLatLng(lat, lng)
}
```

Create the `startUpdatingPositions` method that calls `updateLocations` every second:

```kotlin
private fun startUpdatingPositions() {
    mUpdateTimer?.cancel()
    mUpdateTimer = Timer()
    mUpdateTimer?.scheduleAtFixedRate(object: TimerTask() {
        override fun run() {
            updateLocations();
        }
    }, 2000, 500)
}
```

Create a method that can stop the positions updates at any time:

```kotlin
fun stopUpdatingPositions() {
    mUpdateTimer?.cancel()
    mUpdateTimer?.purge()
}
```

Create a method called `updateLocations` that will update the position of the Locations:

```kotlin
fun updateLocations() {
    var updatedLocations = ArrayList<MPLocation>()
    mLocations?.forEach {
        var newPosition = getRandomPosition()
        var newLocation = MPLocation.Builder(it).setPosition(MPPoint(newPosition.lat, newPosition.lng), 20)
        var charge = nextInt(1, 100)
        updatedLocations.add(newLocation.build())
        robotDisplayRule = MPDisplayRule("robot", baseDisplayRule!!)
        robotDisplayRule?.isVisible = true
        if (charge >= 60) {
            robotDisplayRule?.setIcon(R.drawable.ic_baseline_robo_vacuum, Color.GREEN)
        }else if (charge >= 30) {
            robotDisplayRule?.setIcon(R.drawable.ic_baseline_robo_vacuum, Color.YELLOW)
        }else {
            robotDisplayRule?.setIcon(R.drawable.ic_baseline_robo_vacuum, Color.RED)
        }
        MapsIndoors.addDisplayRuleForLocation(it, robotDisplayRule!!)
    }
    mRobotVacuumLocationSource?.updateLocations(updatedLocations)
}
```

[See the samples in the locationsources folder](https://github.com/MapsPeople/MapsIndoors-Android-Examples/tree/main/MapsIndoorsSamples/app/src/main/java/com/mapspeople/mapsindoorssamples/ui/locationsources)


# Location Details

This is an example of displaying some details of a MapsIndoors location

Requirements for this tutorial will be to have a running fragment or activity with a MapsIndoors Map loaded and ready to use.

We need a view that shows the details of the location. Here we will use a TextView to display the name and description of a location:

```xml
<TextView
    android:layout_width="match_parent"
    android:layout_height="wrap_content"
    android:id="@+id/details_text_view"
    android:background="@color/cardview_light_background"
    android:visibility="gone"
    app:layout_constraintBottom_toBottomOf="parent"
    app:layout_constraintStart_toStartOf="parent"
    app:layout_constraintEnd_toEndOf="parent"
    android:text="This is the text view for details of the location"/>
```

Once the map is ready move the camera to a Venue:

```kotlin
val venue = MapsIndoors.getVenues()!!.currentVenue
activity?.runOnUiThread {
    if (venue != null) {
        //Animates the camera to fit the new venue
        mMap!!.animateCamera(
            CameraUpdateFactory.newLatLngBounds(
                toLatLngBounds(venue.bounds!!),
                19
            )
        )
    }
}
```

We will then create a listener for when a user clicks on a marker to show the details of the selected location. This is done by setting a `onLocationSelectedListener` on your `MapControl` object. We will also listen to when the info window closes, to remove the DetailsTextView from the view. This is done by setting the `onMarkerInfoWindowCloseListener` on `MapControl`.

When a marker is clicked, get the related MapsIndoors location object and propagate that to a method that fills the text in the `detailsTextView`.

```kotlin
mMapControl?.let { mapControl ->
    mapControl.setOnLocationSelectedListener {
        if (it != null) {
            showLocationDetails(it)
        }
        return@setOnLocationSelectedListener false
    }
    mapControl.setOnMarkerInfoWindowCloseListener {
        binding.detailsTextView.visibility = View.GONE
        mMapControl?.setMapPadding(0, 0, 0, 0)
    }
}
```

Create the `showLocationDetails(location: MPLocation)` method in your project.

```kotlin
private fun showLocationDetails(location: MPLocation) {
    binding.detailsTextView.text =  "Name: " + location.name + "\nDescription: " + location.description
    binding.detailsTextView.visibility = View.VISIBLE
    mMapControl?.setMapPadding(0, 0, 0, binding.detailsTextView.height)
}
```

A `TextView` will now appear when a user selects a location and it will disapear again when the user clicks away from the location.

[See the sample in LocationDetailsFragment.kt](https://github.com/MapsPeople/MapsIndoors-Android-Examples/blob/main/MapsIndoorsSamples/app/src/main/java/com/mapspeople/mapsindoorssamples/ui/locationdetails/LocationDetailsFragment.kt)


---

[Next Page](/llms-full.txt/1)